Section 4
4 - 25
9.
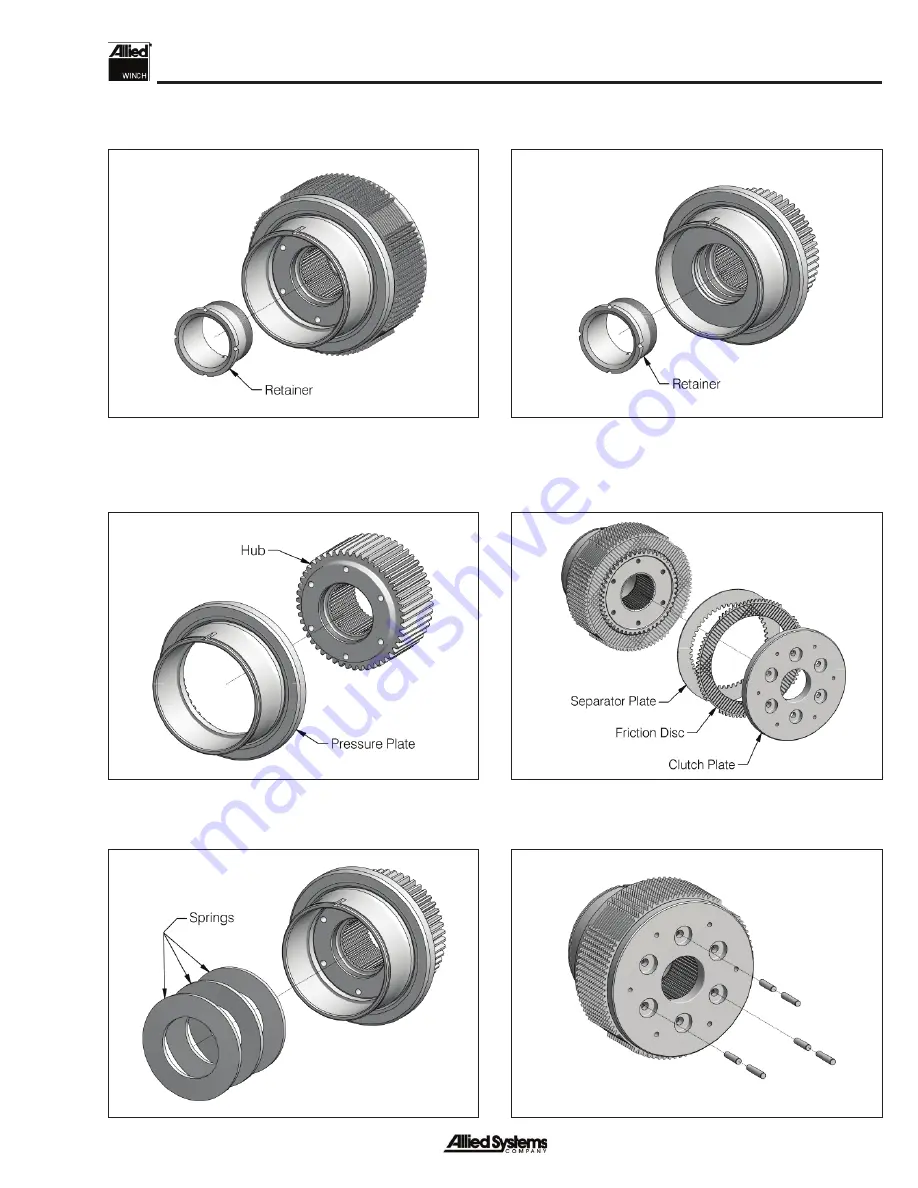
Remove retainer noting the number of turns required
for removal.
10. Disassemble
clutch.
11. Assemble hub & pressure plate.
12. Install springs in series so that they oppose each
other.
13. Install retainer to height “D”. (use the number of turns
required for removal & align marks on teeth).
14. Install frictions, separators, & clutch plate.
15. Insert pins into three equally spaced holes.
Содержание H12E
Страница 8: ...vi Notes ...
Страница 48: ...General 1 40 Notes ...
Страница 49: ...Section 1 1 41 Figure 1 30 H12E Hydraulic Electrical Schematic Option Code B Komatsu D275AX 5 K65 ...
Страница 52: ...Section 1 1 44 Figure 1 33 H12E Hydraulic Electrical Schematic Option Code B Komatsu D85 15 K50 ...
Страница 53: ...Section 1 1 45 Figure 1 34 H12E Hydraulic Electrical Schematic Option Code B Liebherr PR754 L54 ...
Страница 54: ...Section 1 1 46 Figure 1 35 H12E Hydraulic Electrical Schematic Option Code B CAT D8T C74 ...
Страница 55: ...Section 1 1 47 Figure 1 36 H12E Hydraulic Electrical Schematic Option Code D CAT D8T C74 ...
Страница 56: ...Section 1 1 48 Figure 1 37 H12E Hydraulic Electrical Schematic Option Code B John Deere JD 1050K E75 ...
Страница 57: ...Section 1 1 49 Figure 1 38 H12E Hydraulic Electrical Schematic Option Code D John Deere JD 1050K E75 ...
Страница 58: ...Section 1 1 50 Figure 1 39 H12E Hydraulic Electrical Schematic Option Code D Shantui SD32DQ U64 ...
Страница 59: ...Section 1 1 51 Figure 1 40 H12E Hydraulic Electrical Schematic Option Code D CAT D8R C59 ...
Страница 63: ...Troubleshooting 2 4 Notes ...
Страница 75: ...Service 3 12 Notes ...
Страница 90: ...Section 4 4 15 Intentionally Blank ...
Страница 102: ...Section 4 4 27 Intentionally Blank ...
Страница 108: ...Section 4 4 33 Intentionally Blank ...
Страница 116: ...Section 4 4 41 Intentionally Blank ...
Страница 119: ...Repairs 4 44 Notes ...
Страница 120: ......


