AT-SBx908 GEN2 Installation Guide for Virtual Chassis Stacking
107
Powering On AT-SBxPWRSYS2 Power Supplies
The procedure in this section explains how to power on AT-SBxPWRSYS2
Power Supplies. If you have not installed the power supplies, refer to
“Installing AT-SBxPWRSYS2 AC Power Supplies” on page 87 for
instructions.
Before powering on the chassis, review the information in “Power
Specifications” on page 209 for the power specifications of the switches.
Warning
Power cord is used as a disconnection device. To de-energize
equipment, disconnect the power cord.
E3
Note
Pluggable Equipment. The socket outlet shall be installed near the
equipment and shall be easily accessible.
E5
Caution
If the chassis has two AT-SBxPWRSYS2 Power Supplies, you
should power them on within 90 seconds of each other. Otherwise,
the switch might restart its operating software, which will delay the
completion of the initialization process of the management software.
To power on the switch, perform the following procedure:
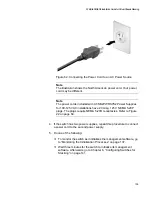
1. Connect the AC power cord included with the power supply to the AC
power connector on the rear panel of the chassis. If the chassis has
two power supplies, you may power them on one at a time or
simultaneously. Refer to Figure 60 on page 108.
Содержание AT-FAN08
Страница 10: ...Figures 10...
Страница 12: ...Tables 12...
Страница 16: ...Preface 16...
Страница 38: ...Chapter 1 Overview 38...
Страница 60: ...Chapter 2 Virtual Chassis Stacking 60...
Страница 80: ...Chapter 4 Installing the Chassis 80 Figure 32 Chassis Orientations in the Equipment Rack Continued...
Страница 82: ...Chapter 4 Installing the Chassis 82 Figure 34 Example of Adjusting the Equipment Rack Brackets...
Страница 104: ...Chapter 4 Installing the Chassis 104...
Страница 140: ...Chapter 5 Powering On the Chassis 140...
Страница 166: ...Chapter 7 Cabling the AT XEM2 Line Card Ports 166...
Страница 214: ...Appendix A Technical Specifications 214...


