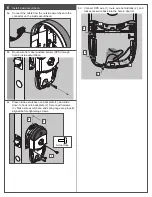
Allegion SCHLAGE NDEB Скачать руководство пользователя страница 5

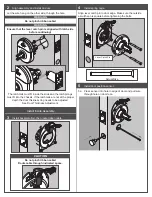
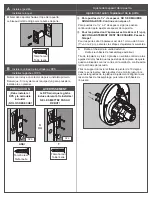
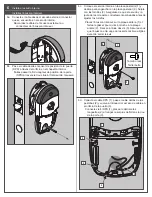
Install inside escutcheon.

6a  Connect the cable from the outside escutcheon to the 

connector on the inside escutcheon.

6b  Route wire from door position sensor (DPS) through 

hole in inside escutcheon. 

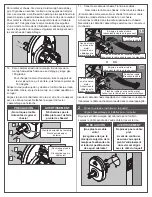
6c  Place inside escutcheon on backplate (1), and slide 

down to hook onto backplate (2). Secure with screws 

(3). Make sure escutcheon and spring cage are properly 

aligned before tightening screws.

Actual Size

1

2

3

6d  Connect DPS wire (1), route wire behind tabs (2), and 

tuck excess wire back into the hole in door (3).

1

2

2

2

3

Содержание SCHLAGE NDEB

Страница 1: ...s Needed Phillips screwdriver Pin wrench Optional T 15 Tamper Torx screwdriver Door preparation See template in package Contact Product Support 1 877 671 7011 ENGAGE WEB MOBILE APPLICATIONS Search for...

Страница 2: ...T IS REQUIRED Continue to step 1 For 1B or 2 thick doors complete the following door thickness adjustment steps A Remove chassis from outside assembly Pull lever post and rotate 10 degrees counter clo...

Страница 3: ...uts on assembly 1b To change handing pull lever post until it stops then rotate 180 degrees Align lever catch pin and slide hole to latch side Release lever post Assembly will click into place CAUTION...

Страница 4: ...are not at the proper depth the door thickness ring needs to be adjusted See Door Thickness Adjustment Install Inside Assembly 3 Install backplate first then route ribbon cable CAUTION Do not pinch r...

Страница 5: ...nsor DPS through hole in inside escutcheon 6c Place inside escutcheon on backplate 1 and slide down to hook onto backplate 2 Secure with screws 3 Make sure escutcheon and spring cage are properly alig...

Страница 6: ...Push Pull Lever With Interchangeable Core Cylinder Install cylinder tailpiece Rotate cam in lever post until the cam stops Insert key into cylinder and insert into lever Rotate the key clockwise 15 d...

Страница 7: ...will transition to a secured locked state 7d Snap the battery securing strap into place then slide the strap down until snug 8 Install battery cover screw Choose either standard Phillips screw or Tor...

Страница 8: ...that may cause undesired operation FCC Radiation Exposure Statement To comply with FCC IC RF exposure requirements for mobile transmitting devices this transmitter should only be used or installed at...

Страница 9: ...or Vis de plaque arri re Unidad interna Assemblage int rieur Manija externa Levier ext rieur Unidad externa Assemblage ext rieur Llave Cl Cable cinta C ble plat Soporte de la bater a Porte piles Chasi...

Страница 10: ...r se usa para indicar la posici n de la puerta Instale y pruebe la cerradura con la puerta abierta para evitar quedarse afuera Verifique la preparaci n de la puerta con la plantilla incluida y prepare...

Страница 11: ...NO SE REQUIERE NING N AJUSTE Contin e con el paso 1 Para puertas de 1B o 2 de espesor siga los pasos a continuaci n para ajustar el espesor de la puerta L Pour les portes dont l paisseur est de 44 mm...

Страница 12: ...ajuste Remettez la plaque d ajustement Ajuste hasta que el inserto de espesor de la puerta ingrese en la muesca en la placa de ajuste Serrez la jusqu ce que l crou rapport de l paisseur de la porte p...

Страница 13: ...plat 1c Conecte el cable del chasis Tienda los cables Raccordez le c ble du ch ssis Acheminez les c bles El cable debe colocarse sobre el chasis Conecte el cable desde la unidad externa al conector en...

Страница 14: ...le c ble plat No aplaste el cable cinta Coloque el cable por el espacio indicado Ne pincez pas le c ble plat Acheminez le c ble dans l espace indiqu 4 Instale la jaula de resorte Installez la cage du...

Страница 15: ...ice para enganchar en la placa posterior 2 Sujete con los tornillos 3 Aseg rese de que el escudo y la jaula de resorte est n correctamente alineados antes de ajustar los tornillos Placez l cusson int...

Страница 16: ...ta que la leva se detenga Faites pivoter la came dans le support du levier jusqu ce que la came s arr te Coloque la llave en el cilindro e inserte en la manija Gire la llave 15 grados en el sentido de...

Страница 17: ...lit dans le porte piles Respectez la polarit Installez 4 piles alcalines AA neuves seulement 7c Conecte el cable del soporte de la bater a con el conector en el tablero de circuito Raccordez le c ble...

Страница 18: ...uede parecer diferente a la de un lector el ctrico montado en la pared Caract ristiques lectriques 6 VCC 500 mA 3 W L Remarque Le lecteur s active lorsqu il d tecte la main de l utilisateur qui tient...

Страница 19: ...re Gire la manija interna El NDE se comunicar en el BLE buscando su aplicaci n ENGAGE durante dos minutos al cabo de cada giro de la manija en el modo FDR Si usted ha utilizado este NDE en el Modo de...

Страница 20: ...Industry Canada Su utilizaci n est sujeta a las siguientes dos condiciones 1 este dispositivo no podr a provocar interferencia y 2 este dispositivo debe aceptar cualquier interferencia incluida la in...

Страница 21: ...20 Notes 1 printed two sides 2 printed black 3 tolerance 13 4 printed in country may vary 5 drawings not to scale 6 20 page saddle stitched booklet Title NDEB Installation Instructions Creation Date 1...

Отзывы: