W 3 S E R I E S
H I G H P R E S S U R E A I R C O M P R E S S O R
©ALKIN COMPRESSORS
33
After deglazing, the cylinder walls should be thoroughly cleaned by scrubbing the bore with a stiff bristle (do
not use wire brushes); brush using ordinary soap or a detergent and hot water. Rinse thoroughly with hot water
and then check the cleanliness of the cylinder bore by wiping it with a soft white cloth.
11.
The cylinders may now be replaced. Replace the cylinders in the manner outlined under “cylinder removal
& replacement”.
12.
After the new piston rings have been installed, the compressor should be operated for at least 10 hours at
full load before checking for proper air delivery or oil consumption.
5.11.7 Oil seal replacement
To replace the oil seal, proceed as follows:
1.
Remove the belts, flywheel and the woodroof key and seal cover.
2.
The oil seal may be removed from the cover by prying under the inside lip with a pinch bar or driving it
out with a metal rod.
3.
Insert the new seal with the sealing lip facing in the same direction as the one removed and coat the outside
diameter of the seal with shellac or pipe compound. Press the seal into the shaft end cover with a padded
vise.
4.
Replace the key and flywheel and the belts.
5.11.8
Piston&piston pin removal and replacement
1.
To remove a piston from the connecting rod, first remove the piston and rod from the compressor as
outlined under “cylinder removal & replacement” on this page.
2.
With the piston and connecting rod removed from the compressor, remove the lock rings at the ends of
the piston pin. With a dowel of appropriate size and a soft hammer drive out the pin. To prevent distorting
the piston during this operation, inserting fork-type shims of the necessary thickness between the rod and
the boss must eliminate the play between the piston pin boss and the connecting rod.
3.
To install the new pin, align the connecting rod between the bosses inside the piston, and insert the same
number of shims between the boss and rod that were used when the pin was driven out.
4.
Lubricate the pin and drive it into the piston and through the connecting rod with an appropriate dowel
and a soft hammer. When the pin is in place, snap the lock ring back in their grooves.
5.
To replace the assembled piston and rod in the compressor, follow the instructions given under Cylinder
& piston removal & replacement in the following section.
5.11.9 Cylinder&piston removal and replacement
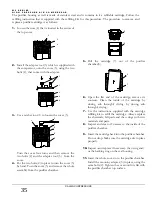
To Remove Cylinders and Pistons Proceed as follows:
1.
Disconnect all tubing connected to the cylinders and drain the oil from the crankcase.
2.
Remove the bolts attaching the 2
nd
and 3rd stage cylinders to the crosshead cylinders, and pull the
compression cylinder off the piston. Next, take out the attaching screws connecting the crosshead cylinder
to the crankcase and pull the crosshead cylinder off the piston. Pull the end of the connecting rod off the
end of the crankshaft and withdraw the rod and piston. If the piston is to be removed from the connecting
rod, follow the procedure outlined under piston removal & replacement on this page.
3.
To remove the 1 st stage piston, first take out the attaching
screws
between the 1st stage cylinders, and and
the crankcase. Then pull the 1 st stage cylinder off the top of the piston. Pull the end of the connecting rod
off the end of the crankshaft and lift the cylinder -with the piston inside- off the crankcase. The piston can
now be pushed out of the cylinder. To remove the piston from the connecting rod, follow the procedure
outlined under “Piston Pin Removal and Replacement” on this page.
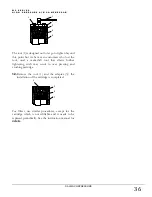
To Replace Piston and Cylinders –Proceed as follows:
Содержание W3 Series
Страница 1: ...W3 SERIES HIGH PRESSURE AIR COMPRESSORS...
Страница 2: ......
Страница 4: ......
Страница 6: ......
Страница 10: ...W 3 S E R I E S H I G H P R E S S U R E A I R C O M P R E S S O R ALKIN COMPRESSORS 5...
Страница 14: ...W 3 S E R I E S H I G H P R E S S U R E A I R C O M P R E S S O R ALKIN COMPRESSORS 9...
Страница 26: ...W 3 S E R I E S H I G H P R E S S U R E A I R C O M P R E S S O R ALKIN COMPRESSORS 21...
Страница 30: ...W 3 S E R I E S H I G H P R E S S U R E A I R C O M P R E S S O R ALKIN COMPRESSORS 25...

