


............................................................................................................................................................................................................................................................
12TMUX (LNW18) cable installation
Equipment and cable installation for 1665 Data Multiplexer
(1665 DMX)
1 - 5 4
365-372-304R7.1
Issue 1, November 2007
............................................................................................................................................................................................................................................................
12TMUX (LNW18) cable installation
Description
This section describes how to connect the TMUX cables to the 1665 DMX High-Capacity
shelf and route the cables out of the bay and to the TMUX terminating equipment.
Perform this procedure if TMUX cables are required for an LNW18 in a function group.
It should be noted that the cables used for 12TMUX support are DS3 cables (12 port). The
new high capacity DS3 cables will also support 12TMUX, but only in a 12 port capacity.
Important!
When cabling the 1665 DMX High-Capacity shelf to a DSX, the DSX
becomes an extension of the 1665 DMX High-Capacity shelf backplane connections.
Therefore, the IN on the 1665 DMX High-Capacity shelf backplane connects to the IN
of the DSX and the OUT of the 1665 DMX High-Capacity shelf backplane connects to
the OUT of the DSX.
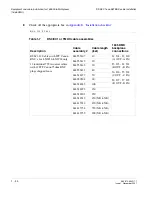
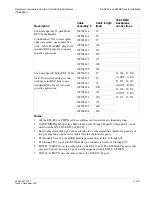
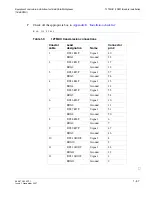
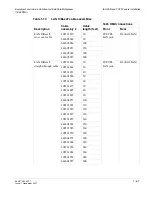
TMUX cable options are listed in
Table 1-7, “DS3/EC1 or TMUX cable assemblies”
.
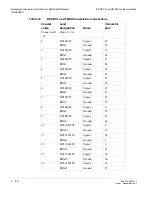
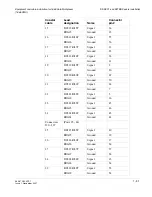
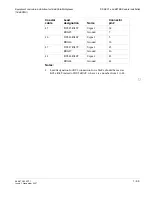
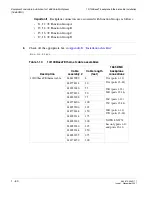
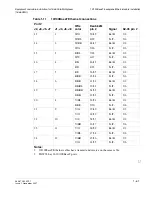
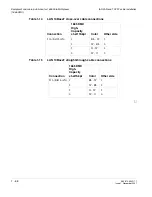
TMUX transmission connections are in
Table 1-9, “12TMUX transmission connections”
. Total of four function groups fully cabled will have 48 DS3 drop capacity.
Procedure
Proceed as follows:
........................................................................................................................................................................................................................
1
Refer to the engineering job specification. Obtain the TMUX (DS3) cables per
“DS3/EC1 or TMUX cable assemblies” (p. 1-44)
and note the function group where each
cable will be used. Label the cables, indicating bay, shelf, function group (A, B, C or D)
and direction (IN or OUT of the bay) at each end.
........................................................................................................................................................................................................................
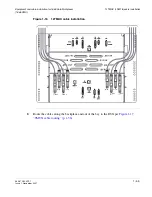
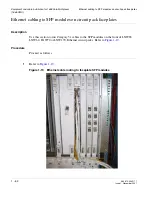
2
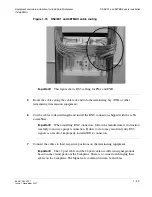
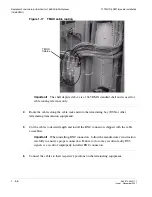
Connect the function group cables at the 1665 DMX High-Capacity shelf end, carefully
matching the correct connector with the appropriate backplane connectors as shown in
Figure 1-16, “12TMUX cable installation” (p. 1-55)
Important!
DS3/EC1 and TMUX cable retaining screws must be tightened to a
maximum of 6.5 in-lb. Do not overtighten.
Содержание Data Multiplexer Explore 1665
Страница 8: ... Contents v i i i 365 372 304R7 1 Issue 1 November 2007 ...
Страница 12: ... List of figures x i i 365 372 304R7 1 Issue 1 November 2007 ...
Страница 16: ... List of tables x v i 365 372 304R7 1 Issue 1 November 2007 ...
Страница 24: ... About this document x x i v 365 372 304R7 1 Issue 1 November 2007 ...
Страница 168: ... 1665 Data Multiplexer 1665 DMX stand alone installation tests I I 2 365 372 304R7 1 Issue 1 November 2007 ...
Страница 250: ... Additional optical tests optional Installation tests 4 6 2 365 372 304R7 1 Issue 1 November 2007 ...
Страница 272: ... Final operations Operational tests 5 2 2 365 372 304R7 1 Issue 1 November 2007 ...
Страница 274: ... 1665 Data Multiplexer 1665 DMX ring setup and testing I I I 2 365 372 304R7 1 Issue 1 November 2007 ...
Страница 326: ... Cleaning pluggable optics modules Fiber cleaning B 1 4 365 372 304R7 1 Issue 1 November 2007 ...
Страница 408: ...I N 4 365 372 304R7 1 Issue 1 November 2007 Index ...


