background image

Installation and Operating Manual (translation)

42

AL-KO EASYAIR

®

7.1 

HMI Basic quick start guide

ART Tech Level II 

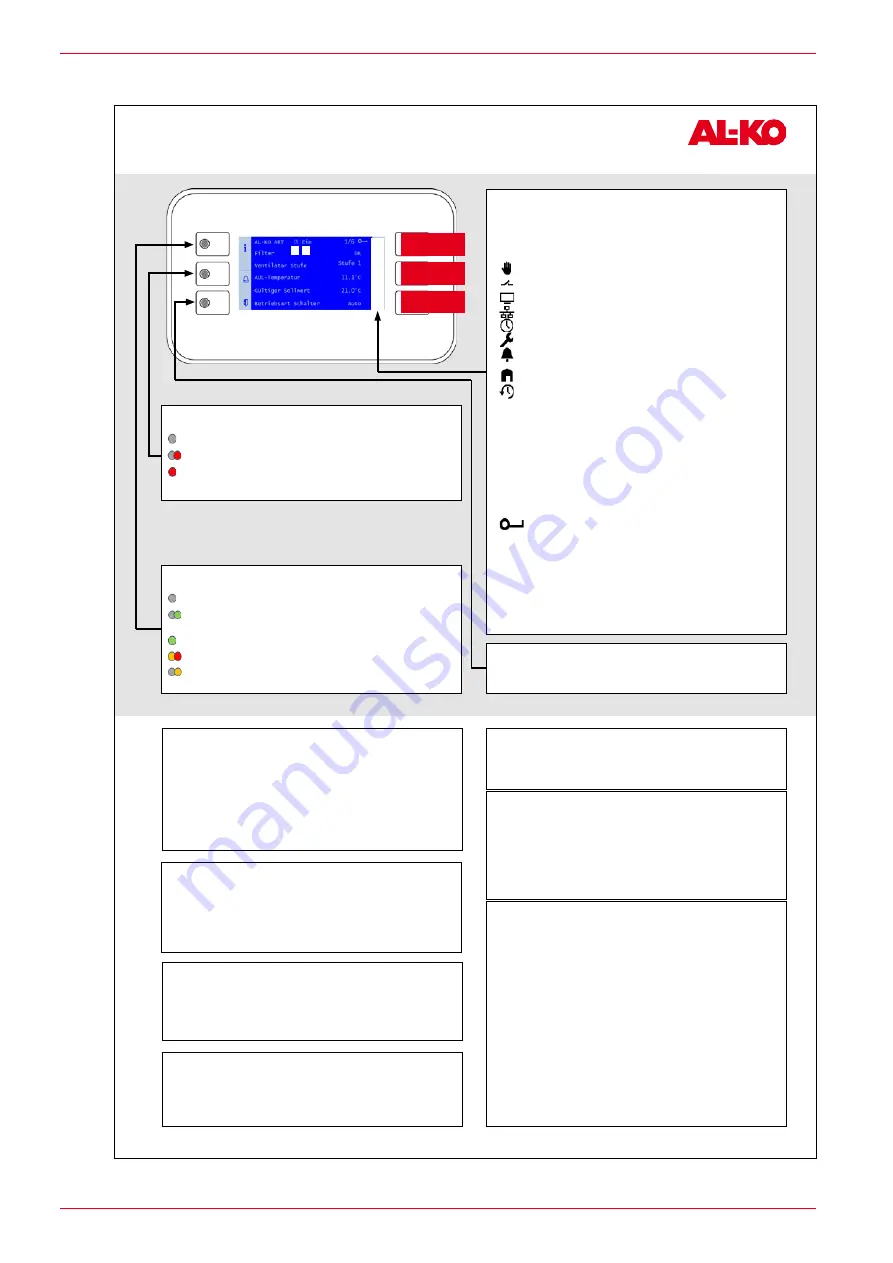
Quick Guide HMI Basic (Room Control Panel)

UP arrow key

DOWN arrow key

ENTER button

Switch on the plant using the control panel (user password required)

1.  Use 

INFO

 to access the 

start page

. Select 

Operating mode

 with the 

arrow 

keys

 and press 

ENTER

.

2.  Use the 

arrow keys

 to mark the required 

operating mode

 and press 

ENTER

.

Plant information

Use 

INFO

 to access the 

main menu

. Select 

Information

 with the 

arrow keys

 and 

press 

ENTER

.

See the operating manual for a description of the individual items.

Setting the temperature setpoint (user password required)

1.  Use 

INFO

 to access the 

main menu

. Select 

Setpoints

 with the arrow keys and 

press 

ENTER

.

2.  Go to 

Temp control

 with the 

arrow keys

 and press 

ENTER

.

3.  Select 

Comfort setpoint

 or 

Economy setpoint

 with the 

arrow keys

 and press 

ENTER

. Now change the value with the 

arrow keys

 and confirm again with 

ENTER

.

Setting the timer program (user password required)

1.  Use 

INFO

 to access the 

main menu

. Select 

Time program

 with the arrow keys 

and press 

ENTER

.

2.  Recommendation: Set the switching times for 

Monday

 and copy it to the other 

days. To do this, select 

Monday

 with the 

arrow keys

 and press 

ENTER

.

3. 

 Time 1

 is fixed to 

00:00 

and cannot be changed. For 

Value 1

off

 is recom-

mended as otherwise the plant starts at 00:00. 

Use the 

arrow keys

 to go to 

Time 2

 or 

Value 2

 and press 

ENTER

. Use the 

arrow keys to send the morning compensation time (e.g. 

07:00

) and the oper-

ating mode (e.g. 

Stage 1

).

4.  Set the other value/time pairs in the same way. Leave unused switching times 

at 

*:*

Set a corresponding 

value … 

to 

off

 as the shut-down time.

5.  If necessary, copy the time switching catalogue from 

Monday

 to other days. 

To do this, use the 

arrow keys

 to go to “Copy schedule” and press 

ENTER

. Use 

the 

arrow keys

 to select the destination (e.g. 

Tues-Fri

 for Tuesday to Friday) 

and confirm with 

ENTER

. The time switching catalogue is copied.

Important information!

1.  The number of plant steps and the availability of the economy mode depend on 

the configuration of the plant (see operating instructions).

2.  In economy mode, the plant is operated at a reduced temperature setpoint. See 

the operating manual for further information.

Password entry

1.  Press 

INFO

 to access the 

main menu

. The topmost entry is the 

password 

enter

. Press 

ENTER

.

2.  A password consists of four numbers. Each number is set separately with the 

arrow keys

 and confirmed with 

ENTER

Enter the user password 

1 0 0 0 

After entering the password correctly, a key symbol appears at top right of the 

display. 

3.  Other passwords levels are described in the operating manual.

Acknowledging alarms (only when alarms are pending)

1.  Press 

ALARM

; the 

alarm list detail

 appears.

2.  Then press 

ALARM

 again; the 

alarm list

 appears. The topmost entry is 

Ac-

knowledge

. Press 

ENTER

.

3.  Select 

Execute

 with the 

arrow keys

 and press 

ENTER

 again. The acknowledge-

ment attempt is started.

2

1

3
4
5
6
7
8

Display on the start page

If no button is pressed for a few minutes, the display jumps to the main menu. 

Press 

INFO

 to go to the start page with the most important plant information.

1. State

Plant switched on control panel (HMI Basic, Facility, Web)

Plant switched via external enable (e.g. presence sensor)

Plant switched on the room control panel (HMI Room)
Plant switched via the building management system
Plant switched via the time program

Plant OFF: Configuration is not complete

Plant OFF: switched off alarm or emergency stop
Plant ON: Free cooling, cool-down or overheating protection

Plant ON: early start before time program (boost)

2. Operating mode

Off

Plant OFF

Start

Plant is starting up (dampers open, pre heating)

On

Plant ON

Comfort

Plant ON in comfort mode

Economy

Plant ON in economy mode

Run-on

Plant follow-up (humidifier/electrical heating coil)

3. 


Display of the logged-in password level

4. Filter alarm 

Display of the filter state (depending on the equipment 

of the plant, the degree of soiling in percent is also 

displayed).

5. Fan steps 

Display of the current fan steps

6. Outside air temp 

Display of the current outdoor temperature

7. Valid setpoint 

Display of the current valid temperature setpoint

8. Operating mode switch  Switching of the operating mode on the control panel

ESCAPE button

Press this button to return to the previous menu item.

INFO button with integrated INFO-LED

Off:

 Plant off

Green flashing: 

Plant starts (dampers open, preheating) or running 

on (humidifier drying, electric heating cooling)

Green:

 Plant on

Orange/red flashing:

 Manual mode active

Orange flashing: 

Plant not functional as not fully configured

ALARM button with integrated ALARM LED

Off: 

No alarm; press to go directly to the 

alarm history

.

Red flashing:

 Alarm

Red: 

Alarm is still active; an attempt has been made to ac-

knowledge it

3421375

Содержание EASYAIR RO-01

Страница 1: ...COMPACT AIR HANDLING UNIT EN INSTALLATION AND OPERATING MANUAL AL KO EASYAIR EN ...

Страница 2: ...auptstraße 248 250 D 89343 Jettingen Scheppach Germany Phone 49 8225 39 0 Fax 49 8225 39 2113 E mail klima technik al ko com Revision history Version Description Date 1 0 Initial release 01 06 2011 2 0 Update 01 10 2015 3 0 Update 01 07 2016 4 0 3313736_BA EASYAIR 4 0 02 2021 04 02 2021 ...

Страница 3: ... Holes for on site exchanger connections 17 3 3 Sample EASYAIR type plates 18 4 Delivery transport storage 19 4 1 Delivery 19 4 2 Transport 19 4 2 1 Transport under difficult conditions 20 4 2 2 Fork lift truck pallet truck 20 4 2 3 Crane transport using a base frame bracket 21 4 3 Storage prior to assembly 22 4 4 Disposal of packaging 22 5 Assembly 23 5 1 Safety instructions for assembly 23 5 2 P...

Страница 4: ... actuators 41 7 Integrated control 42 7 1 HMI Basic quick start guide 43 7 2 HMI Room quick start guide 44 8 Servicing and maintenance 45 8 1 Safety instructions for servicing and maintenance 45 8 2 Fuses and terminal assignment 46 8 3 Maintenance schedule 46 8 4 Maintaining and cleaning components 49 8 4 1 Pump warm water and pump cold water heat exchangers 49 8 4 1 1 Maintenance 50 8 4 1 2 Clean...

Страница 5: ...s appendix 61 11 1 Control schemes legend 61 11 2 RO units with PWW coil 62 11 3 RO units with PWW and PCW coils 63 11 4 RO units with electric heating coil 64 11 5 PL units with PWW coil 65 11 6 PL units with PWW and PCW coils 66 11 7 PL units with electric heating coil 67 12 Spare parts 68 13 Certifications 69 13 1 EC Declaration of Incorporation conforming to 2006 42 EC 70 13 2 EC Declaration o...

Страница 6: ...is a permanent part of the described product and must be handed over to the buyer if the prod uct is sold 1 1 Explanation of symbols 1 1 1 Safety instructions DANGER This signal word is used to indicate an immediately dangerous situation which if not avoided will result in death or severe injury WARNING This signal word is used to indicate a potentially dangerous situation which if not avoided cou...

Страница 7: ...h or serious injuries due to falling Warning of danger of slipping If the required safety instructions are not observed this can result in death or serious injuries due to slipping Warning of electrical voltage If the required safety instructions are not observed this can result in death or serious injuries due to hazardous electrical voltage Warning against suspended loads If the required safety ...

Страница 8: ...on signs used in the installation and operating manual indicate instructions to be observed Meaning Prohibition sign Wear eye protection If you do not wear eye protection there is a risk of eye injuries Wear foot protection If you do not wear foot protection there is a risk of foot injuries Wear hand protection If you do not wear hand protection there is a risk of hand injuries Wear head protectio...

Страница 9: ...t such as cut proof gloves safety goggles work gloves ear protection helmet mask 1 3 Legal notices All specified data serve solely to describe the product No statement on a specific characteristic or suitability for a spe cific purpose can be derived from these data The data do not exempt the user from his own judgement and checks ...

Страница 10: ...r handling unit for air conditioning Only operate the EASYAIR unit when fully assembled Set up the unit horizontally otherwise there is a risk that puddles may form among other things Protect the unit against moisture Only original spare parts from AL KO THERM are to be used Children and people who are not familiar with the unit may not use it Observe all accident prevention and fire protection re...

Страница 11: ...prevent restart Integrate weatherproof units into the lightning protection concept when installed out doors Avoid sparks and flying sparks in the intake area of the installation Observe the working instructions and this installation and operating manual Work with care Use the personal protective equipment when working on the installation Use other protective equipment according to the work carried...

Страница 12: ...sively ruled out if the other applicable standards for the overall system to be completed and installed by the plant manufacturer are adhered to If installation is performed contrary to our regulations and the defect damage which has occurred is attributable to improper modification processing or any other treatment all damage compensation or warranty claims are ruled out The orderer must prove th...

Страница 13: ...st draw up operating procedures in an understandable form and in the lan guage of the employees taking the Installation and Operating Manual and the operating conditions into considera tion 2 4 Residual dangers The installation may present a danger if it is not operated by trained personnel and or is used improperly or not according to its designated use Residual hazards are potential dangers that...

Страница 14: ... available without integrated control Both the air handling units with rotary heat exchanger and the units with countercurrent plate heat exchanger achieve heat recovery rates of 80 90 according to DIN EN 308 dry The units therefore make a significant contribution to saving energy and reducing costs Sound emissions are minimised by a comprehensive insulation Optional components for extended use ar...

Страница 15: ...t H 98 136 mm 3 SUP ETA silencer module 9 Suction and outlet hoods with weatherproof housing design ODA suction hood with integrated droplet elimi nator and base tray 4 Heater module either water led or electrical 10 Without integrated control 5 Heater cooler module water led or cooling empty part with preparation for evaporator 11 Cable bushing plates for on site electrical connection 6 Filter mo...

Страница 16: ... possible 2 ODA EHA silencer module 8 Levelling foot H 98 136 mm 3 SUP ETA silencer module 9 Suction and outlet hoods with weatherproof housing design ODA suction hood with integrated droplet eliminator and base tray 4 Heater module either water led or electrical 10 Without integrated control 5 Heater cooler module water led or cooling empty part with preparation for evaporator 11 Cable bushing pl...

Страница 17: ...ress 17 Product description 3313737 3 2 3 Holes for on site exchanger connections 1 1 External view IMPORTANT Holes for exchanger connections may only be inserted in the cross hatched area Non com pliance leads to constructional damage to the panel ...

Страница 18: ...ample EASYAIR type plates Each functional unit is assigned a separate type plate The type plates contain the order number position details year of manufacture manufacturer s data as well as the design data These type plates are externally attached to the unit Type plate ...

Страница 19: ... up within the standard limitations of use 20 C to 40 C 4 2 Transport WARNING Danger of death Suspended loads For crane transport all valid safety conditions according to DGUV regulation 52 Cranes and DGUV Control unit 100 500 chapter 2 8 must be observed Do not walk under suspended loads Use the specified attachment and mounting points Observe the weight specifications Only use suitable lifting e...

Страница 20: ...ns in this Installation and Operating Manual and the relevant regulations on occupational safety and environmental protection Only transport the unit upright and secure the unit against tipping and slipping Avoid distorting the housing or other damage Damage that results from improper packaging and transport are at the expense of the initiator As described in chapters 4 2 2 Fork lift truck pallet ...

Страница 21: ...work under suspended loads Use the specified attachment and mounting points Observe the weight specifications Only use suitable lifting equipment Only use suitable industrial trucks and lifting equipment crane Only use suitable positioning tools Attach suitable load securing equipment before lifting the load Wear personal protective equipment 1 2 3 1 Base frame bracket 2 Spacer on site 3 Spreader ...

Страница 22: ...the functional parts from dirt e g chips stones wire etc Constant and above all abrupt temperature changes must be prevented during storage In this case there is a dan ger that moisture may condense As a result mould can form To avoid bearing damage the fan must be rotated monthly if at a standstill for more than one month For storage periods of more than 1 year check the ease of movement of the f...

Страница 23: ... and tested ladders steps scaffolding and work platforms Work with care Wear personal protective equipment CAUTION Risk of crushing the limbs and cutting injuries on sharp edges during assembly installation of the modules Only have assembly commissioning maintenance and repair work carried out by trained qualified staff Use assembly aids when installing the modules and components Work with care We...

Страница 24: ...nd circuit boards are securely in place in the switch cabinet Re fasten any loose components Connect the equipotential bonding to the connection piece or connection frame 1 1 Equipotential bonding cable The fresh air intake must be designed in accordance with the applicable standards and should be located away from exhaust air outlets or exhaust openings kitchen laundry etc If possible the exhaust...

Страница 25: ...ubstructures Unevenness of the substrate must be compensated using appropriate measures e g underlays etc The foundation version must meet the on site requirements for the acoustics structure borne sound insulation un derlay and the professional water drainage of the condensate The unit must be professionally connected to the foundation in accordance with the on site conditions Points to be consid...

Страница 26: ...efore final alignment connect the electric cable and the hoses together Corresponding colour coded and labelled plugs are attached to the ends of the cables to prevent the connections being interchanged in error In the case of units with constant pressure in combination with silencer modules the hose for atmospheric measurement must be placed in the intermediate floor of the silencer module This i...

Страница 27: ...he roof ridges to the blind rivet via the corresponding holes 3 Remove excess joint material Sikaflex 221 RLT after assembly by gently tilting upwards Vertically offset roof 2 1 1 Joint material Sikaflex 221 RLT 2 Blind rivet 4 2x8 Step Action 1 Before assembling the housing parts apply the supplied joint material Sikaflex 221 RLT to the sheet metal flange below and above the row of holes without ...

Страница 28: ...he duct Requirements for the duct system In favour of efficiency energy consumption and air performance of the unit the pipe system must be designed for slow flow speeds and low pressure drop All connections between the ventilation ducts and air handling unit must be designed and secured to fit exactly Inspection openings must be provided Condensation protection thermal insulation Outdoor air and ...

Страница 29: ...out of air from the closed drain pipe For a weatherproof version the pipe trace heating is to be provided The pipeline must be protected against environmental influences Drain pipe 40 on site H2 H1 H3 Dimension H3 below equipment installation level Height minimal maximal Overpressure up to 800 Pa Vacuum up to 800 Pa H1 0 130 mm 50 mm mm WC 50 mm H2 55 mm 145 mm 1 5 mm WC 25 mm mm WC 2 50 mm H3 100...

Страница 30: ...ty regulations 5 6 1 Connection of room control panels option Connection of room control panels see circuit diagram 5 6 2 Connection of the field devices to the control Connection of field devices to the control see circuit diagram 5 6 3 Assembly connection of supply air outdoor air exhaust air temperature sensor Electrical connections see circuit diagram NOTE In the EASYAIR a frost protection sen...

Страница 31: ...ally on site WARNING Risk of injuries due to incorrect or faulty connection Only have the electrical connection carried out by an approved electrician Only have assembly servicing and maintenance carried out by qualified staff Wear personal protective equipment CAUTION Risk of burns due to contact with the hot electric air heater Wait until the hot electric air heater has cooled down Wear personal...

Страница 32: ...ion In this unit version a design hood completely closed is installed instead of the switch cabinet hood with display and repair switch openings The following components and field devices are pre wired on a terminal row Supply exhaust air fan Damper adjustings actuators Rotor controller only for EASYAIR units with a rotary heat exchanger RO For the connection of the components and field devices re...

Страница 33: ...ing the pipelines The medium inlet is located on the air outlet side Fig Counterflow principle for heat ex changer connection IMPORTANT Counter hold using a suitable tool e g pipe wrench during connection of the heat exchang ers in order to avoid damage Install pipes and connections in such a way that the heat exchangers remain freely accessible for maintenance Maximum working pressure 16 bar Maxi...

Страница 34: ...or supply air temperature The heat output is metered by reg ulating the corresponding actuating valve IMPORTANT At temperatures below freezing point the heat exchanger must be either drained and blown out with compressed air or filled with a commercially available antifreeze with corrosion in hibiting additive due to the risk of freezing and corrosion 5 7 2 Connection of heater cooler module optio...

Страница 35: ...C Valves and actuators must be installed professionally It should be noted here whether a version with 2 way valves 3 way valves or with a combination of 2 way and 3 way valves is used For the electrical connection of the actuators see the circuit diagram 2 way valve 3 way valve versions and combined 2 way and 3 way valve versions 2 way valves 1 2 5 6 3 6 6 4 5 4 3 way valves 1 2 5 6 3 6 6 4 5 4 3...

Страница 36: ...ulic connection must be carried out at the discretion of the heating specialist If the heater cooler module is the last component before the on site duct a duct side inspec tion opening must be provided directly on the register droplet eliminator This is used for inspection and cleaning Function Heater and cooler are integrated into the temperature control The temperature is set by controlling the...

Страница 37: ...table absorbent materials such as cloths or binders Dispose of the used cloths or binders in accordance with the applicable regulations Wear personal protective equipment Dispose of the ingested spills in a professional manner in accordance with local regula tions IMPORTANT At temperatures below freezing point the heat exchanger must be filled with a commer cially available antifreeze with corrosi...

Страница 38: ...s at a sufficient distance from contamination sources kitchen hood extraction central dust extraction etc that the electrical installations have been implemented completely and professionally 6 2 Before system start WARNING Risk of injury from fan during fan test run Never disassemble or bypass safety installations Work with care Remove any loose parts in the air handling unit Eliminate tripping h...

Страница 39: ... protocol Inspection doors inspection covers must be closed 6 3 Switching the installation on off WARNING Risk of severe injuries or death Working on the EASYAIR can result in serious injury or death After switching off via the main switch no safety functions of the unit are guaranteed e g frost protection Never use the main switch to switch it on and off during operation Use the main switch only ...

Страница 40: ...wing In address mode Pulses according to the set address 1 16 When starting Reset to factory setting communication Press the button In normal operation Triggering the rotational angle adaptation In address mode Confirmation of the set address 1 16 3 Pushbutton and LED display yellow Off Drive is ready for operation Yellow flashing Adaptation or synchronisation process active Yellow flick ering Com...

Страница 41: ... technical progress 41 Integrated control 3313737 7 Integrated control NOTE Further information on the control of the EASYAIR units can be found in the AL KO THERM Operating Manual functional description for Control ART TECH LEVEL II ...

Страница 42: ...he main menu The topmost entry is the password enter Press ENTER 2 A password consists of four numbers Each number is set separately with the arrow keys and confirmed with ENTER Enter the user password 1 0 0 0 After entering the password correctly a key symbol appears at top right of the display 3 Other passwords levels are described in the operating manual Acknowledging alarms only when alarms ar...

Страница 43: ...g run time by 1 hour Press MINUS to decrease the remaining run time by 1 hour 3 Press FAN to switch in a cycle between Stage 1 Stage 2 Stage 3 and Automatic Setting the temperature setpoint not possible in party mode Press PLUS or MINUS to increase or decrease the setpoint by 0 5 C Important information 1 The switching authorisation of the room control panel depends on the setting in the controlle...

Страница 44: ...NG Risk of injuries due to overrun of fans Only open the inspection doors only when the fans are switched off and stationary Observe the delay time of the fans Observe a waiting time of at least 3 minutes until the fan impellers are stationary before opening the inspection doors Never brake the impellers of the fans by hand or using an object CAUTION Risk of burns as a result of contact with hot s...

Страница 45: ...nnections Check leaktightness X 2 5 Check doors and closures for ease of movement and leak tightness Repair X 3 Air filter 1 3 6 12 24 3 1 Check for impermissible contamination and damage leakages and odours the air filter must have the separation efficiency corresponding to the filter class for its entire period of use If there is noticeable contamination or leak age the affected filter must be r...

Страница 46: ...their accessories must be checked regularly for airborne contamina tion corrosion and damage 5 2 Check for soiling damage and corrosion Clean and repair X 5 3 Check leaktightness between exhaust and outdoor air supply Repair X 5 4 Check condensate tray for soiling corro sion and function Repair X 5 5 Check function of siphon Repair X 5 6 Checking the hygiene condition X 5 7 Rotary heat exchanger 5...

Страница 47: ...ction Repair X 6 3 Check the function of the damper adjusting actuators Repair X 7 Fans 1 3 6 12 24 7 1 Inspect the fan for soiling damage and corrosion Clean and repair X 7 2 Check the impeller for soiling unbalance and running noises Switch on motor briefly Clean and repair X 8 Control unit 1 3 6 12 24 8 1 Perform visual inspection of clamping and plug in connections Clean check that they are se...

Страница 48: ... performed regularly is to determine and eliminate hygiene deficiencies on the air conditioning systems at an early stage through frequent visual inspections or random microbiological self checks The regular hygiene checks include the following measures Visual inspection of the relevant unit area for hygiene deficiencies such as e g microbial growth or soiling rust for mation calcium deposits and ...

Страница 49: ... be used for all types of finned heat exchanger 1 Compressed air All heat exchanger registers 2 Steam cleaners Steel galvanised heat exchanger registers only 3 High pressure water cleaner only with THD multi jet method All heat exchanger registers IMPORTANT When using compressed air and steam cleaners ensure a sufficient distance and that the jet is aligned parallel to the fins NOTE Complete remov...

Страница 50: ... units see figure THD multi jet method The use of the THD multi jet method includes the correction of any bent fins to restore the optimum flow and per formance of the heat exchangers fluidic renovation 1 2 1 THD multi jet method front 2 THD multi jet method back For further information on the THD multi jet method Technischer Hygiene Dienst GmbH Einödshoferweg 3 5 12109 Berlin Phone 49 0 30 66 76 ...

Страница 51: ...NG Risk of cuts During maintenance and cleaning of the heat exchanger there is a risk of cuts Wear personal protective equipment cut proof gloves 8 4 2 1 Maintenance IMPORTANT To avoid bearing damage the thermal mass must be rotated periodically monthly in the event of a prolonged standstill IMPORTANT Check seals before commissioning Check drive elements and control elements The respective manufac...

Страница 52: ...ob served If necessary the thermal mass can be cleaned with compressed air depending on the degree of contamination Use a hot water high pressure cleaner for stubborn contamination IMPORTANT Only use compressed air or water without chemical additives as the medium The air or water jet must act on the thermal mass vertically otherwise there is a risk of damage 8 4 2 3 Drive belt maintenance Visuall...

Страница 53: ... Check plates for soiling Remove oil and grease deposits see 8 4 3 2 Cleaning on page 53 Check water drain and siphon of the drain tray and top up if necessary 8 4 3 2 Cleaning The heat exchanger can be cleaned using a hot water high pressure cleaner The following parameters are to be observed here Nozzle Flat jet nozzle Pressure max 50 bar Water volume max 450 l h Water temperature max 70 C Dista...

Страница 54: ...multi leaf dampers for soiling damage and corrosion Check the mechanical function of the multi leaf dampers Check the end position of the damper adjustings actuators and adjust if necessary Lubricate the damper bearing and joints if necessary using appropriate lubricants 8 4 4 2 Cleaning Clean the multi leaf dampers at regular intervals 8 4 5 Droplet eliminator WARNING Risk of cuts There is a risk...

Страница 55: ...ance Theballbearingsusedarelow maintenanceanddesignedforextendedrunningtimes Theycannormallybeusedupto 40 C Maintenance is not required under normal conditions Check fans for dirt damage and corrosion Check fan mounting and retighten all fastening screws Check the function of the protective devices 8 4 6 2 Cleaning Clean the ventilation wheel motor and motor mounting regularly 8 4 7 Sound absorber...

Страница 56: ...used air filters always replace them Otherwise the hygienic require ments will not be met Release the clamping device by simply pulling it out using pull out lever that is supplied loose Pull the filter bags out of the unit individually Clean the filter gaskets inspect and replace any damaged gaskets Insert new filter bags and close the clamping device by pushing it in IMPORTANT Only use original ...

Страница 57: ...y author ised persons Use the personal protective equipment when working on the installation Use other protective equipment according to the work carried out 9 1 Contacts For all questions that you have in connection with our products please contact the manufacturer of your ventilation installation one of our branches or directly to AL KO THERM GmbH Phone 49 82 25 39 0 Hauptstraße 248 250 Fax 49 8...

Страница 58: ... a long period of time the instructions for the individual components must be observed The information from the component manufacturers must also be followed request this information if necessary Before recommissioning observe chapters 6 Commissioning on page 38 and 8 Servicing and maintenance on page 44 10 2 Dismantling Dismantling must be carried out according to the currently valid and applicab...

Страница 59: ...according to the work carried out Avoid contact with the dust 10 3 Disposal WARNING Risk of poisoning when disposing of the media The unit may contain media that are hazardous to health such as coolants Work with care Avoid skin and eye contact with the media do not swallow media and observe the safety data sheets Wear personal protective equipment When disposing of the media comply with the relev...

Страница 60: ...sensor 6 Outdoor damper adjusting actuators 20 Room air temperature sensor 7 Outdoor air filter differential pressure 21 Exhaust air quality sensor 8 Rotary heat exchanger 22 Exhaust air temperature sensor 9 WRG bypass damper actuator 23 Exhaust air filter differential pressure 10 Supply air fan 24 Exhaust air temperature sensor according to WRG defrost protection 11 Duct effective pressure supply...

Страница 61: ...emes appendix 3313737 11 2 RO units with PWW coil EHA ODA ETA EASYAIR Controller DO AI AO DI Bus SUP X5 M T M FC EC ΔP ΔP ΔP FC EC ΔP M Q5 D5 ΔP D2 D3 Q1 Q2 BMS T X1 T X2 CO 2 T Room D4 Rotor controller T T 8 5 10 7 6 22 1 2 3 4 18 23 13 21 11 19 24 26 14 20 25 27 12 ...

Страница 62: ...11 3 RO units with PWW and PCW coils EHA ODA ETA EASYAIR Controller DO AI AO DI Bus SUP M FC EC ΔP ΔP ΔP FC EC ΔP M Q5 D5 ΔP D2 D3 Q1 Q2 BMS T X1 T X2 CO 2 T Room D4 Rotor controller X5 M T Q6 T M T 5 10 7 6 22 18 23 13 16 21 11 19 26 14 20 25 27 15 12 24 8 1 2 3 4 ...

Страница 63: ...mes appendix 3313737 11 4 RO units with electric heating coil EHA ODA ETA EASYAIR Controller DO AI AO DI Bus SUP X5 M T M FC EC ΔP ΔP ΔP FC EC ΔP ΔP D2 D3 Q1 Q2 T X1 T X2 CO 2 T Room D4 Rotor controller Q5 FS Y1 T 17 8 5 10 7 6 22 18 23 21 11 19 24 26 20 25 27 1 2 3 4 ...

Страница 64: ... 64 AL KO EASYAIR 11 5 PL units with PWW coil EHA ODA SUP EASYAIR Controller DO AI AO DI Bus ETA T M FC EC ΔP Room ΔP M Q5 D5 ΔP D2 D3 Q1 Q2 BMS X1 T M Room M ΔP FC EC ΔP T T X2 CO 2 T T 5 10 6 9 22 18 23 13 21 11 19 24 26 14 20 25 27 12 7 1 2 3 4 ...

Страница 65: ...es appendix 3313737 11 6 PL units with PWW and PCW coils EHA ODA SUP EASYAIR Controller DO AI AO DI Bus ETA FC EC ΔP ΔP Room M Q5 D5 D2 D3 Q1 Q2 BMS X1 T Room M ΔP FC EC ΔP T T X2 CO 2 M T M Q6 ΔP T M T 1 2 3 4 5 10 6 9 22 18 23 13 21 11 19 24 26 14 20 25 27 12 15 16 7 ...

Страница 66: ... AL KO EASYAIR 11 7 PL units with electric heating coil EHA ODA SUP EASYAIR Controller DO AI AO DI Bus ETA T M FC EC ΔP ΔP ΔP D2 D3 Q1 Q2 BMS X1 T Room Room M ΔP FC EC ΔP T T X2 CO 2 M T Q5 Y1 FS 1 2 3 4 17 5 10 6 9 22 18 23 21 11 19 24 26 20 25 27 7 ...

Страница 67: ... found in the corresponding customer documentation which is created on the basis of the order AL KO THERM GmbH Phone 49 82 25 39 0 Hauptstraße 248 250 Fax 49 82 25 39 2113 D 89343 Jettingen Scheppach E mail klima technik al ko com Germany Web www al ko com Customer Service Phone 49 82 25 39 2574 E mail service center al ko com ...

Страница 68: ...ifications The following EC Declaration of Incorporation and EC Declaration of Conformity will be issued per order according to their validity If both the order number and the position of the unit are specified the issued document must be assigned to the respec tive unit ...

Страница 69: ... for industrial environments Résistance au brouillage pour les zones industrielles DIN EN 61000 6 3 Störaussendung für Wohnbereich Geschäfts und Gewerbebereiche sowie Kleinbetriebe Emission standard for residential commercial and light industrial environments Émission au brouillage pour le domaine d habitation les locaux commerciaux et professionnels ainsi que les petites exploitations DIN EN 6100...

Страница 70: ...aine d habitation les locaux commerciaux et professionnels ainsi que les petites exploitations DIN EN 61000 6 2 Störfestigkeit für Industriebereiche Immunity standard for industrial environments Résistance au brouillage pour les zones industrielles DIN EN 61000 6 3 Störaussendung für Wohnbereich Geschäfts und Gewerbebereiche sowie Kleinbetriebe Emission standard for residential commercial and ligh...

Страница 71: ...Subject to changes in line with technical progress 71 3313737 Notes ...

Страница 72: ...Installation and Operating Manual translation 72 AL KO EASYAIR Notes ...

Страница 73: ...Subject to changes in line with technical progress 73 3313737 Notes ...

Страница 74: ......

Страница 75: ......

Страница 76: ...L KO THERM GMBH l Jettingen Scheppach l Germany All rights reserved for AL KO THERM GMBH as well as in the event of applications for industrial property rights This documentation or excerpts thereof may not be copied or forwarded to third parties without the express consent of AL KO THERM GMBH We reserve the right to make technical changes that do not impair the function 3313737 February 2021 ...

Отзывы: