


DRM-R1 Mini-Converter Rack-Mount Frame v1.2
www.aja.com
7
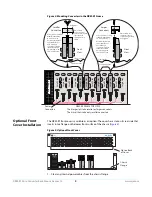
The larger converters using tall standoffs require two mounting spaces because of the
size and layout of the frame. With this in mind, the converters can be mixed and matched
in the frame. However, only same-sized smaller converters can be paired in one space.
Example:
Six FIDO-TR converters require 6 mounting spaces using 3 double brackets and 3 small
standoffs, and 6 HA5’s require 6 mounting spaces using 3 double brackets and 3 medium
standoffs. This arrangement fills the frame to capacity.
Example:
Six 3GDA’s require 12 mounting spaces, 6 single mounting brackets and 6 medium
standoffs. This arrangement fills the frame to capacity.
Example:
Three HD10DA’s require 6 mounting spaces, 3 single mounting brackets and 3 medium
standoffs. That leaves 6 unused spaces for mounting up to 6 smaller FiDO’s using 3
double mounting brackets and 3 short standoffs.
Example:
Six FiDO-TR’s require 6 mounting spaces using 3 double brackets and 3 small standoffs.
That leaves 6 unused spaces for the following:
• Two Hi5's using 2 spaces, one double mounting bracket and a medium standoff.
• Two HA5's using 2 spaces, one double mounting bracket and a medium standoff.
• One ROI-series converter, using 2 spaces, one single mounting bracket and a long
standoff. Note that this particular configuration supports 11 converters, because the
large converter occupies two slots.
There are many possible combinations but these examples demonstrate some of the
options available using the DRM-RO frame.
Installation
Procedure
Install the converters in the DRM frame as explained below and as shown in
1. Determine the size of standoff and mounting bracket required for the converter you
plan to install.
2. Position a star washer and standoff over a hole in the bottom of the frame where you
want to mount a converter or converters.
3. Insert a screw from the underside of the frame through the hole, washer, and
standoff, and tighten the screw to anchor the washer and standoff in place.
4. Position the converter(s) within the chosen slot(s) next to the standoff.
5. Place the bracket over the converter(s) and align the bracket hole(s) with the
standoff.
6. Cinch the bracket down tightly to the converter and standoff. Small converters
require a wing-nut inserted through a flat bracket. Large converters require a screw
inserted through a spacer bracket.
7. Repeat the process for as many converters as you want to install.
8. Connect signal cables and the power connector to each mini-converter.
9. Rack mount the DRM frame, reserving 3-RU spaces if any of the largest converters are
installed, or might be installed in the future. Otherwise, 2-RU spaces are sufficient.
10. Connect the AC power cord to the DRM-R1 and plug it into a 100–240VAC outlet.


