-35-
8. Auto-Stop Function Check (MW)
Requirements: Same as Item 5.
(1) Adjust the S.S.G setting to AM; carrier at 999 kHz; distortion rate at 30 %; source at 1 kHz, and output at 40 ~ 65 dBuV.
(2) Start the tuning search mode, and check that the auto-stop function is applied at MW 999 kHz.
<FM Adjustment>
Make sure that the following settings are done before adjustment.
Preparation
*
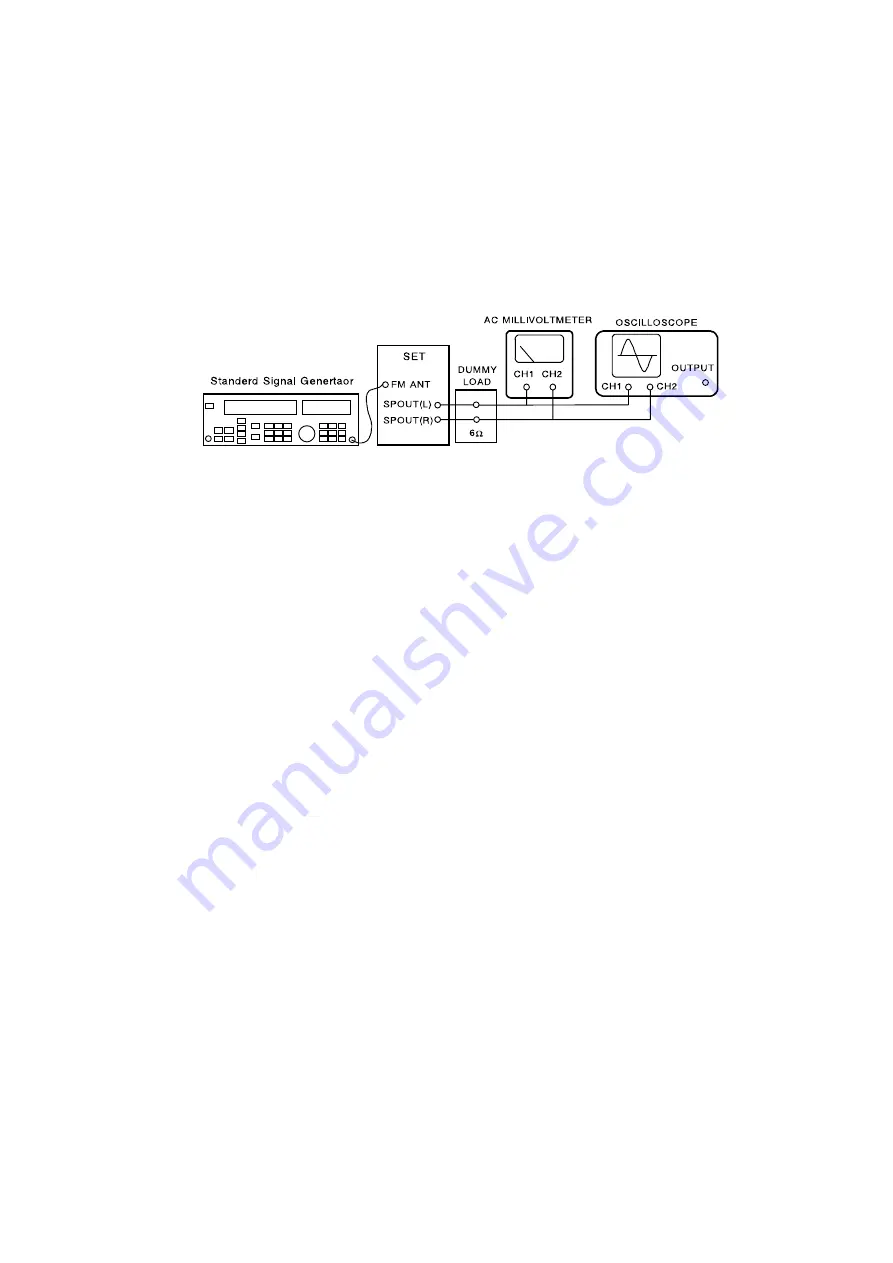
Measuring instruments: Standard Signal Generator (S.S.G.) / Oscilloscope / Millivoltmeter / Dummy resistor (6
Ω
)
(1) Connect the measuring instruments as shown in the diagram below.
(2) Connect the output terminal of signal generator to the antenna input terminal of the unit.
9. Tracking Adjustment
Requirements
*
Test Point: SP OUT (Lch, Rch)
Adjustment point: L901, L902, L904, L905
(1) Adjust the S.S.G. setting to FM; carrier at 108 MHz, distortion at 75 kHz , and source 1 kHz, position output at maximum.
(2) Adjust the unit to FM 108 MHz.
(3) While monitoring 1 kHz waveform through oscilloscope, decrease the S.S.G. output level (till slight noises appear in the waveform).
(4) Adjust L905->L904->L902->L901->L902->L904->L905. Repeat adjustment (L905, L904, L902, L901) two to three time so that the
millivoltmeter indicates the maximum level.
10.Separation Check
Requirements: Same as Item 9.
(1) Adjust the S.S.G. setting to FM; carrier at 98 MHz; distortion at 67.5 kHz; source at 1 kHz, and output at 60 dBuV.
(2) Switch the S.S.G. to PILOT ON, and set to PILOT 7.5 kHz.
(3) Adjust the unit to FM 98 MHz.
(4) Check that S.S.G outputs only from Lch and that the difference between Lch and Rch at that time is 12 dB or above.
(5) Check for Rch in the same manner.
11. Auto-Stop Function Check
Requirements: Same as Item 5.
(1) Adjust the S.S.G. setting to FM; carrier at 98 MHz or 83 MHz; distortion at 75 kHz; source at 1 kHz and output at 10 ~ 35 dBuV.
(2) Start the tuning search mode, and check that the auto-stop function is applied at FM 98 MHz or 83 MHz.
ELECTRICAL ADJUSTMENT -4/7
Содержание NSX-R10
Страница 23: ... 23 SCHEMATIC DIAGRAM 1 5 MAIN 1 2 AMP SECTION NC NC NC ...
Страница 24: ... 24 SCHEMATIC DIAGRAM 2 5 MAIN 2 2 TUNER SECTION ...
Страница 25: ... 25 SCHEMATIC DIAGRAM 3 5 HP SECTION ...
Страница 27: ... 27 SCHEMATIC DIAGRAM 4 5 FRONT DECK SECTION NC NC NC ...
Страница 30: ... 30 SCHEMATIC DIAGRAM 5 5 POWER SECTION ...
Страница 31: ...WIRING 4 4 PT C B 31 1 2 3 4 5 6 7 8 9 10 11 12 13 14 15 A B C D E F G H I J K L M N O P Q R S T U ...
Страница 40: ... 40 FL DISPLAY 1 1 HUA 13SS09T GRID ASSIGNMENT ANODE CONNECTION PINCONNECTION ...
Страница 41: ... 41 IC BLOCK DIAGRAM 1 2 IC LC72131D N C BD3881FV ...
Страница 42: ... 42 IC BLOCK DIAGRAM 2 2 IC LA1845N A ...
Страница 53: ...2 11 IKENOHATA 1 CHOME TAITO KU TOKYO 110 8710 JAPAN TEL 03 3827 3111 0251431 ...


