background image

Содержание NSX-MA945

Страница 1: ...For assistance and information call toll free I 800 BUY AIWA United States and Puerto Rico 3Z NFS 903 01 190215ATS U 9 mm dliEE DIGITAL AUDIO ...

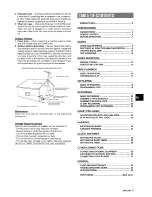
Страница 2: ...t get inside the unit through the ventilation openings Carts and stands When placed or mounted on a stand or cart the unit should be moved with care Quick stops excessive force and m k uneven surfaces may cause the Y A unit or cart to overturn or fall Condensation Moisture may form on the CD pickup lens when The unit is moved from a cold spot to a warm spot The heating system has just been turned ...

Страница 3: ... CODE Maintenance Clean the unit only as recommended in the Operating Instructions Damaae Reauirina Service Have the units serviced by a qualified service technician if The AC power cord or plug has been damaged Foreign objects or liquid have gotten inside the unit The unit has been exposed to rain or water The unit does not seem to operate normally The unit exhibits a marked change in performance...

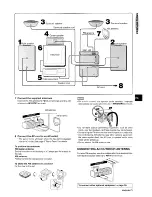
Страница 4: ...ain unit lConnect the speaker cord with the plug to the SPEAKERS HIGH FREQ R terminal Connect the speaker cord with the white stripe to the SPEAKERS LOW FREQ SUB WOOFER R 0 terminal and the black cord to the O terminal 2 3 4 5 6 Sound signals from 5 1CH SUB WOOFER INPUT jack are outputted from the built in subwoofer in the front speakers Connect the left speaker to the main unit Connect the speake...

Страница 5: ...xtend this antenna horizontally in a T shape and fix its ends to the wall AM antenna Position to find the best possible reception To stand the AM antenna on a surface Fix the claw to the slot Do not leave objects generating magnetism such as credit cards near the speakers as these objects may be dama ged Do not bring the FM antenna near metal objects or curtain rails Do not bring the AM antenna ne...

Страница 6: ... hold its weiaht Inserting batteries Detach the battery cover on the rear of the remote control and insert two R6 size AA batteries R6 AA When to replace the batteries The maximum operational distance between the remote control and the sensor on the main unit should be approximately 5 meters 16 feet When this distance decreases replace the batteries with new ones Using the remote control The instr...

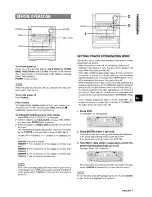
Страница 7: ...2 3 SETTING POWER ECONOMIZING MODE Setting this unit to power economizing mode reduces pc wer consumption as follows k 1 1 r I 1 1 i k t 1 2 3 A hen the power is turned off all the display lights turn off fowever if the clock is not set the game Demo page 8 1 will jegin when the power is turned off f CD Tape or Rhythm play function page 9 does not play for 10 minutes or if there is no audio input ...

Страница 8: ...he power switched off the game is silent With the power switched on it is livened up with audio referred to as game sound in the following 1 2 3 Press F Three numbers on the display start to run Press once The number on the left side stops Press twice to stop the remaining two numbers Scoring 20 points are given to start the game If all the numbers are eaual 50 points are added to the score If not...

Страница 9: ...h low frequency sound is originally emphasized In this case cancel the T BASS system oWhen playing back a tape recorded with BBE it is recommended that BBE be set to off to avoid distorted high This unit has a library of rhythm patterns from which you can n select the desired one to add to the playback of any music sources thus allowing you to create your original sounds The mix created with the B...

Страница 10: ...ic the AUTO mode may not work correctly with songs whose tempo is fuzzy or is varying for example _______________ You can let the music start playing before performing step 1 or later at the desired moment 1 2 3 4 Press BEAT ON OFF to switch the function on You will hear the current rhythm pattern Change the rhythm pattern and the level setting as required by pressing RHYTHM and turning MULTI JOG ...

Страница 11: ...E FUNCTOON SPICE A B function The SPICE A B function allows you to add percussion to the playback of the music and create your original sounds Your sounds created with SPICE A B can be recorded on tape if you want to To select sounds 1 2 3 _ start playing and hit SPICE A or B in time with the music as if to play percussion instruments BEAT ON OFF m You cannot use the SPICE A B function when making...

Страница 12: ... SPICE A You ll hear the sound currently stored in A its name appearing in the display Each time you press A the sound is produced If you want to change the sound of A turn MULTI JOG until you find the desired sound If a time out occurs after completing step 2 and before performing step 3 press SPICE A again In a similar way check the sound of B and change it if you want to To adjust the level of ...

Страница 13: ...ization curve can be customized to suit your preference If a time out occurs while you are performing these steps press UP or DOWN to return to the previous display 1 2 3 4 Press GEQ The current GEQ mode or GEQ ON will be displayed Press UP or DOWN to select frequency bands Each time you press UP DOWN a blinking 4 segmerlt indicatorwill move to the next upper or lowerfrequency bancl Ifthe current ...

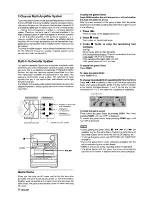
Страница 14: ...nes are plugged in the 5 1 CH page 31 is selected The DSP Digital Signal Processor SURROUND sonically changes the acoustic characteristics of any listening rooms allowing you to enjoy the real sound presence of different environments This unit has been programmed with 5 different SURROUND modes J 4 SELECTING A PROGRAMMED DSP SURROUND MODE _ _________________________ r I MULTI JOG Five modes of DSP...

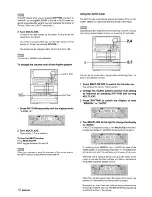
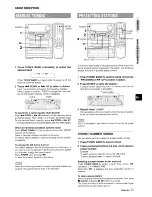
Страница 15: ...interval is changed all preset stations are cleared The preset stations have to be set again MULTI JOG 4 The unit can store a total of 32 preset stations When a station is stored a preset number is assigned to the station Use the preset number to tune in to a preset station directly 1 Press TUNER BAND to select a band arrd press a DOWN or _ UP to select a staticm 2 Press 11 SET to store the statio...

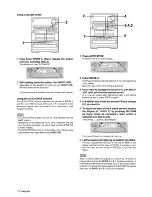
Страница 16: ...rom front side to reverse side once only select Z To play both sides repeatedly select 1 When tapes are loaded in both decks on the display indicates Continuous Play To select a playing deck When tapes are loaded in both decks press TAPE DECK 1 2 first to select a deck The selected deck number is displayed To stop play press To pause play deck 2 only press II To resume play press again To change t...

Страница 17: ...ct the deck to be played back first Press REV MODE DECK 2 to select 1 Press 4 to start playback Playback continues until is pressed About cassette tapes To prevent accidental erasure break off the phastic tabs on the cassette tape after recording with a screwdriver or other pointed tool Side A II 1 Type II tape Tab for side A detection I slot To record on the tape again cover the tab openings with...

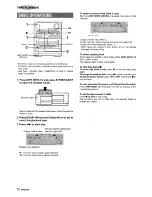
Страница 18: ...s off Direct Play Function Press CD The power is turned on and play of the loaded disc s begins When A OPEN CLOSE is pressed the power is also turned on and the disc compartment is opened To check the remaining time During play press CD EDIT CHECK The amount of time remaining until all tracks finish playing is displayed To restore the playing time display repeat the above Selecting a track with th...

Страница 19: ...DIT RECORDING page 22 PROGRAMMED EDIT RECORDING page 23 or recording during PROGRAMMED PLAY page 19 or RANDOM PLAY page 19 Up to 30 tracks can be programmed from any of the insc rted discs 1 2 3 2 5 d u Use the remote control 1 2 3 4 5 Press PRGM twice in stop mode PRGM is displayed PRGM When PRGM is pressed once in step 1 the unit enters the KARAOKE PROGRAM page 27 Press DISC DIRECT PLAY then pre...

Страница 20: ...stment during recording The VOLUME control has no effect on recording It only sets the level feeding the speakers and headphones Remember however recording takes on the BEAT AUTO SPICE FILL IN SPICE A B functions as well as on the BBE function 1 7 iW s 15 2 m a L ll il i 3t Wml Zrmd 7 t i 4 W4 L INSERTING BLANK SPACES Insertion of 4 second blank spaces enables you to activate the Music Sensor func...

Страница 21: ...es of the original tape The reverse side of both tapes will start simultaneously as soon as the longer tape has been reversed m Dubbing does not start from a point halfway in the tape The reverse mode is automatically set to Z The Dolby NR does not affect recording 1 2 3 Press TAPE DECK 1 2 Insert the original tape into deck 1 and the tape to be recorded on into deck 2 Insert each tape with the si...

Страница 22: ...side A ends recording on the back side B starts To stop recording Press Recording and CD play stop simultaneously To clear the edit program Press CLEAR twice so that EDIT disappears on the display To check the order of the programmed track numbers Before recording press CD EDIT CHECK to select side A or B and press or repeatedly Programmed Track number track numbers Tape Aide Program number To add...

Страница 23: ...peat step 5 for the rest of the tracks for side A A track whose playing time is longer than the remaining time cannot be programmed Press CD EDIT CHECK to select side 9 and g program the tracks for side B g After confirming B on the display repeat step 5 Tape side B reverse side Press REC REC MUTE to start recording The tape is rewound to the beginning of the front s e the lead segment is played t...

Страница 24: ...L SELECT and hold it down for about 4 seconds until L flashes A noise signal is sent to each channel in turn in the following sequence r L Left speaker CEN Center speaker R Right speaker S L Left surround speaker S R Right surround speaker 3 Adjust the sound level of the center and the surround speakers While CEN S R or S L is displayed press DOWN or UP to adjust the volume of the center or each s...

Страница 25: ... when no center speaker is connected The center channel signals are output through the left and right speakers 3 STEREO mode Use this mode when no surround speakers are connected This mode reproduces rear sounds through the front speakers To select PHANTOM or 3 STEREO Press DOLBY PRO LOGIC repeatedly until the desired DC LBY PRO LOGIC mode is displayed The DOLBY PRO LGGIC mode is displayed cyclica...

Страница 26: ...s recommended to prevent howling Contact your local Aiwa dealer for details This unit can use discs or tapes as Karaoke sources Use the vocal fader function for ordinary discs or tapes Use the multiplex function for multi audio discs or tapes Press KARAOKE repeatedly to select the vocal fader or multiplex function Each time KARAOKE is pressed one of these functions is selected cyclically 0 Vocal F...

Страница 27: ...racks 4 Press CD EDIT CHECK repeatedly Each time it is pressed the f disc number and track number are displayed in the reserved order To stop play Press When 4 is pressed the play starts from the last track again To skip a current track Press The skipped track is cleared from the program To clear all the reservations Press repeatedly until K POO is displayed Press it once more to cancel the Karaok...

Страница 28: ...Press the CLOCK and then press within 4 seconds Repeat the same procedure to restore the 12 hour standard If the clock display flashes This is caused by a power interruption The current time needs to be reset If power is interrupted for more than approximately 24 hours all settings stored in memory after purchase need to be reset 1 ____ ___________ ________ Lfj L fg I s Ju L ______________________...

Страница 29: ...hat was selecued in step 1 by pressing one of the function buttons before pressing ENTER or II n step 3 To check the timer settinlg Press TIMER The selected source the timer on time and the dLlration for thle timer activated period will be displayed for 4 seconds To change any of the previous settilng Carry out from step 1 However if you do not change the timer on time in step 3 just press ENTER t...

Страница 30: ...und signals through this jack Use an optical cable to connect digital audio equipment DAT deck MD recorder etc Remove the dust cap from the CD DIGITAL OUT OPTICAL jack Then connect an optical cable plug to the CD DIGITAL OUT OPTICAL jack t2 w rk 3l4v w e tw 1 A W WW w JaT s4 w E P fa I l s J 5 1 CH INPUT JACKS This unit can input sound signals from the audio equipment DVD player LD player etc that...

Страница 31: ...enables you to enjoy theater quality sound in your home 1 Press VIDEO AUX 5 11 CH repeatedly until 5 1 ch IN is displayed 2 Start playing DOLBY DIGITAL SURROUIND salundl on the DVD player The DOLBY PRO LOGIC BBE and the SURFIOUND ar automatically canceled when the 5 1 CH is select d Make sure the software pla yed back with the connected DVE player support the DOLBY DIGITAL SURROUND The function is...

Страница 32: ...e speaker terminals Disconnect the AC cord then correct the speaker connections Was an incorrect function button pressed Sound is emitted from one speaker only Is the other speaker disconnected The output sound is not stereo Is the Karaoke function turned on page 26 An erroneous display or a malfunction occurs Reset the unit as stated below The power is not turned on Disconnect the AC cord and con...

Страница 33: ...i Cabinet type Speakers Impedance Output sound pressure Ieve l Dimensions W x H x D Weight shielded type Subwoofer 200 mm 77 8 in cone type Woofer 120 mm 43 4 in cone type Tweeter 60 mm 2 8 in cone type Super tweeter 20 mm 13 18 in Ct ralrnk type 6 ohms 6 ohms 87 dB W rn 240 x 354 x 319 mm 9 2 x 14x lZ5 8it7 7 0 kg 151bs70Z Specifications and external appearanceare subject to change without notice...

Страница 34: ...Iibreria mueble o estanteria cerrada hermeticamente donde la ventilation no sea adecuada Entrada de objetos y Iiquidos Tenga cuidado de que objetos y Iiquidos no entren en la unidad por Ias aberturas de ventilation Carros de mano y soportes Cuando ponga o monte la unidad en un soporte o carro de mane esta debera moverse con m mucho cuidado Las paradas repentinas la fuerza excesiva 3 AL y Ias super...

Страница 35: ...nidad de puesta a tierra la conexion de Ios terminals de puesta a tierra y Ios requisites para conectar a tierra Ios mismos terminals PLiesta atierra delamtena segtin elCodigo Electrico Nac ond it CABLE DE BAJADA DE LA ANTENA UNIDAD DE DESCARGA DE LA ANTENA NEC SECCION 810 20 I EQUIPQ DEL I 11 2 2 NEC CODIGO ELECTRICO NAC ONAL PUESTA A TIERRA DEL SERVICIO LLECTRICO NEC ARTICULO 250 PARTE H Manteni...

Страница 36: ...e el altavoz derecho a la unidad principal Conecte el cable de altavoz con clavija al terminal SPEAKERS HIGH FREQ R Conecte el cable de altavoz con franja blanca al terminal SPEAKERS LOW FREQ SUB WOOFER R 0 y el cable negro al terminal e Las setiales de sonido procedentes de la toma 5 lCH SUB WOOFER INPUT salen desde el altavoz de subgraves incorporado en Ios altavoces delanteros 2 3 4 5 6 Conecte...

Страница 37: ... en la pared Antena de AM Pongala para obtener la mejor recepcion posible Para poner la antena de AM en position vertical sobre una superficie Fije el gancho en la ranura altavoces Las conexiones mal hechas poclrian causar cortocircuitos en Ios terminals SPEAKERS No deje objetos que generen magrr tismo tales lcomo tarjetas de credito cerca de Ios altavoces porque podrfan estropearse No ponga la an...

Страница 38: ...WHW 2 gd L p p3 3 F gp S j 4 gq t d t j Gk We swbhct Insertion de Ias pilas Quite la tapa de Ias pilas ubicada en la parte trasera del control remoto e inserte dos pilas R6 tamafio AA R6iAA Cuando reemplazar Ias pilas La distancia maxima de operation entre el control remoto y el sensor de la unidad principal debera ser de 5 metros aproximadamente Cuando disminuya esta distancia reemplace Ias pilas...

Страница 39: ...alimentacion CLOCK 1 2 3 PUESTA DEL MC DO DE AHC f3R0 Dli ENERGIA Al poner esta unidad en el modo de ahorm de energfa se reduce el consumo de energia de la forma siguiente Cuando se desconecta la alimentacion todas Ias Iuces del visualizador se apagan Sin embargo si el reloj no esta puesto en hors la dernostracion del juego pagina 8 empezara cuando se desconecte la alimentacion Si la funcion de re...

Страница 40: ...tar del juego Pulse DEMO estando la unidad encendida o apagada y tanto si ei reloj esta puesto en hors como si no Con la alimentacion desconectada el juego se silencia Cuando se conecta la alimentacion el juego se activa con sonido a partir de ahora sonido del juego 1 2 3 Pulse En el visualizador empiezan a moverse tres ritmeros Pulse una vez El ntimero del Iado izquierdo se para Pulse dos veces p...

Страница 41: ...originaimente En este case cancele el sistema T BASS Cuando reproduzca una cinta grabada con BBE se recomienda desactivar BBE para evitar el sonido de alta frecuencia distorsionado UTILIZATION DE LA HJNCION BEAT Esta unidad tiene una Iibrelria de patrones de rihmo de la que usted podra elegir et rittmo deseado para atiadirlc a la reproduction de cualquier fuente musical permitiendole as crear sus ...

Страница 42: ...te el tempo del patron de ritmo actual para we coincida con el tempo de la musics Dependiendo de la musics el modo AUTO tal vez no funcione correctamente con canciones cuyo tempo es impreciso o cambia a menudo por ejemplo Y 1 L _ ________ _ _ ______________ _ J Puede dejar que la mfisica empiece a reproducirse antes de realizar el paso 1 u otro posterior en ei memento deseado 1 2 3 4 Pulse BEAT ON...

Страница 43: ... de casete utilizando SYNC DUB Para utilizar la funcion FILL IN Durante la __________________________ reproducci6n con la funcion BEAT activada pulse FILL IN en el memento deseado El visualizador indicarar FILL IN y cuando termine el ciclo actual del patron de ritmo usted oira un breve sonido diferente del patron de ritmo Este sonido depende de Ios patrones de ritmo Si 10 desea pruebe a cambiar el...

Страница 44: ...el visualizador Cada vez que pulse A se producira sonido Si desea cambiar el sonido de A gire MULTI JOG hasta encontrar el sonido deseado Si pasa un intervalo de tiempo despues de completarse el paso 2 y antes de realizar el paso 3 pulse de nuevo SPICE A De forma similar compruebe el sonido de B y cambielo si 10 desea Para ajustar el nivel de Ios sonidos A y B acceda a la visualization de LEVEL X ...

Страница 45: ...e ecualizacion pLlede persorralizarse para satisfact r sus preferencias Si ha transcurrido el tiempo predeterminado mientlras realizaba estos pasos pulse UP o DOWN para volver a la visualization anterior 1 2 3 4 Pulse GEQ Se visualizara el modo G EQ actual o GEQ ON Pulse UP o DOWN para seleccionar Iias bandas de frecuencias Cadavez que pulse UP DOWN un indlicador de 4 segmentcs se desplazara a la ...

Страница 46: ...e active DOLBY PRO LOGIC Ios auriculares esten enchufados se seleccione 5 1 CH pagina 31 14 ESPAitOL El DSP Procesador de Serial Digital SURROUND cambia s6nicamente Ias caracteristicas acfisticas de cualquier sala de escucha permitiendole disfrutar de la presencia del sonido real de ambientes diferentes Esta unidad ha sido programada con 5 modos SURROUND diferentes SURROUND w f iM MULTI JOG Cinco ...

Страница 47: ...oras preajustadas tendran que ajustarse de nuevo MULTI JOG La unidad puede almacenar un total de 32 emisc ras Cuando almacene una emisora a esa emisora se Ie asignara un nfimero de preajuste Utilice et nulmero de preajuste para sintonizar directamente una emisora preajustada 7 PulseTUNER BAND para seleccionar una banda y pulse 4 DOWN o UF para seleccionar una emisora 2 Pulse 11 SET para allmacenar...

Страница 48: ...ra reproducer una cara solamente seleccione 1 Para reproducer de la cara delantera a la trasera una vez solamente seleccione Para reproducer repetidamente ambas caras seleccione C Cuando haya cintas introducidas en ambas platinas el indicador del visualizador indicara la reproduction continua Para seleccionar una platina de reproduction Cuando haya cintas cargadas en ambas platinas pulse primero T...

Страница 49: ... 1 2 para seleccionar la platina que vaya a realizar la reproduction en primer Iugar Pulse REV MODE DECK 2 para seleccionar 1 Pulse 4 para iniciar la reproduction La reproduction continuara hasta que se pulse cerca de Ias cintas de casete Para evitar el borrado accidental romps con un destornillador u otra herramienta puntiaguda Ias IengLietas de plastico del casete despues de grabar iieta _ la ca...

Страница 50: ... OPEN CLOSE Para iniciar la reproduction cuando la alirnentacion este desconectada funcion de reproduction directs Pulse CD La alimentacion se conectara y la reproduction del de Ios disco s introducido s empezara Cuando se pulse 4 OPEN CLOSE la alimentacion tambien se conectara y el compartimiento de 10sdiscos se abrira Para comprobar el tiempo restante Durante la reproduction pulse CD EDIT CHECK ...

Страница 51: ...omaticamente cuando se realiza la GRABACION CON EDICION Al pagina 22 la GRABACION CON EDICION PROGRAMADA pagina 23 la grabacion durante la REPRODUCTION PROGRAMADA pagina 19 o la REPRODUCTION ALEATORIA pagina 19 Se podra programar un maximo de 30 canciones de cualquiera de Ios discos introducidos G Utilice el control remoto 7 Pulse PRGM dos veces en el rnodo de parada PRGM se visualiza Cuando PRGM ...

Страница 52: ... boton Ajuste de sonido durante la grabacion El control VOLUME no causa ningun efecto en la grabacion Solo ajusta el sonido de Ios altavoces y de ICIS auriculares Sin embargo recuerde que la grabacion asume Ias funciones BEAT AUTO SPICE FILL IN SPICE A B asi como tambien la funcion BBE w W i i w w t w INSERCION DE ESPACIOS SIN GRABAR La insertion de espacios sin grabar de 4 segundos Ie permite act...

Страница 53: ...a original La cara de inversion de atmbas lcintas empezara simultaneamente tan pronto como termine de invertirse la cinta mas Iarga m La copia no empieza desde un punto ubicado en medicl de la cinta El modo de inversion se pone automaticamente f n 11 El ajuste Dolby NR no afecta a la grabacion 1 2 3 Pulse TAPE DECK 1 2 Inserte la cinta original en la platina 1 y la cinta que vaya a grabar en la pl...

Страница 54: ...cara trasera cara B Para detener la grabacion Pulse La grabacion y la reproducci6n del disco compacto se pararan simult meamente Para borrar el programa de edition Pulse dos veces CLEAR para que EDIT desaparezca del visualizador Para comprobar el orden de Ios numeros de Iascanciones programadas Antes de grabar pulse CD EDIT CHECK para seleccionar la cara A o B y pulse repetidamente 0 Numeros de Ia...

Страница 55: ...esto de Ias cancicmes para la cara A x a Una cancion CUYO tiempo de grabacion sea superior al tiempo L restante no podra ser prc gramada Pulse CD EDIT CHECK para seleccicmar la caria B y programe Ias canciones para la calra B a Despues de confirmar que B aparezca en el visualizador repita el paso 5 Cara B de la cinta cara trasera Pulse REC REC MUTE para iniciar la grabacion La cinta se rebobina ha...

Страница 56: ...ndos hasta que Se envia una sehal de ruido a cada canal en el orden siguiente rL Altavozizquierdo CEN Altavoz central R Altavoz derecho 1 S L Altavoz desonido ambiental izquierdo S R Altavoz desonido amtiental dercho 3 4 Ajuste el nivel del sonido del altavoz central y de Ios altavoces de sonido ambiental Mientras se visualiza CEN R o S L pulse DOWN o E UP para ajustar el volumen del altavoz centr...

Страница 57: ...ltavoz central saldran por Ios altavoces derecho e izquierdo Modo 3 STEREO Utilice este modo cuando no est6n conectados Ios altavoces de sonido ambiental Este mado reproduce el sonido O de Ios altavoces traseros pcr Ios altavoces delanteros n Para seleccionar PHANTOM 03 STEREO Pulse repetidamente DOLBY PRO LOGIC hasta que se visualice el modo DOLBY PRO LOGIC deseado El mods DOLBY PRO LOGIC se visu...

Страница 58: ...crofonos y el ajuste de volumen del eco se cancelaran 26 ESPA L Microfonos recomendados Se recomienda utilizar microfonos tipo unidirectional para evitar el aullido Pongase en contacto con su concesionario Aiwa para que Ie de Ios detalles J t FUNClONES DE DESVANECIMIENTO DE VOZ MULTIPLEX Esta unidad puede utilizar discos o cintas como fuentes de Karaoke Utilice la funcion de desvanecimiento de voz...

Страница 59: ...ro de cancion s siendo reproducido ultima reserva res rvadas restante s Ntimero de El nfimerd cle la cancion cancion de la ultima reserva que esta reproduci ndmse parpadea Para anadir una reserva durante la reproduction Repita el paso 3 Para comprobar Ias canciones reservadas Pulse CD EDIT CHECK repetidarnente Cada vez que 10pulse el numero del disco y el nfim ro de la cancion se visualizaran en e...

Страница 60: ...o pulse 9 antes de que pasen 4 segundos Repita el mismo procedimiento para reponer el modo de 12 horas Si parpadea la visuaiizacion del reloj Esto se CietJera a una interruption en el suministro de alimentacion La hors tendra que ponerse de nuevo Si la alimentacion se interrumpe durante mas de 24 horas aproximadamente todos Ios ajustes almacenados en la memoria despues de adquirir la unidad tendra...

Страница 61: ... temporizador la unidad se encendera y la reproduction empezara con la fuente seleccionada Usted puede cambiar la fue nte que fue seleccionada en el paso 1 pulsando uno de Ios botones de funcion antes de pulsar ENTER o II en el paso 3 Para comprobar el ajuste del tempcwizador Pulse TIMER La fuente seleccionada la hors de encendido del temporizadl r y la duraci6n del periodo activado por tempo riza...

Страница 62: ...r equipos de audio digital platina de cinta audiodigital grabadora de minidiscos etc Quite la tapa contra el POIVO de la toma CD DIGITAL OUT OPTICAL Luego conecte la clavija del cable optico a la toma CD DIGITAL OUT OPTICAL opqTqpgm Cuando no se utilice la toma CD DIGITAL OUT OPTICAL TOMAS 5 1 CH INPUT Esta unidad puede introducer sefiales de sonido procedenies del equipo de audio reproductor DVD ...

Страница 63: ...tir disfrutar en su hogar de un sonido de calidad igual ala de un tine 1 Pulse repetidamente VIDEO AUJIX 5 l CHI hasti que se visualice 5 1 ch IN 2 Inicie la reproduction del sonido DOLBY DIGITAL SURROUND en el re productor DVD m DOLBY PRO LOGIC BBE y SURROUND se cancelan automaticamente cuando se seleccioni 5 1 CH Asegurese de que el programa reproducido con el reproductor DVD conectado soporte D...

Страница 64: ...ecte el cable de aiimentacion de CA y Iuego corrija Ias conexiones de Ios altavoces LSe ha pulsado un boton de funcion equivocado Solo sale sonido de un altavoz LEsta el otro altavoz desconectado La salida de sonido no es estereo Esta activada la funcion de Karaoke pagina 26 Se produce una visualization erronea o un mal funcionamiento Vuelva a ajustar la unidad como se indica mas abajo La alimenta...

Страница 65: ...molo Generalidades Alimentacion Consumo Dimensioned de la unidad principal An x Al x Prof Peso de la unidad principal Consumo en el modo de espera Laser de semi onciuctor nm 1 bit doble 85 dB 1 kHz OdB 0 05 1 Ikt z OdB No se puede medir 120 V CA 60 HZ 230 W 260 x 324 x 340 mrr ll 5kg Con el mc do de ahorro de energia desactivado 36 W Con el mc dode ahorro de energia activado 1 5 W Sistema de altav...

Страница 66: ... et de Iiquide Faire attention a ce que aucun corps etranger ou Iiquide ne penetre clans I appareil pas Ies orifices de ventilation Chariot et support Si I appareil est pose ou monte sur un support ou un chariot deplacer ce dernier avec precaution Les arr ts brusques une force excessive et Ies surfaces inegales 3 AV peuvent provoquer Ie renversement ou la chute de I appareil et du chariot Condensa...

Страница 67: ...t ces electrodes lise hlaterre d une antenne selon Iecode national d electricity NEC T FIL DE DESCENTE D ANTENNE UNITE DE DECHARGE DANTENNE NEC SECTION 810 20 APPAREILLAGE DAMENEE DE COURANT CONDUCTEURS DEMISE A LA TERRE NEC SECTION 810 21 COLLIERS DE MISE A LA TERRE ELECTRODE DEMISE A LA TERRE DE LA LIGNE D AMENEE DE COURANT NEC ARTICLE 250 PARTIE H NEC CODE NATIONAL DELECTRICITE Entretien Nettoy...

Страница 68: ...NT Commencer par connecter es enceintes Ies antennes et tout appareil optionnel Brancher Ie cordon secteur en dernier IIn y a pas de difference entre Ies enceintes avant Chacune d elles peut re connectee comme enceinte gauche L ou droite R 4 5 6 Les signaux sonores venant de la prise 5 1 CH SUB WOOFER INPUT sent sortis par Ie haut parleur infragrave de chaque enceinte avant Connecter I enceinte ga...

Страница 69: ...te antenne horizontalement selon la forme d un T et fixer ses extremities a un mur Antenne AM Positioner cette antenne de man ere obtenir la meilleure reception possible Pour poser I antenne AM sur une surface Fixer la griffe clans la rainure clans Ies bornes SPEAKERS Ne pas Iaisser que des cartes endommages Ne pas mettre I antenne FM pres d objets mda lliques ou de tringles a rideaux Ne pas mettr...

Страница 70: ... mur Fixer chaque enceinte a un endroit qui peut supporter son poids Mise en place des piles Enlever Ie couvercle des piles du dos de la telecommande et mettre deux piles R6 taille AA en place R6 AA Quand remplacer Ies piles La distance maxi male de fonctionnement entre la telecommande et Ie capteur situe sur I appareil principal doit etre d environ cinq metres Lorsque cette distance diminue rempl...

Страница 71: ...DU MODE ECONOIMIE D ENERGIE La mise de cet appareil en msde economie d energie diminue la consummation electrique cotmme suit Quand I appareil est hors tension tous Ies indicateulrs de I affichage s eteignent Toutefois si I horloge n est pas reglee Ie jeu Demo page 8 demarre quand on met I appareil hors tension Si la fonction disque compact cassette ou generaticm de rythme page 9 n est pas utilise...

Страница 72: ...loge soit reglee ou pas Quand I appareil est hors tension Ie jeu est silencieux Quand I appareil est sous tension Iejeu comprend une animation sonore appelee son du jeu clans Ies explications suivantes 1 2 3 Appuyer sur Trois chiffres se deplacent sur I affichage Appuyer une fois sur Le chiffre de gauche s arrtle Appuyer deux fois sur H pour arr er Ies deux autres chiffres Marque On dispose de 20 ...

Страница 73: ... Ie systeme T BASS Lors de la lecture d une cassette enregistree avec BBE il est conseille de mettre Ie systeme BBE hors service pour eviter une distortion du son aux frequencies elevees Cet appareil est muni d un groupe de types de rythme parmi Iesquels on peut selectionner celui que I on souhaite pour I ajouter au son de toute source de musique et creer ainsi ses propres sons originaux Le melang...

Страница 74: ... risque de ne pas fonctionner correctement avec de la rnusique dent Ie tempo est flou ou variable par exemple 2 4 2 3 On peut Iaisser la musique demarrer avant d effectuer I etape 1 ou inversement 1 2 3 4 Appuyer sur BEAT ON OFF pour mettre la fonction en service Le type de rythme courant est audible En appuyant sur RHYTHM et en tournant MULTI JOG changer Ie type de rythme et Ie reglage de niveau ...

Страница 75: ...e appuyer sur FILL IN au moment souhaite UTILISATION DE LA FONCTION SPICE Fonction SPICE A B La fonction SPICE A B permet d ajouter des percussions a la source de musique et de creer ainsi ses propres sons originaux Les sons trees avec la fonction SPICE A B peuvent re enregistres sur cassette si on Ie souhaite Pour selectionner des sons 1 2 3 Appuyer sur A Le son courant memorise en A est audible ...

Страница 76: ...dible et son nom apparah sur l afFichage Chaque fois qu on appuie sur A Ie son est produit Si on veut changer Ie son de A tourner MULTI JOG jusqu a ce que I on trouve Ie son souhait Si une coupure se produit apres avoir termin6 l etape 2 et avant d effectuer I etape 3 appuyer de nouveau sur SPICE A D une fagon similaire contrder Ie son de B et Ie changer si on veut Pour regler Ie niveau des sons d...

Страница 77: ...D UNE NOIUVELLE COURBE D EGALISATION I On peut personnaliser la courbe d egalisation comrne on prefere Si une coupure se produit tandis qu on effectue ces apes appuyer sur UP ou DOWN pour repasser a l affichageprecedent 1 2 3 4 Appuyer sur GEQ Le mode d egalisation graphique colurant ou GEQ ON est affiche Appuyer sur UP ou DOWN pour selectionner Ies bandes de frequencies Chaque fois qu on appuie s...

Страница 78: ...casque est branche I entree 5 1 CH Voir page 31 est selectionnee 14 FRAN AIS Le systeme SURROUND DSP processeur numerique de signaux change Ies caracteristiques acoustiques de la sane d ecoute et permet ainsi d obtenir la presence sonore de different environnements avec realisme Cet appareil a ete programme avec cinq modes SURROUND different SELECTION D UN MODESU RROUN D DSP PROGRAM ME MULTI JOG _...

Страница 79: ...isees sent supprimees Une nouvelle memorisation est alors necessaire L 4 IIKmMl Y LJ ________ _ MULTI JOG Lappareil peut memoriser unltotal de 32 stations Quand une station est memorisee un numerw de prereglage Iui est affecte Pcmr accorder directement I appareil sur une station memorisee utiliser Ie numero de prereglage correspondent 1 Appuyer sur TUNEFI BAND pour selectionrwr ww gamme puis appuy...

Страница 80: ...selectionner Pour Iire de la face avant a la face arriere une seule fois selectionner Z Pour Iire Ies deux faces a plusieurs reprises selectionner C Quand il y a des cassettes clans Ies deux platines sur I affichage signifie Lecture continue Pour selectionner une platine de lecture Quand il y des cassettes en place clans Ies deux platines appuyer d abord sur TAPE DECK 1 2 pour selectionner une pla...

Страница 81: ...ur selectionner 11 Appuyer sur 4 pour demarrer la lecture La lecture continue jusqu a ce qu on appuie sur Au sujet des cassettes Pour eviter un effacement accidental utiliser un tournevis ou tout autre objet effile p our caswr Ies ergots en plastique de la cassette apres I enregistrement ace A Pour enregistrer de nouveau sur urne cassette recouvrir Ies cavites des ergots avec du ruban adhesif OUIa...

Страница 82: ... Pour enlever des dieques appuyer sur A OPEN CLOSE Pour demarrer la lecture quand I aiimentation est toupee fonction de lecture directe Appuyer sur CD IJappareil est mis sous tension et la lecture du ales disque s en place commence Quand on appuie sur OPEN CLOSE I appareil est aussi mis sous tension et Ie compartment a disques s ouvre Pour verifier Ie temps restant Pendant la lecture appuyer sur C...

Страница 83: ... de I ENREGISTREMENT AVEC MONTAGE PROGRAMME voir page 23 ou Iors de l enregistrement pendant la LECTURE PROGRAMMED voir page 19 CIUla LECTURE ALEATOIRE voir page 19 B 8 8 DA 1 On peut programmer un max mum de 30 plages de n importo Iequel des disques en place C 1 2 3 2 5 44 bw m u Utiliser la telecommande 1 2 3 4 5 Appuyer sur deux fois PRGM en mode arr PRGM est affiche Quand on appuie une fois su...

Страница 84: ...ur 11 Applicable quand la source est TUNER VIDEO AUX ou MD Pour reprendre I enregistrement appuyer de nouveau sur cette touche Reglage du son pendant I enregistrement La commande VOLUME n a pas d effet sur I enregistrement Elle regle seulement e niveau des signaux allant aux enceintes et au casque Toutefois ne pas oublier que I enregistrement est affecte par Ies fonctions BEAT AUTO SPICE FILL IN e...

Страница 85: ...originale Les faces arriere des deux cassettes demarrent en m me temps des que la cassette la plus Iongue a ete inversee o La duplication ne demarre pas a un point situe au milieu d une face Le mode d inversion est automatiquement regle sur Le reducteur de bruit Dolby n affecte pas I enregistrement 1 2 3 Appuyer sur TAPE DECK 1 2 Inserer la cassette originale clans la pllatine 1 et la cassette a e...

Страница 86: ...ndes puis I enregistrement demarre Une fois que I enregistrement sur la face avant face A est termine I enregistrement sur la face arriere face B demarre Pour arr ter I enregistrement Appuyer sur Lenregistrement de la cassette et la lecture du disque compact s arr ent simultanement Pour effacer Ie programme du montage Appuyer deux fois sur CLEAR de maniere que EDIT disparaisse de I affichage Pour ...

Страница 87: ... Repeter I etape 5 pcmr Ie reste des plages de la face A Une plage dent la duree de lecture est superiwre au temp s restant ne peut pas re programmed Appuyer sur CD EDIT CHECK pour sdectionner la face B puis programmer Ies plages Ipour cette face Apres s re assure que B est affich repeter I etape 5 Face B de la cassette face arlriere Appuyer sur O REC REC MUTE pour demiwrer I enregistrement La cas...

Страница 88: ...sur MANUAL SELECT pendant environ quatre secondes jusqu a ce que L clignote Un signal sonore est envoye successivement a chaque canal clans I ordre suivant L Enceintegauche CEN Enceintecentrale R Enceintedroite I L S L Enceinte surround gauche S R Enceinte surround droite Regler Ie niveau sonore des enceintes centrale et surround Tandis que CEN S R ou S L est affiche appuyer sur DOWN ou UP pour re...

Страница 89: ...ale sent sortis par Ies enceintes gauche et droite Mode 3 STEREO Utiliser ce mode quand aucune enceinte surround n est connectee Ce mode reproduit Ies sons arrier par Ies enceintes avant Pour selectionner PHANTOM ou 3 STEREO Appuyer sur DOLBY PRO LOGIC a plusieurs reprises jusqu i ce que Ie mode DOLBY PRO LOGIC scluhaite soit affiche Ls mode DOLBY PRO LOGIC est affichb de manibre cycliqw comme sui...

Страница 90: ...n est changee Ies reglages de volume de microphone et de niveau d echo sent annules Microphones recommandes L utilisation de microphones de type unidirectionnel est recommandee pour eviter Ie hurlement Pour plus de details contacter Ie distributeur Aiwa local Cet appareil permet I emploi de disques ou de cassettes comme sources Karaoke Utiliser la fonction Vocal Fader pour des disques ou cassettes...

Страница 91: ...tion en tours de lecture clignote Pour ajouter une reservation pendant la lecture Repeter I etape 3 Pour contr61er Ies plages reserveesl Appuyer a plusieurs reprisc s sur CD EDIT CHECK A chaque pression un numero de disque et un Inumero de plage sent afflches clans I ordre r serv6 Pour arr 6ter la lecture Appuyer sur Quand on appuie sur 4 la lecture rt demarre A la d rniere plage Pour sauter la pl...

Страница 92: ...passer au format de 24 heures Appuyer sur CLOCK puis appuyer sur clans Ies quatre secondes Pour retablir Ie format de 12 heures proceder de la m me maniere Si I affichage de I horloge clignote Ceci est dti a une interruption d alimentation Lheure courante doit re reglee de nouveau Si I alimentation est interrompue pendant plus d environ 24 heures tous Ies reglages memorises apres I achat doivent t...

Страница 93: ...nence sur a source selectionnee En appuyant sur une des touches de fonction avant d appuyw sur ENTER ou II a I etape 3 on pel t changer la source selectionnee a I etape 1 Pour contrder Ie reglage de la mirwterie Appuyer sur TIMER La source selectionnee I heure de la mise sous t nsion par la minuterie et la duree de la mise sous tension par la minuterie sent affichees pendant quatre secondes Pour c...

Страница 94: ... enregistreur de minidisque etc Enlever Ie capuchon antipoussidre de la prise CD DIGITAL OUT OPTICAL Ensuite connecter la fiche d un cable optique a cette prise PRISES 5 1 CH INPUT Cet appareil peut recevoir des signaux sonores de I appareil audio Iectur de DVD Iectur de disque Iaser etc qui contient un decodeur Dolby Digital muni de bornes de sortie 5 1 ch Se reporter a la partie CONNEXION D UN L...

Страница 95: ... a domicile 1 Appuyer surVIDE AUX 5 l CH a plusieurs reprises jusqu a ce que 5 1 ch IN soit affiche 2 Demarrer la lecture du son DOLBY DIGITAL SURROUND sur Ie Iecteur de DVD Les systemes DOLBY PRO LOGIC BBE et SURROUND sent automatiquement annules quand I entree 5 1 CH est selectionnee S assurer que Ie support utilise avec Ie Iecteur de DVD connecte est compatible avec Ie systeme DOLBY DIGITAL SUR...

Страница 96: ...te Debrancher Ie cordon secteur puis corriger Ies connexions d enceinte Une touche de fonction incorrect n est elle pas en service Le son ne sort que par une seule enceinte oIlautre enceinte n est elle pas deconnectee Le son sorti n est pas st6reo La fonction Karaoke n est elle pas en service page 26 Un affichage ou un fonctionnement errone se produit Reinitialiser I appareil comme indique ci dess...

Страница 97: ...0 Hz Bande normale 50 Hz 15000 Hz Polarisation CA 1 t e de lecture platine 1 1 t e d enregistrement de lecture 1 t e d effacement platine 2 Laser Convertisseur N A Rapport signal bruit Distortion harmonique Pleurage et scintillement Generalit6s Alimentation electrique Puissance absorbee Dimensions de I appareil principal Lx H x P Poids de I appareil principal Puissance absorbee en attente Laser a ...

Страница 98: ......

Страница 99: ......

Страница 100: ...N 11 12 BEAT ON OFF 9 11 RHYTHM 9 10 12 F 4 f f kI q 4 J 4 f z y t f a a fi r vi s5n J 8 x if 7 i8 x v a x Yv x sRd z k a wT I H J 4 w T f 5 J L For assistance and information CD EDIT CHECK 18 22 23 CD BLANK SKIP 19 DISC DIRECT PLAY 1 3 18 19 22 23 DISC CHANGE 18 opEN cLosE n mmmn 18 TIMER 29 SLEEP 28 MONO TUNER 15 CLOCK 28 CD EDIT CHECK 18 22 23 27 PRGM 19 27 RANDOM REPEAT 18 19 O 9 10 15 18 19 2...

Отзывы: