AirVerter
®
Model 96 HVLP Paint Spray System
DO NOT OPERATE SPRAY GUNS WITHOUT PERSONAL SAFETY EQUIPMENT
5
WARNING
Gun must be de-pressurized prior to any maintenance or disassembly
procedure. Disconnect all air and fluid hoses prior to performing any
maintenance operation.
CLEANING
Cleaning the Model 96 Spray Gun
Thorough removal of paint after each use is
ESSENTIAL
to the optimum operation of your
gun.
1. Using small amounts of solvent, repeatedly
flush the gun until all paint is removed and the
solvent runs clear.
2. Clean the exterior of the gun and cup with a
solvent-dampened cloth.
3. Remove the needle, nozzle and air cap and
clean them with a brush and solvent.
4. Check to see that all paint residue is removed
from inside the nozzle. Paint build-up here can
reduce fluid flow and prevent the needle from
seating properly causing leakage during
subsequent use.
5. Check the air passages in the air cap. Paint
build-up here reduces air flow and will result in
a distorted pattern.
6. Clean the packings at the rear of the fluid
block with a brush and solvent. Improperly
cleaned packings can cause the needle to
stick, resulting in poor performance of the gun.
If using a gun washer, place the Gun in the
cleaner and cycle. Then follow instructions above
making sure all parts are clean and dry before re-
assembly.
SPRAY GUN PERFORMANCE IS DIRECTLY RELATED TO
HOW WELL THE GUN IS CLEANED AFTER USE
Cleaning Ancillary Equipment
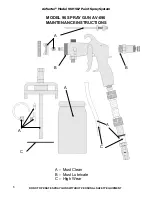
A. If using a 1-Quart Cup, be sure to clean the
Air Pressure Tube of all paint residue.
B. Clean the anti-drip feature on the cup lid and
be sure this air passage is open.
C. Clean all paint residue from the cup, with
particular attention to the gasket and cup lip.
(
Hint
: Periodically turning the gasket over
prolongs gasket life.)
D. Clean or replace the filter on the Inductor to
maintain proper airflow through the system.
Lubricate
A. Use Vaseline or a non-silicone grease to
lubricate the gun.
B. Lubricate all threaded connections for ease
of maintenance.
C. Lubricate the Needle only where it passes
through the needle packings.
D.
DO NOT
allow lubricant to get into the Fluid
Tube, Nozzle, Air Cap, or interior of the paint
chamber (areas where paint may come in
contact with lubricant).
WEAR ITEMS
A. Replace Fluid Needle and Nozzle when the
Needle extends 3/32
″
beyond the Nozzle.
Unscrew the Fluid Regulating Assembly
being careful not to lose the Needle Tension
Spring. Remove Needle and replace.
B. Replace the inductor filter on the AirVerter
®
Inductor when it becomes clogged and can
no longer be cleaned. A filter must be used
to prevent dust and dirt from being blown
onto the finish.
Содержание AV-096
Страница 12: ......


