background image

10

11

SPRAY

Attach spray gun to airless unit and tighten fittings securely. 

Set the gun safety latch. (Also may be called gun safety 

lock, or trigger lock)  

* The gun safety latch should always be set when the gun 

is not being triggered.

Read all warnings and safety precautions supplied with the 

spray gun and in product manual.

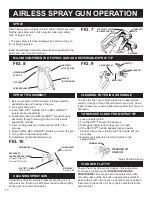
MAJOR COMPONENTS OF SPRAY GUN AND REVERSIBLE SPRAY TIP

FIG. 7

1.  Be sure pressure relief procedure is followed before 

assembling tip and housing to the gun.

2. Lock gun safety latch.

3. Insert REV-TIP™ cylinder into the REV-GUARD™ 

(guard housing assembly).

4. Guide metal seat into REV-GUARD™ (guard housing 

assembly) through retaining nut & turn until it seats 

against the cylinder.

5. Insert O-Ring gasket on metal seat so it fits in the 

grooves.

6. Finger tighten REV-GUARD™ retaining nut onto the gun.

7. Turn guard in the desired position.

8. Completely tighten the retaining nut.

1.  Lock gun safety latch.

2. Turn REV-TIP™ handle 180 degrees.

3. Disengage trigger lock & trigger gun into pail.

4. If the REV-TIP™ handle appears locked (resists  


turning), loosen the retaining nut. The handle will now 

turn easily.

5. Engage gun safety latch & return handle to the  


spray position.

Spray Position Shown

REVERSE TO 

UNPLUG

RETAINING NUT

CLOGGED FLAT TIP

Should the spray tip become clogged, relieve pressure 

from hose by following the

 "PRESSURE RELIEF 

PROCEDURE." 

Secure gun with the safety latch, take 

off guard, take out the tip, soak in appropriate solvent & 

clean with a brush. (Do not use a needle or sharp pointed 

instrument to clean the tip. The tungsten carbide is brittle 

and can chip.)

CLEANING SPRAY GUN

Immediately after the work is finished, flush the gun out 

with a solvent.  Brush pins with solvent and oil them lightly 

so they will not collect dried paint.

To clean the filter, use a brush dipped in an appropriate 

solvent. Change or clean filters at least once a day. Some 

types of latex may require a filter change after four hours of 

operation.

SPRAY TIP ASSEMBLY

CLEANING FILTER IN GUN HANDLE

TO REMOVE CLOGS FROM SPRAY TIP

FIG. 10

O-RING GASKET

Part # 561-026

METAL SEAT

Part # 561-029

REV-TIP™ CYLINDER

Part # 561-XXX

RETAINING NUT

REV-GUARD™

GUARD HOUSING ASSEMBLY

G Thread 7/8" 561-002

F Thread 11/16" 561-001

REVERSIBLE

SPRAY TIP

TRIGGER GUARD

TIP GUARD

HANDLE

(FILTER INSIDE)

GUN SAFETY 

LATCH OR LOCK

FIG. 8

FIG. 9

O-RING GASKET

METAL SEAT

REV-GUARD™

REV-TIP™

AIRLESS SPRAY GUN OPERATION

GUN SAFETY LATCH 

IN LOCKED POSITION

GUN SAFETY 

LATCH

RELEASED

Содержание SL 6250

Страница 1: ...001 809 APR 09 AIRLESS PAINT Sprayer SERVICE OPERATION MANUAL AIRLESSCO SL 6250 ...

Страница 2: ...26 Frame Assembly 27 Suction Assembly 27 Notes 28 Airlessco Accessories 30 1 Filling the Packing Nut Wet Cup 5 2 Spray Tip 6 3 Prime Valve 6 4 Pressure Control Knob 6 5 Choke Fuel Throttle 6 6 Static Discharge 6 7 Spray Gun 10 8 Gun Safety Latch 10 9 Major Gun Components 10 10 Spray Tip 10 11 Airless Spray Gun 11 12 Oil and Lubrication 14 13 Fluid Pump 16 14 Fluid Pump Connection 16 15 Fluid Pump ...

Страница 3: ...T READ AND FOLLOW ALLSAFETYWARNINGSANDINSTRUCTIONS RELATED TO THE USAGE OF THIS EQUIPMENT ON PAGES 2 3 4 READ LEARN AND FOLLOW THE PRESSURE RELIEF PROCEDURE ON PAGE 9 OF THIS MANUAL SL6250G Part No Bare 301 693 Part No Complete 301 694 Max Pressure 3000 PSI Output FreeFlow 1 70 GPM Output At Pressure 1 60 GPM Tip Size 1 Gun 0 041 in Tip Size 2 Gun 0 029 in Motor Honda GX160 Weight 136 lbs This gas...

Страница 4: ...ishing equipment is readily available and properly maintained NEVER LEAVE SPRAYER UNATTENDED WITH PRESSURE IN THE SYSTEM FOLLOW PRESSURE RELIEF PROCEDURES ON PAGE 9 Keep spraying area free from obstructions Make sure area has good ventilation to safely remove vapors NEVER keep flammable material in spraying area NEVER spray in vicinity of open flame or other sources of ignition Spraying area must ...

Страница 5: ...COMPONENTS 1 Sprayer Connect a ground wire and clamp supplied to a true earth ground 2 Fluid Hose use only grounded hoses 3 Spray gun or dispensing valve grounding is obtained through connection to a properly grounded fluid hose and pump 4 Object being sprayed according to your local code 5 All solvent pails used when flushing should only be metal pails which are conductive Once each week check el...

Страница 6: ...efore cleaning gun and hose Make contact of gun with bucket and spray without the tip in a well ventilated area into the grounded steel bucket 4 Never use high pressure in the cleaning process USE MINIMUM PRESSURE 5 Do not smoke in spraying cleaning area Reduce the risk of injection injury static sparking or splashing by following the specific cleaning procedure on page 6 and 9 ALWAYS follow the P...

Страница 7: ...ar grade gasoline c Remove the fuel cap and fill tank Be sure the air vent in the fill cap is not plugged so fuel can flow to the carburetor then replace the cap Your unit was factory tested in an anti freeze solution which was left in the pump Before using oil base paint flush with mineral spirits only Before using water base paint flush with mineral spirits followed by soapy water then a clean w...

Страница 8: ...m gradually close the choke raise the RPM of engine slightly by moving throttle to the left Close the prime valve Refer to Fig 3 11 Point the gun into the metal pail and hold a metal part of the gun firmly against the pail Refer to fig 6 12 Disengage the gun safety latch and squeeze the gun trigger At the same time slowly turn the pressure control knob clockwise just enough to move liquid at low p...

Страница 9: ...n Prime Valve OPEN to the prime position ensuring the pressure is released from the system d Turn Pressure Control Knob to minimum pressure e Install spray tip onto gun f Close the prime valve to the pressure position g Turn the pressure control knob to desired spray pressure h Disengage the gun safety lock and you are ready to start spraying WARNING If you spray into the paint bucket always use t...

Страница 10: ... EASY WAY TO KEEP THE OUTSIDE OF THE TIP CLEAN FROM MATERIAL BUILD UP Every time you stop spraying for even a minute lock the gun and submerge the gun into a small bucket of thinner compa rable with the material sprayed Thinner will dissolve the build up of paint on the outside of tip tip guard and gun much more effectively than if the paint dries out completely Clogged standard flat tip clean onl...

Страница 11: ...cking nut daily Your pump has a patented Triple Life Packing System Packing life will be extended a minimum of three times if the following Packing Adjustment procedure is followed IF SEEPAGE OF PAINT INTO THE PACKING NUT AND OR MOVEMENT OF THE PISTON UPWARD IS FOUND WHILE NOT SPRAYING THE PACKING NUT SHOULD BE TIGHTENED ENOUGH TO STOP LEAKAGE ONLY BUT NOT ANY TIGHTER OVERTIGHTENING WILL DAMAGE TH...

Страница 12: ...un safety latch return handle to the spray position Spray Position Shown REVERSE TO UNPLUG RETAINING NUT CLOGGED FLAT TIP Should the spray tip become clogged relieve pressure from hose by following the PRESSURE RELIEF PROCEDURE Secure gun with the safety latch take off guard take out the tip soak in appropriate solvent clean with a brush Do not use a needle or sharp pointed instrument to clean the...

Страница 13: ...igger Guard 6 119 055 Screw 7 119 054 Nut 8 120 109 Gun Head 9 120 540 Actuator Pin 2 10 120 536 Gun Plate 11 120 038 Nut 12 120 056 Plastic Washer 13 120 538 Gun Trigger Lock 14 120 055 Wave Washer 15 120 049 Retaining Ring 16 120 082 Handle Seal 17 120 090CX 120 090FX Gun Filter Coarse Gun Filter Fine 18 120 088 Spring 19 120 106 Gun Handle Assy 20 120 542 2 Finger Gun Trigger 21 120 506 4 Finge...

Страница 14: ...iscous Application too heavy thin cautiously reduce pressure and or use tip in next smaller nozzle group Coating fails to close smooth over Material too viscous thin cautiously Spray pattern irregular deflected Orifice clogged Tip damaged clean carefully replace with new tip Craters or pock marks bubbles on work Solvent balance use 1 to 3 short solvents remainder long solvents this is most likely ...

Страница 15: ...1 013 015 017 019 021 023 025 027 029 031 035 039 041 4 6 102 152 209 211 213 215 217 219 221 223 225 227 229 6 8 152 203 309 311 313 315 317 319 321 323 325 327 335 8 10 203 254 409 411 413 415 417 419 421 423 425 427 431 10 12 254 305 511 513 515 517 519 521 523 525 527 531 535 12 14 305 356 613 615 617 619 621 623 625 627 631 635 639 641 14 16 356 406 715 717 721 739 741 754 16 18 406 457 815 8...

Страница 16: ...l be extended a minimum of 3 times if the proper packing tightening procedure is followed PACKING TIGHTENING PROCEDURE Inspect the packing nut daily If seepage of paint into the packing nut and or movement of the piston upward is found while not spraying the packing nut should be tightened enough to stop leakage only but not any tighter OVERTIGHTENING WILL DAMAGE THE PACKINGS and reduce the packin...

Страница 17: ...operates but paint pressure is too low or none The pressure setting is too low The tip or gun filter is clogged The tip is worn The fluid displacement pump filter is clogged There is a large pressure drop in the fluid hose Increase the pressure see page 6 Remove the tip and or filter and clean them Replace Tip Clean the filter Use a larger diameter hose The displacement pump operates but the outpu...

Страница 18: ...halves See figure 18 5 Secure the fluid pump housing to the tie rods and screw locknuts with washers on loosely 6 Tighten the tie rod locknuts evenly to 30 ft lb NOTE AFTER ALL THE ROD LOCKNUTS ARE TIGHT THE ALIGNMENT OF BOTH RODS SHOULD ALLOW EASY ASSEMBLY AND DISASSEMBLY OF THE COUPLING IF ANY BINDING LOOSEN AND RETIGHTEN ALL THE ROD LOCKNUTS TO IMPROVE THE ALIGNMENT MISALIGNMENT CAUSES PREMATUR...

Страница 19: ...ce piston holder 187 248 in a vise Slide piston into holder and lock in place with a 1 4 pin 187 250 5 Clean all parts and inspect them carefully for wear or damage Inspect the outside of the piston rod for scoring or wear Replace these parts if needed A worn piston rod will cause premature wear of packings 6 Using 3 8 allen wrench to unscrew retainer from piston 7 Remove outlet seat O ring outlet...

Страница 20: ...the piston rod down through the packings out of the pump 3 Now push the packing removal tool up through the pump remove from the top bringing the packings spacer springs along with it leaving the fluid body empty NOTE MAKE SURE ALL PACKINGS GLANDS HAVE BEEN REMOVED FROM THE FLUID PUMP 4 Clean inside of fluid body 5 Disassemble all parts clean for reassembly Discard any old packings Save the metal ...

Страница 21: ...187 051 Outlet Seat Support 10 187 016 Suction Retainer 11 187 020 Suction Ball 12 187 065 Suction Seat 13 106 014 O Ring PARTS LIST FIGURE 21 22 CONT Item No Part No Description 14 187 059 Packing Leather 15 187 037 Male Gland 16 187 029 Packing Polyethylene 17 187 058 Female Adaptor 18 187 031 Belleville Springs 19 187 025 Male Gland 20 187 060 Packing Leather 21 187 030 Packing Polyethylene 22 ...

Страница 22: ...e Optional 3 100 109 Nipple 4 100 023 Hose 5 169 010 Nipple 6 100 028 Plug 7 111 200 99 Manifold Filter Assy 8 301 309 Hose 9 167 016 Elbow FIG 23 PARTS LIST FIGURE 23 CONT Item No Part No Description 10 301 253 Manifold 11 100 317 Nut 2 12 100 345 Bolt 2 13 169 013 Elbow 14 100 123 Hose 15 100 036 Tee 16 119 083 Prime Valve 17 119 086 Bypass Hose Assy SEE FIGURE 22 ...

Страница 23: ...9 Nipple 3 8 M x 1 4 M 10 100 028 Plug 1 4 1 7 6 5 4 3 2 10 9 8 11 14 13 12 PRIME VALVE 119 083 PARTS LIST FIGURE 24 Item No Part No Description 1 115 303 Handle with Label 2 117 046 Screw 3 115 063 Washer 4 115 072 Spacer 5 115 064 Belleville Spring 3 6 115 065 Retaining Ring 7 115 067 Washer 8 115 071 Valve Stem 9 115 068 O Ring Black 10 115 069 Ball 11 115 029 Valve Seat 12 115 012 Washer 13 11...

Страница 24: ...trical Control Board 4 Using an insulated screwdriver adjust Pressure Calibration Trimpot by turning clockwise until the clutch engages When the clutch engages the pump will commence Priming When pump is primed turn the Prime Valve to the Closed Pressure Position THE PUMP WILL BEGIN TO PRESSURIZE AND THE CLUTCH WILL DISENGAGE AT A LOW PRESSURE CONTINUE TURNING THE TRIMPOT CLOCKWISE TO INCREASE PRE...

Страница 25: ...sure prime pressure valve is in the prime position This is important because the sensor plugged into the board is not measuring pressure in the fluid section STEP 9 When Steps 7 8 have been completed and the magneto and sensor check good the electrical control board is the only item left replace the board See page 22 ELECTRICAL TROUBLESHOOTING Clutch Does Not Engage CLUTCH REPLACEMENT REMOVING THE...

Страница 26: ...s greater than 024 remove the removable spacer Reassemble and check gap for proper clearance 11 Place cog belt over cog pulley portion of clutch Set gearbox and clutch assembly on the support brackets Fig 30 items 25 26 screw in the two vertical bracket screws Fig 30 item 20 and start the four horizontal screws throught the gearbox plate Fig 27 item 5 and into the back of the gearbox 12 Slide cog ...

Страница 27: ...Plate 9 301 230 Screw CLUTCH ASSEMBLY 301 284 ENGINE ASSEMBLY 1 7 6 5 4 3 2 9 8 FIG 29 FIG 28 1 2 3 4 5 6 7 8 9 10 1 2 1 16 PARTS LIST FIGURE 28 Item No Part No Description 1 112 041 Differential Screw 2 112 054 Coupling Nut Assy 3 301 284 99 Replacement Clutch 4 301 037 Bearing 2 5 301 274 Spacer 2 6 100 333 Retaining Ring 2 7 301 413 Removable Spacer 8 301 412 Spacer 9 136 068 Spring 10 301 316 ...

Страница 28: ...0 111 044 Screw 4 21 140 029 Washer 10 PARTS LIST FIGURE 30 CONT Item No Part No Description 22 113 023 Washer 4 23 100 317 Nut 2 24 169 050 Screw 2 25 301 299 Bottom Support 26 301 232 Top Support 27 301 173 Return Bracket 28 100 328 Stud 2 29 140 035 Washer 2 30 140 051 Nut 2 31 301 059 Spacer 2 32 189 047 Coupling Set Cover 33 189 046 Coupling Set 34 189 048 Retaining Rings 2 35 301 467 Shield ...

Страница 29: ... 141 008 Inlet Filter SUCTION ASSEMBLY 301 594 FIG 32 1 8 9 7 4 5 6 3 2 PARTS LIST FIGURE 31 Item No Part No Description 1 301 201 Frame 2 301 202 Motor Bracket 3 301 165 Wheel 2 4 136 126 Screw 4 5 140 029 Washer 12 6 100 317 Nut 4 7 331 048 Rubber Boot 2 8 305 039 Spacer 2 9 143 029 Set Collar 2 10 331 342 Screw 2 11 100 270 Cup 12 120 021 Nut 2 FRAME ASSEMBLY 301 273 12 11 10 ...

Страница 30: ...r pack 100 064 Used to cover suction filter 100 065 5 Gallon strainer HOSE COVER 4 mil poly protects your airless hose from paint and abrasion damage Comes in 1000 roll with perforations each 50 100 219 Hose Cover Roll 100 426 Case of 6 Rolls HIGH PRESSURE AIRLESS HOSE Standard Tip Extension Swivel Extension Bare Pole Quick Flush The only clean water flushing system Cuts sprayer clean up time in h...

Страница 31: ... all information and special offers for which you are eligible WARRANTY REGISTRATION CARD Copyright 2008 Airlessco All rights reserved Replacement wear parts program subject to change without notice Material Usage in Galons per Week FORM 001 043 OCT08 Equipment Owned Units Owned Buying in Next 6 Months Electric Paint Sprayers 0 0 6GMP 1 2hp 0 7 0 8GMP 3 4hp 1 1 25GMP 1hp Gasoline Paint Sprayer 1 2...

Страница 32: ...id return of the equipment claimed to be defective to an authorized Airlessco Service Warranty Center for verification of the claim If the claim is verified Airlessco will repair or replace free of charge any defective parts The equipment will be returned to the original purchaser transportation prepaid If inspection of the equipment does not disclose any defect in material or workmanship repairs ...

Отзывы: