


38
Installation and Verification Manual
2
Installation (Getting Started)
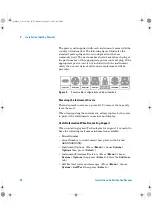
The power cord supplied with each instrument varies with the
country of destination. The following figure illustrates the
standard power plug and cord configurations that are
commonly used. The part number shown beneath each plug is
the part number of the appropriate power cord and plug. If the
appropriate power cord is not included with the instrument
notify the nearest Agilent office and a replacement will be
provided.
Removing the Instrument Covers
The instrument covers are a press-fit. To remove them, gently
lever them off.
When transporting the instrument, always replace both covers
to protect the instrument connectors and display.
Useful Information When Requesting Support
When contacting Agilent Technologies for support it is useful to
have the following instrument information available:
•
Model Number.
•
Serial Number. (on instrument base plate in the format
GBXXXXXXXXX)
•
Instrument Options. (Press
<Menu>
, choose
System >
Options
then press
<Select>
.)
•
Instrument Firmware Revision. (Press
<Menu>
, choose
System > Options
then press
<Select>
. Select the
Software
tab.)
•
Self Test fail codes and messages. (Press
<Menu>
, choose
System > Self Test
then press
<Select>
.)
Figure 2
Power cable configurations and part numbers
panther3_iv.book Page 38 Wednesday, January 15, 2003 12:03 PM
Содержание OmniBER J7230A
Страница 2: ...sdh_Lynx2 book Page 148 Wednesday April 17 2002 12 49 PM...
Страница 10: ...8 Installation and Verification Manual panther3_iv book Page 8 Wednesday January 15 2003 12 03 PM...
Страница 172: ...170 Installation and Verification Manual panther3_iv book Page 170 Wednesday January 15 2003 12 03 PM...
Страница 173: ...sdh_Lynx2 book Page 148 Wednesday April 17 2002 12 49 PM...