


78
Agilent Intuvo 9000 GC Installation
1
Installing the GC
j
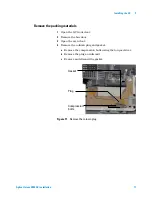
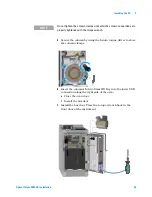
Tighten the Guard chip compression bolt using the Intuvo
torque driver until you hear one click.
k
Close the Guard chip cover.
l
Install the inlet cover.
Install a new column gasket
1
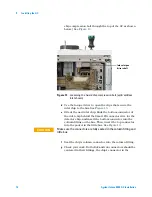
Carefully remove the new gasket from its packaging. Inspect
the gasket to be sure it is not deformed. The two round lobes
are the sealing surfaces.
2
Carefully insert the round gasket lobes into the slot of the
click and run fitting, then align the lobes into the inner
pockets of the click and run fitting. (Note that the gasket is
double-sided.)
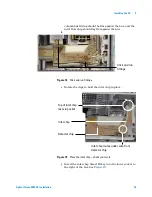
3
Locate the hole in the gasket, align it over the pin on the bus
fitting, and press the gasket body flat against the bus so the
pin fits through the alignment hole.
Split/splitless
Multimode
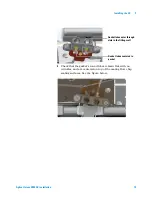
CAUTION
When handling gaskets, especially nickel gaskets, avoid any
deformation. Keep the gasket sealing surfaces flat, with no creases
or wrinkles. Deformation of the sealing surfaces can create leaks.
Avoid contaminating the sealing surfaces.
Содержание Intuvo 9000
Страница 1: ...Agilent Technologies Agilent Intuvo 9000 Gas Chromatograph Installation and First Startup...
Страница 6: ...6 Agilent Intuvo 9000 GC Installation...
Страница 25: ...Installing the GC 1 Agilent Intuvo 9000 GC Installation 25 3 Reinstall the GC covers...
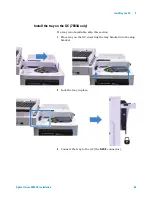
Страница 26: ...26 Agilent Intuvo 9000 GC Installation 1 Installing the GC Connect the power cord and LAN cable LAN...
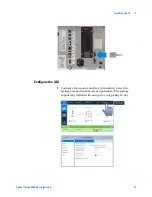
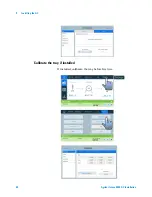
Страница 27: ...Installing the GC 1 Agilent Intuvo 9000 GC Installation 27 Turn on the GC...
Страница 29: ...Installing the GC 1 Agilent Intuvo 9000 GC Installation 29...
Страница 52: ...52 Agilent Intuvo 9000 GC Installation 1 Installing the GC Detector cover Vent chimney Screw O Ring...
Страница 84: ...84 Agilent Intuvo 9000 GC Installation 1 Installing the GC 8 Close the GC front door...
Страница 114: ...Agilent Technologies...


