background image

Using BenchCel Diagnostics

22

G5580A BenchCel Microplate Handler Quick Guide

2

Click 

Initialize this profile

 to establish communication with the BenchCel Microplate 

Handler and load the profile information.

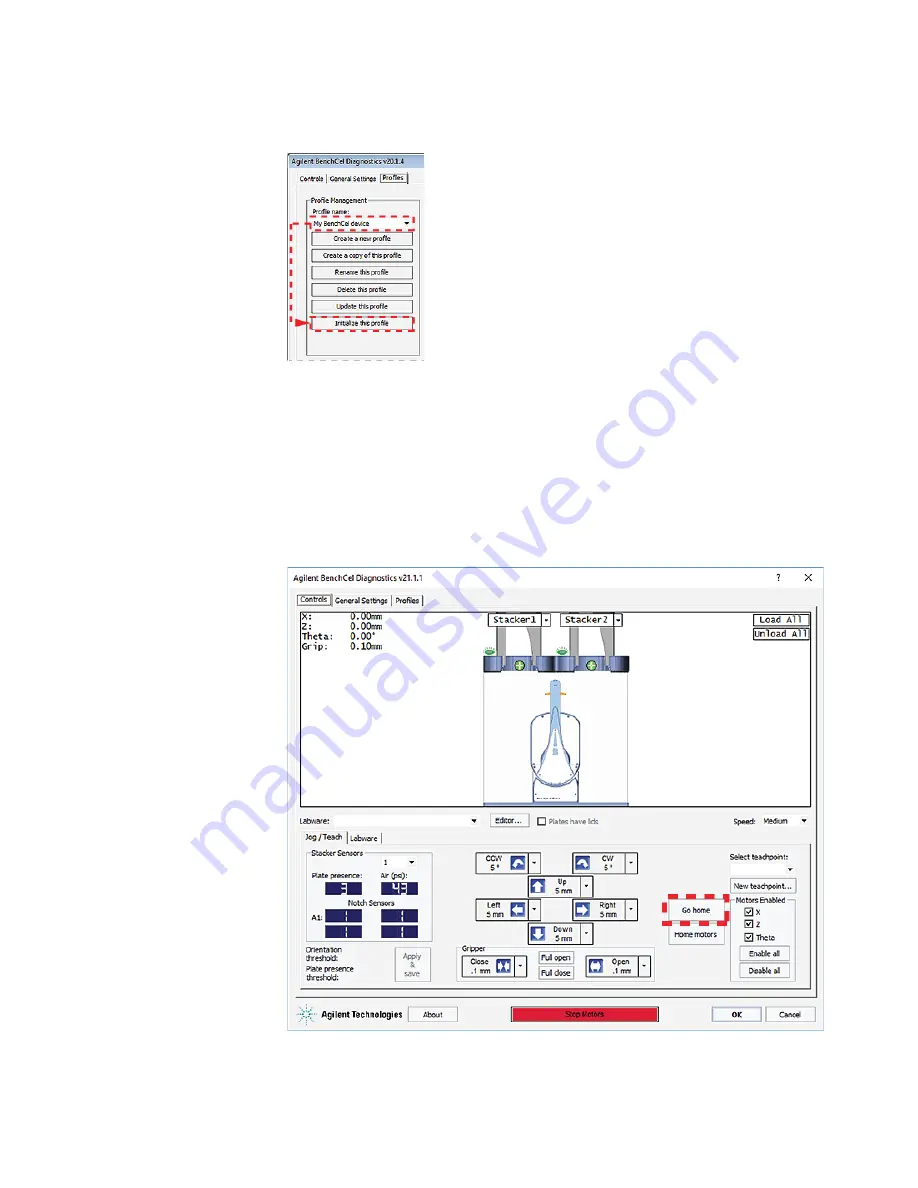
Sending the robot to the home position

The home position is where the robot head is at the center of the BenchCel Microplate 
Handler and the robot arms are perpendicular to the 

x

-axis. You send the robot to the 

home position if you want the robot out of the way in a safe position.

To send the robot to the home position:

1

In the 

Controls

 tab, click the 

Jog/Teach

 tab.

2

Click 

Go Home

.

Содержание BenchCel Microplate Handler

Страница 1: ...nd axes of motion on page 7 Labware considerations on page 11 Starting up and shutting down on page 12 Handling labware racks safely on page 14 Filling and emptying the labware racks on page 14 Instal...

Страница 2: ...dler User Guide You are familiar with the VWorks Automation Control software See the VWorks Automation Control Quick Start For detailed instructions see the VWorks Automation Control User Guide Where...

Страница 3: ...of the device and that you have read the Agilent Automation Solutions Products General Safety Guide and the safety section of the BenchCel Microplate Handler User Guide Figure Safety label location on...

Страница 4: ...n emergency WARNING After pressing the emergency stop button the robot arm might have momentum and continue to move until it comes to the end of its travel in the x axis z axis or theta axis or until...

Страница 5: ...they are not contact Agilent Technical Support Figure Gripper alignment A Correct B Incorrect 3 At the emergency stop pendant turn the button clockwise to restore power to the motors 4 If you stopped...

Страница 6: ...stics use the available commands to manually move the robot or other components including Release the microplate that the robot is currently holding Upstack the microplate that the robot is currently...

Страница 7: ...omponents front view 1 2 3 4 5 6 7 8 9 Item Feature Description 1 Labware rack with labware The accessory that stores labware to be processed in a run 2 Stacker head The structure at which A labware r...

Страница 8: ...ts the interlock circuit and stops the robot motors Use this method of stopping the robot for emergencies only 6 Rack release button The button that unlocks the rack for removal The rack release butto...

Страница 9: ...s that are attached to and rotate about the robot head along the theta axis 9 Robot grippers The structures inside the robot arms that close and open to hold and release a microplate Using the provide...

Страница 10: ...AC power entry Connects the power cord to the BenchCel device 4 Ethernet port Connects the Ethernet cable from the controlling computer to the BenchCel device to allow communication between the comput...

Страница 11: ...tice the gripper microplate contact point Figure Labware rack detail with microplate held by the stacker grippers front view Lidded microplates Microplates that do not have lids or have shallow lids l...

Страница 12: ...at have been through thermal cycling might become warped Tall labware Especially tall tube racks and tip boxes that are taller than 65 mm might pose challenges in the BenchCel device Contact Agilent T...

Страница 13: ...operate the BenchCel Microplate Handler see Using BenchCel Diagnostics on page 20 For instructions on running protocols in BenchCel workstations see the VWorks Automation Control User Guide Shutting d...

Страница 14: ...vy Grasp the rack handle firmly to prevent the rack from slipping or tilting To carry a rack firmly grasp the rack by the handle as shown in the following figure Figure Carrying a front load rack Fill...

Страница 15: ...load rack The doors on the front load rack provide easy access for placing labware into the front of a rack that is installed on a device Before you start If the rack is already installed on the Benc...

Страница 16: ...essing outward on the thumb tabs 3 Carefully lift the labware out through the front of the rack Filling the standard and top load racks WARNING Use care to avoid sliding your hand on the interior edge...

Страница 17: ...ANT If you are removing labware from an installed rack ensure that the stack is unloaded See To verify the stack is in the unloaded state on page 15 2 Carefully slide the labware in small stacks up an...

Страница 18: ...u want to remove and then click Close Stacker grippers When you install the rack the prongs in the labware rack tabs will be inserted into the slots in the clamps If the clamps are open the slots will...

Страница 19: ...e button again To uninstall a rack when rack release button is blue 1 In BenchCel Diagnostics initialize the profile 2 In the Controls tab click Unload All to unload all the stackers See figure item 1...

Страница 20: ...describes the following Opening BenchCel Diagnostics on page 20 Initializing the BenchCel Microplate Handler in Diagnostics on page 21 Sending the robot to the home position on page 22 Homing the rob...

Страница 21: ...ation WARNING When you initialize the BenchCel device the robot head can move To prevent potential injury keep clear of the device while it is in motion CAUTION To prevent potential equipment damage r...

Страница 22: ...information Sending the robot to the home position The home position is where the robot head is at the center of the BenchCel Microplate Handler and the robot arms are perpendicular to the x axis You...

Страница 23: ...ors the robot grippers return to the Gripper open position defined for the selected labware To home the robot 1 In the Controls tab click the Jog Teach tab 2 Click Home Motors Disabling and enabling t...

Страница 24: ...k the directional button Theta Select the option to enable the theta axis motor Clear the check box to disable the theta axis motor Enable All Click to turn on all the motors Disable All Click to turn...

Страница 25: ...u can adjust the speed setting for the x axis z axis and theta axis for each speed high medium or slow as a percentage of the factory set maximum speed To select the robot speed 1 In Diagnostics click...

Страница 26: ...at the teachpoint Pick from teachpoint Picks up the microplate from the selected teachpoint and moves the plate to the ready for upstack position under the stacker head Place at teachpoint Moves the r...

Страница 27: ...open the clamps stacker grippers to remove a microplate CAUTION Opening the clamps stacker grippers might cause the microplate or stack of microplates to drop To open or close the clamps stacker grip...

Страница 28: ...n you can use the commands in Diagnostics to extend or retract the shelves CAUTION Retracting the shelves might cause the microplate or stack of microplates to drop To extend or retract the shelves 1...

Страница 29: ...move the robot head to a convenient position and then open the robot grippers For instructions see Jogging the robot on page 24 2 Unload used labware from the labware racks See Filling and emptying t...

Страница 30: ...www agilent com Agilent Technologies Inc 2020 January 2020 SD V1000027 SD V1000027 Revision B...

Отзывы: