


1-6
Getting Started
Step 3. Connect the Line-Power Cable
Step 3. Connect the Line-Power Cable
C A U T I O N
Always use the three-prong AC power cord supplied with this instrument.
Failure to ensure adequate earth grounding by not using this cord may cause
instrument damage.
C A U T I O N
Do not
connect ac power until you have verified the line voltage is correct as
described in the following paragraphs. Damage to the equipment could result.
C A U T I O N
This instrument has autoranging line voltage input. Be sure the supply voltage
is within the specified range.
1
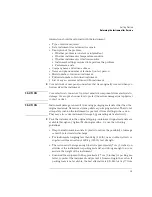
Verify that the line power meets the requirements shown in the following table.
2
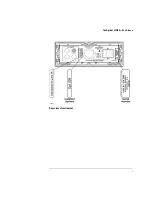
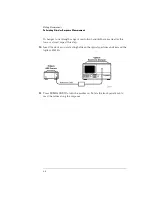
Connect the line-power cord to the instrument’s rear-panel connector.
3
Connect the other end of the line-power cord to the power receptacle.
Various power cables are available to connect the Agilent 83438A to ac power
outlets unique to specific geographic areas. The cable appropriate for the area
to which the Agilent 83438A is originally shipped is included with the unit. You
can order additional ac power cables for use in different geographic areas.
Refer to “Power Cords” on page 4-4.
Line Power Requirements
Power:
115 VAC: 50 WATTS MAX.
230 VAC: 50 WATTS MAX.
Voltage
nominal: 115 VAC / 230 VAC
range 115 VAC: 90-132 V
range 230 VAC: 198-254 V
Frequency
nominals: 50 Hz / 60 Hz
range: 47-63 Hz
Содержание 83437A
Страница 1: ...Agilent 83438A Erbium ASE Source User s Guide ...
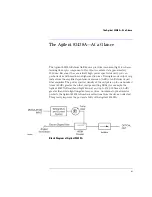
Страница 5: ...v The Agilent 83438A At a Glance Rear view of instrument ...
Страница 8: ......
Страница 10: ......
Страница 24: ...2 4 Making Measurements Performing Stimulus Response Measurements ...
Страница 41: ...3 Specifications 3 3 Regulatory Information 3 6 Specifications and Regulatory Information ...
Страница 47: ...3 7 Specifications and Regulatory Information Regulatory Information Declaration of Conformity I ll ...
Страница 48: ......
Страница 54: ......
Страница 61: ...5 7 Servicing General Information ...
Страница 63: ...5 9 Servicing General Information ...
Страница 79: ...5 25 Servicing Adjustment Procedure ...
Страница 85: ...5 31 Servicing Replacing Instrument Assemblies Location of resistors R2 R8 and R9 ...
Страница 92: ...5 38 Servicing Replaceable Parts ...
Страница 94: ...5 40 Servicing Replaceable Parts ...
Страница 96: ...5 42 Servicing Replaceable Parts ...
Страница 98: ...5 44 Servicing Replaceable Parts ...
Страница 100: ...5 46 Servicing Replaceable Parts ...
Страница 106: ......