background image

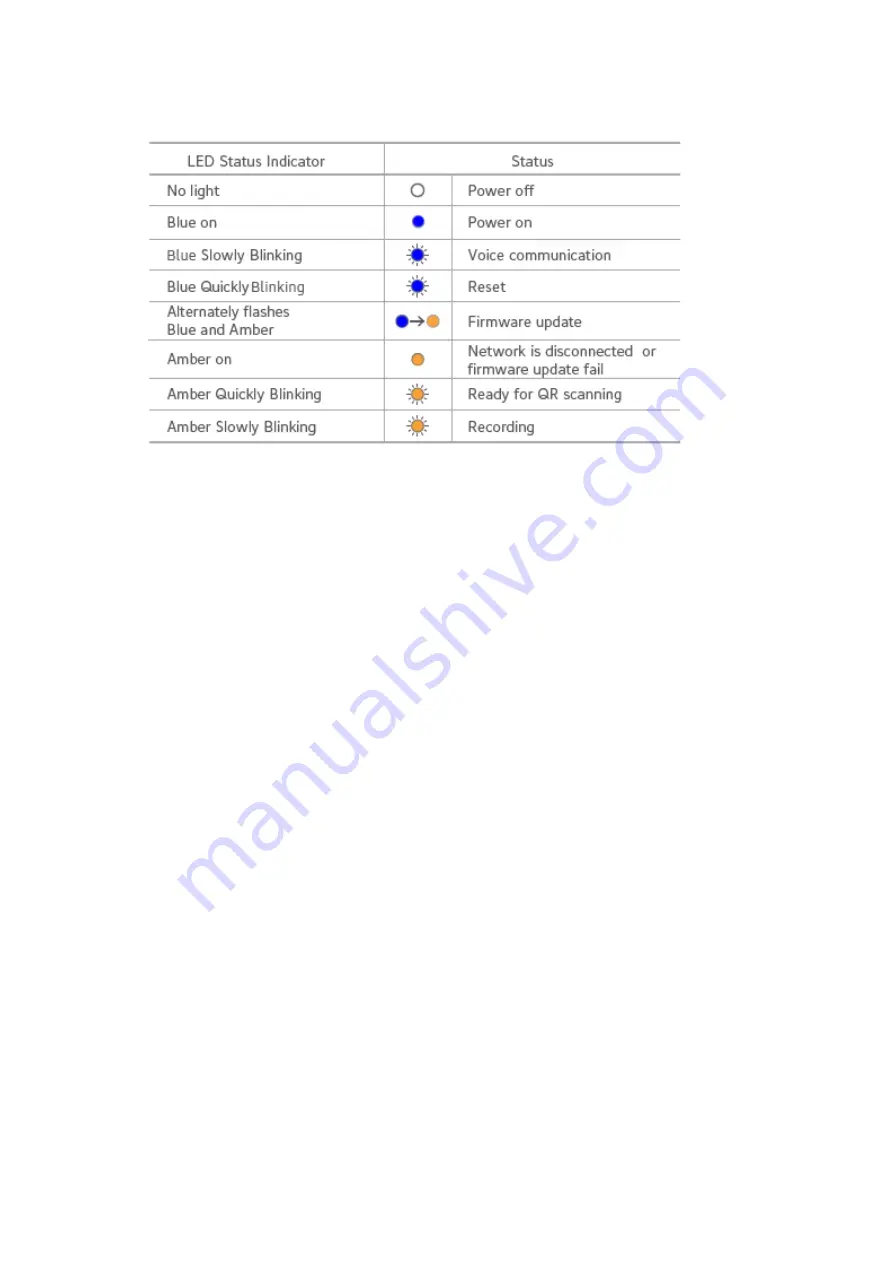
LED Status Indicator


Important safety use information


1.

 For indoor use only.


2.

 Avoid installing in wet or humid places.


3.

 Avoid installing in high temperature environments, such as near radiators, stoves or other 

heat sources.


4.

 Avoid installing on appliances that generate vibration, such as refrigerators or air 

conditioners.


5.

 Avoid installing it near devices that emit strong radio waves as this may degrade wi-fi 

performance.


6.

 This product can be placed on a flat surface, such as a desk or table.


7.

 This product can be mounted on a wall or celling with supporting installation accessories.


8.

 This product do not rotate head over allowed range (-

180⁰ ~ +180⁰).


Содержание GP-AEOCAMEU

Страница 1: ...Cam 360 user guide Modified on Mon 22 Feb 2021 at 9 43 PM Aeotec Cam 360 was develop to wirelessly monitor your home using WiFi communication through SmartThings Connect It is powered by Aeotec WiFi technology ...

Страница 2: ...Get familiar with your Aeotec Cam 360 Package Content Aeotec Cam 360 USB Cabel Power Adapter ...

Страница 3: ...4 Avoid installing on appliances that generate vibration such as refrigerators or air conditioners 5 Avoid installing it near devices that emit strong radio waves as this may degrade wi fi performance 6 This product can be placed on a flat surface such as a desk or table 7 This product can be mounted on a wall or celling with supporting installation accessories 8 This product do not rotate head ov...

Страница 4: ...nes apple com app smartthings samsung connect id1222822904 mt 8 for more details Through QR Code 1 Open SmartThings Connect 2 Tap Add 3 Tap Device 4 Select Scan QR code 5 Scan the QR Codelocated on Aeotec Cam 360 1 If you are having issues select Add Device Manually 2 Input Aeotec Cam 360 Serial Number 6 Plug Cam 360 into any outlet within range of your WiFi Router 7 Once SmartThings Connect disco...

Страница 5: ...the reset button located on the back of Cam 360 for 3 seconds 2 Release the reset button as soon as the LED begins blinking blue 3 The speaker will sound The camera is booting please wait to confirm that it is factory reset 4 Once the LED begins blinking amber the Cam 360 is factory reset and ready to be paired following the pair steps above WiFi Signal Strength This function in SmartThings Connec...

Страница 6: ... but fails to onboard follow the below steps which should help with setup finalization 1 Factory reset Cam 360 2 Confirm that device is within range of your 2 4GHz WiFi network 3 Ensure WiFi credentials were properly entered 4 Reboot your WiFi router and ensure there are no special network settings that may affect discovery mesh networks firewall etc Cam 360 offline If Cam 360 goes offline after i...

Страница 7: ...S or Android Radio protocol WiFi Radio frequency 2 4 GHz WiFi IEEE 802 11 b g n Operation Temperature 20 C 50 C 4 F 122 F Indoor Outdoor use Indoor only Power Supply 5V 2A Micro USB External Power Supply 230V 1A Type C Basic specification Chipset SSC323 CMOS Sensor GC2063 Focal length 3 9mm Angle 110 Diaphragm F2 1 RAM 64MB Flash 32MB Night vision yes Night vison type 8 940nm Night vision distance...

Отзывы: