If the advice does not lead
to the desired result, call the
nearest Authorized Service
Centre.
8.2
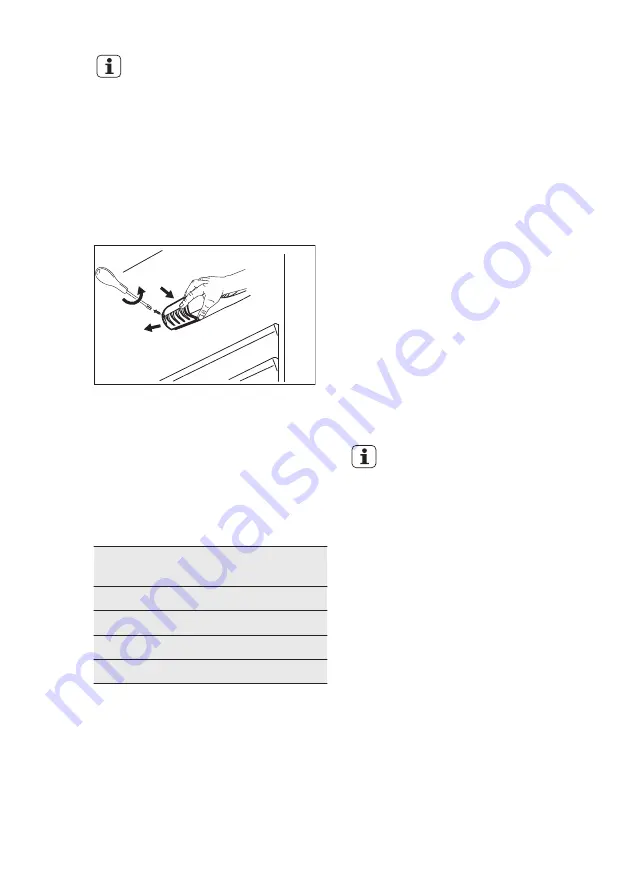
Replacing the lamp
Disconnect the plug from the mains
socket.
1.
Remove the screw from the lamp
cover.
2.
Remove the lamp cover (refer to the
illustration).
3.
Replace the used lamp with a new
lamp of the same power and
specifically designed for household
appliances (the maximum power is
shown on the lamp cover).
4.
Install the lamp cover.
5.
Tighten the screw to the lamp cover.
6.
Connect the plug to the mains
socket.
7.
Open the door.
Make sure that the light comes on.
8.3
Closing the door
1.
Clean the door gaskets.
2.
If necessary, adjust the door. Refer to
"Installation".
3.
If necessary, replace the defective
door gaskets. Contact the Authorised
Service Centre.
9.
INSTALLATION
9.1
Positioning
This appliance can be installed in a dry,
well ventilated indoor where the ambient
temperature corresponds to the climate
class indicated on the rating plate of the
appliance:
Climate
class
Ambient temperature
SN
+10°C to + 32°C
N
+16°C to + 32°C
ST
+16°C to + 38°C
T
+16°C to + 43°C
Some functional problems
might occur for some types
of models when operating
outside of that range. The
correct operation can only
be guaranteed within the
specified temperature
range. If you have any
doubts regarding where to
install the appliance, please
turn to the vendor, to our
customer service or to the
nearest Authorised Service
Centre.
9.2
Electrical connection
• Before plugging in, ensure that the
voltage and frequency shown on the
rating plate correspond to your
domestic power supply.
• The appliance must be earthed. The
power supply cable plug is provided
with a contact for this purpose. If the
domestic power supply socket is not
earthed, connect the appliance to a
separate earth in compliance with
www.aeg.com
30
Содержание SDS51400S1
Страница 75: ...DEUTSCH 75 ...
Страница 76: ...www aeg com shop 222371838 A 202015 ...


