GB
19
Cooling/warming process
1. For sanitary reasons, clean the inside of the fridge with a damp cloth before
every use.
2. Fill the fridge with the items to be cooled/warmed.
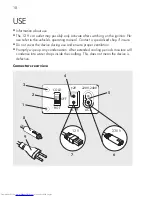
3. Plug the respective connecting cable into the connection socket of the fridge.
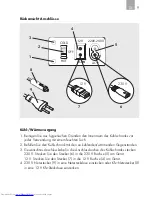
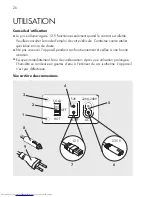
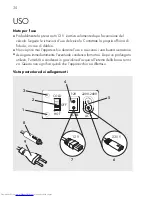
230 V: insert the plug (6) into the 230 V socket (5) on the appliance.
12 V: insert the plug (7) into the 12 V socket (4) on the appliance.
4. insert the 230 V mains plug (9) into a mains outlet or the car plug (8) into a
12 V car outlet.
5. Powering on the fridge:
cooling: set the switch (2) to the „cOlD“ position
Warming: set the switch (2) to the „hOT“ position
6. The fridge will start cooling. The lED will light up green (3 - cool) or red (1 -
warm).
attention: The device does not shut off automatically. The cooling unit will run con-
stantly whilst the coolbag is connected to a power source. remember this will drain
the vehicle’s battery if the vehicle is not running.
7. set the switch (2) to the „OFF“ position to end cooling/warming.
8. Unplug the 230 V mains plug (9) from the mains outlet or the car plug (8) from
the 12 V car outlet and carefully roll up the cable.
9. clean and dry the inside of the fridge after use. This will prevent mould.
Tips for achieving the best cooling power
▪
select a well ventilated location for use, away from sunlight.
▪
allow warm foods to first cool off before cooling them in the coolbag.
▪
Do not open the coolbag more often than necessary.
▪
Do not leave the coolbag open longer than necessary.

