background image

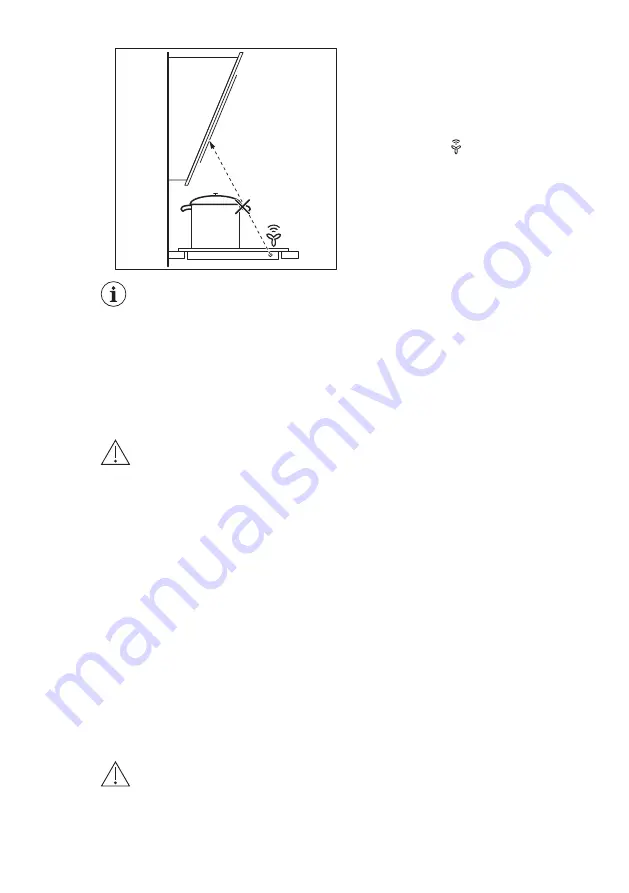
It may happen that other

remote controlled

appliances may block the

signal. To avoid it do not

operate the remote of the

appliance and the hob at the

same time.

Cooker hoods with the Hob²Hood

function

To find the full range of cooker hoods

which work with this function refer to our

consumer website. The AEG cooker

hoods that work with this function must
have the symbol  .

6. 

CARE AND CLEANING

WARNING!

Refer to Safety chapters.

6.1 

General information

• Clean the hob after each use.

• Always use cookware with clean

bottom.

• Scratches or dark stains on the surface

have no effect on how the hob

operates.

• Use a special cleaner applicable for

the surface of the hob.

• Use a special scraper for the glass.

6.2 

Cleaning the hob

Remove immediately:

 melted plastic,

plastic foil, sugar and food with sugar.

If not, the dirt can cause damage to

the hob. Take care to avoid burns. Put

the special scraper on the glass

surface at an acute angle and move

the blade on the surface.

Remove when the hob is sufficiently

cool:

 limescale rings, water rings, fat

stains, shiny metallic discoloration.

Clean the hob with a moist cloth and

non-abrasive detergent. After

cleaning, wipe the hob dry with a soft

cloth.

Remove shiny metallic

discoloration:

 use a solution of water

with vinegar and clean the glass

surface with a moist cloth.

7. 

TROUBLESHOOTING

WARNING!

Refer to Safety chapters.

ENGLISH

15

Содержание HKL85410XB

Страница 1: ...EN User Manual 2 Hob FR Notice d utilisation 22 Table de cuisson HKL85410XB ...

Страница 2: ...few minutes reading to get the very best from it Visit our website for Get usage advice brochures trouble shooter service information www aeg com webselfservice Register your product for better service www registeraeg com Buy Accessories Consumables and Original spare parts for your appliance www aeg com shop CUSTOMER CARE AND SERVICE Always use original spare parts When contacting our Authorised ...

Страница 3: ...packaging away from children and dispose of it appropriately Keep children and pets away from the appliance when it operates or when it cools down Accessible parts are hot If the appliance has a child safety device this should be activated Children shall not carry out cleaning and user maintenance of the appliance without supervision Children aged 3 years and under must be kept away from this appl...

Страница 4: ...ING Use only hob guards designed by the manufacturer of the cooking appliance or indicated by the manufacturer of the appliance in the instructions for use as suitable or hob guards incorporated in the appliance The use of inappropriate guards can cause accidents 2 SAFETY INSTRUCTIONS 2 1 Installation WARNING Only a qualified person must install this appliance Remove all the packaging Do not insta...

Страница 5: ...licable or to the mains cable Contact our Authorised Service Centre or an electrician to change a damaged mains cable The shock protection of live and insulated parts must be fastened in such a way that it cannot be removed without tools Connect the mains plug to the mains socket only at the end of the installation Make sure that there is access to the mains plug after the installation If the main...

Страница 6: ...h empty cookware or without cookware Do not put aluminium foil on the appliance Cookware made of cast iron aluminium or with a damaged bottom can cause scratches on the glass glass ceramic Always lift these objects up when you have to move them on the cooking surface This appliance is for cooking purposes only It must not be used for other purposes for example room heating 2 4 Care and cleaning Cl...

Страница 7: ...ld Function Comment 1 ON OFF To activate and deactivate the hob 2 Lock The Child Safety De vice To lock unlock the control panel 3 STOP GO To activate and deactivate the function 4 Bridge To activate and deactivate the function 5 Heat setting display To show the heat setting 6 Timer indicators of cooking zones To show for which zone you set the time 7 Timer display To show the time in minutes 8 Ho...

Страница 8: ...at Control 3 step Residual heat indicator continue cooking keep warm residual heat Lock The Child Safety Device function operates Incorrect or too small cookware or no cookware on the cooking zone Automatic Switch Off function operates 3 4 OptiHeat Control 3 step Residual heat indicator WARNING There is a risk of burns from residual heat The indicator shows the level of the residual heat The induc...

Страница 9: ...4 7 5 hours 8 9 4 hours 10 14 1 5 hour 4 3 The heat setting To set or change the heat setting Touch the control bar at the correct heat setting or move your finger along the control bar until you reach the correct heat setting 4 4 Cooking zone indication The horizontal line shows the maximum size of the cookware The break in the horizontal line shows the minimum cookware diameter min max Refer to ...

Страница 10: ...r To deactivate the function set the cooking zone with and touch The remaining time counts back to 00 The indicator of the cooking zone goes out When the time comes to an end the sound operates and 00 flashes The cooking zone deactivates To stop the sound touch CountUp Timer The count up timer You can use this function to monitor how long the cooking zone operates To set the cooking zone touch aga...

Страница 11: ...Touch for 4 seconds Set the heat setting in 10 seconds You can operate the hob When you deactivate the hob with the function operates again 4 12 OffSound Control Deactivating and activating the sounds Deactivate the hob Touch for 3 seconds The display comes on and goes out Touch for 3 seconds or comes on Touch of the timer to choose one of the following the sounds are off the sounds are on To conf...

Страница 12: ... speed 1 Fan speed 1 Mode H5 On Fan speed 1 Fan speed 2 Mode H6 On Fan speed 2 Fan speed 3 1 The hob detects the boiling process and acti vates fan speed in accordance with automatic mode 2 The hob detects the frying process and acti vates fan speed in accordance with automatic mode 3 This mode activates the fan and the light and does not rely on the temperature Changing the automatic mode 1 Deact...

Страница 13: ... The bottom of the cookware must be as thick and flat as possible Cookware dimensions Induction cooking zones adapt to the dimension of the bottom of the cookware automatically to some limit The cooking zone efficiency is related to the diameter of the cookware The cookware with a smaller diameter than the minimum receives only a part of the power generated by the cooking zone Refer to Technical i...

Страница 14: ...es 20 60 Use max l water for 750 g of potatoes 7 9 Cook larger quantities of food stews and soups 60 150 Up to 3 l liquid plus ingredi ents 9 12 Gentle fry escalope veal cor don bleu cutlets rissoles sausages liver roux eggs pancakes doughnuts as nec essary Turn halfway through 12 13 Heavy fry hash browns loin steaks steaks 5 15 Turn halfway through 14 Boil water cook pasta sear meat goulash pot r...

Страница 15: ...w the hob operates Use a special cleaner applicable for the surface of the hob Use a special scraper for the glass 6 2 Cleaning the hob Remove immediately melted plastic plastic foil sugar and food with sugar If not the dirt can cause damage to the hob Take care to avoid burns Put the special scraper on the glass surface at an acute angle and move the blade on the surface Remove when the hob is su...

Страница 16: ...n acoustic signal sounds and the hob deactivates An acoustic signal sounds when the hob is deactivated You put something on one or more sensor fields Remove the object from the sensor fields The hob deactivates You put something on the sensor field Remove the object from the sensor field Residual heat indicator does not come on The zone is not hot because it operated only for a short time If the z...

Страница 17: ... the bottom of the cookware is too small for the zone Use cookware with correct dimensions Refer to Technical informa tion chapter and a number come on There is an error in the hob Disconnect the hob from the electrical supply for some time Disconnect the fuse from the electrical system of the house Connect it again If comes on again speak to an Authorised Service Centre comes on There is an error...

Страница 18: ...Service Centre and conditions of guarantee are in the guarantee booklet 8 INSTALLATION WARNING Refer to Safety chapters 8 1 Before the installation Before you install the hob write down the information bellow from the rating plate The rating plate is on the bottom of the hob Serial number 8 2 Built in hobs Only use the built in hobs after you assemble the hob into correct built in units and work s...

Страница 19: ... 12 mm 28 mm 38 mm B 57 mm 41 mm 31 mm min 30 mm min 500 mm 20 mm 20 mm min 2 mm A B A 12 mm 28 mm 38 mm B 57 mm 41 mm 31 mm min 500 mm R 5mm min 55mm 490 1 mm 750 1mm min 38 mm min 2 mm min 12 mm min 2 mm ENGLISH 19 ...

Страница 20: ...AU 220 240 V 50 60 Hz Induction 7 4 kW Made in Germany Ser Nr 7 4 kW AEG 9 2 Cooking zones specification Cooking zone Nominal power maximum heat setting W Power function W Power function maximum dura tion min Cookware diam eter mm Left front 2300 3200 10 125 210 Left rear 2300 3200 10 125 210 Middle front 1400 2500 4 125 145 Right rear 1800 3500 2800 3700 5 5 145 245 245 280 The power of the cooki...

Страница 21: ...y the crosses of the respective cooking zones 10 2 Energy saving You can save energy during everyday cooking if you follow below hints When you heat up water use only the amount you need If it is possible always put the lids on the cookware Before you activate the cooking zone put the cookware on it Put the smaller cookware on the smaller cooking zones Put the cookware directly in the centre of th...

Страница 22: ...endre quelques instants pour lire cette notice afin d utiliser au mieux votre appareil Visitez notre site Internet pour Obtenir des conseils d utilisation des brochures de l aide des informations www aeg com webselfservice Enregistrer votre produit pour obtenir un meilleur service www registeraeg com Acheter des accessoires consommables et pièces de rechange d origine pour votre appareil www aeg c...

Страница 23: ...nt les risques encourus Ne laissez pas les enfants jouer avec l appareil Ne laissez pas les emballages à la portée des enfants et jetez les convenablement Tenez les enfants et les animaux éloignés de l appareil lorsqu il est en cours de fonctionnement ou lorsqu il refroidit Les parties accessibles sont chaudes Si l appareil est équipé d un dispositif de sécurité enfants nous vous recommandons de l...

Страница 24: ... ou couvercles sur la table de cuisson car ils pourraient chauffer N utilisez pas de nettoyeur vapeur pour nettoyer l appareil Après utilisation éteignez toujours la zone de cuisson à l aide de la manette de commande correspondante et ne vous fiez pas à la détection des récipients Si la surface vitrocéramique en verre est fissurée éteignez l appareil pour éviter tout risque d électrocution Si le c...

Страница 25: ...t électrique AVERTISSEMENT Risque d incendie ou d électrocution L ensemble des branchements électriques doit être effectué par un technicien qualifié L appareil doit être relié à la terre Avant toute intervention assurez vous que l appareil est débranché Vérifiez que les données électriques figurant sur la plaque signalétique correspondent à celles de votre réseau Si ce n est pas le cas contactez ...

Страница 26: ...l pour éviter tout risque d électrocution Les porteurs de pacemakers doivent rester à une distance minimale de 30 cm des zones de cuisson à induction lorsque l appareil est en cours de fonctionnement Lorsque vous versez un aliment dans de l huile chaude elle peut éclabousser AVERTISSEMENT Risque d incendie et d explosion Les graisses et l huile chaudes peuvent dégager des vapeurs inflammables Tene...

Страница 27: ... un chiffon doux humide Utilisez uniquement des produits de lavage neutres N utilisez pas de produits abrasifs de tampons à récurer de solvants ni d objets métalliques 2 5 Mise au rebut AVERTISSEMENT Risque de blessure ou d asphyxie Contactez votre service municipal pour obtenir des informations sur la marche à suivre pour mettre l appareil au rebut Débranchez l appareil de l alimentation électriq...

Страница 28: ...u minuteur des zones de cuisson Pour indiquer la zone à laquelle se réfère la durée sélectionnée 7 Affichage du minuteur Pour indiquer la durée en minutes 8 Hob Hood Pour activer et désactiver le mode manuel de la fonction 9 Pour choisir la zone de cuisson 10 Pour augmenter ou diminuer la durée 11 Fonction Booster Pour activer et désactiver la fonction 12 Bandeau de sélection Pour sélectionner un ...

Страница 29: ...e cuisson 4 2 Arrêt automatique Cette fonction arrête la table de cuisson automatiquement si toutes les zones de cuisson sont désactivées vous ne réglez pas le niveau de cuisson après avoir allumé la table de cuisson vous avez renversé quelque chose ou placé un objet sur le bandeau de commande pendant plus de 10 secondes une casserole un torchon etc Un signal sonore retentit et la table de cuisson...

Страница 30: ...ouches sensitives Pour désactiver la fonction appuyez sur Les zones de cuisson fonctionnent de nouveau de manière indépendante 4 6 Démarrage automatique de la cuisson Activez cette fonction pour obtenir le niveau de cuisson souhaité plus rapidement Lorsqu elle est activée la zone commence par chauffer au niveau de cuisson le plus élevé puis revient au niveau de cuisson souhaité Pour activer la fon...

Страница 31: ...our sélectionner la zone de cuisson appuyez sur à plusieurs reprises jusqu à ce que l indicateur de la zone de cuisson correspondante s affiche Pour activer la fonction appuyez sur la touche du minuteur s allume Lorsque le voyant de la zone de cuisson clignote lentement le minuteur démarre L affichage indique en alternance et le nombre de minutes écoulées Pour contrôler la durée de fonctionnement ...

Страница 32: ...sur s allume Appuyez sur pendant 4 secondes Réglez le niveau de cuisson dans les 10 secondes qui suivent Vous pouvez utiliser la table de cuisson Lorsque vous éteignez la table de cuisson avec la fonction est de nouveau activée 4 12 OffSound Control Activation et désactivation des signaux sonores Éteignez la table de cuisson Appuyez sur pendant 3 secondes L affichage s allume puis s éteint Appuyez...

Страница 33: ...uisson La table de cuisson détecte automatiquement la température du récipient et ajuste la vitesse du ventilateur Modes automatiques Éclaira ge auto matique Faire bouillir1 Faire fri re2 Mode H0 Désac Désac Désac Mode H1 On Désac Désac Mode H2 3 On Vitesse du venti lateur 1 Vitesse du venti lateur 1 Mode H3 On Désac Vitesse du venti lateur 1 Mode H4 On Vitesse du venti lateur 1 Vitesse du venti l...

Страница 34: ...de l éclairage Vous pouvez régler la table de cuisson pour activer automatiquement l éclairage dès que la table de cuisson est allumée Pour ce faire réglez le mode automatique sur H1 H6 L éclairage de la hotte s éteint 2 minutes après avoir éteint la table de cuisson 5 CONSEILS AVERTISSEMENT Reportez vous aux chapitres concernant la sécurité 5 1 Ustensiles de cuisson Sur les zones de cuisson à ind...

Страница 35: ...le niveau de cuisson et la consommation énergétique de la zone de cuisson n est pas linéaire Lorsque vous augmentez le niveau de cuisson l augmentation énergétique de la zone de cuisson n est pas proportionnelle Cela signifie que la zone de cuisson utilisée à un niveau de cuisson moyen utilise moins de la moitié de sa puissance Les valeurs figurant dans le tableau suivant sont fournies à titre ind...

Страница 36: ... cuisson avec la fonction Protégez le bandeau de commande de la hotte des rayons directs du soleil Ne dirigez pas de lumière halogène sur le bandeau de commande de la hotte Ne recouvrez pas le bandeau de commande de la table de cuisson N interrompez pas le signal entre la table de cuisson et la hotte par exemple avec une main ou une poignée d ustensile de cuisine Observez l image La hotte de l ill...

Страница 37: ...s de calcaire et d eau projections de graisse décolorations métalliques luisantes Nettoyez la table de cuisson à l aide d un chiffon humide et d un détergent non abrasif Après le nettoyage séchez la table de cuisson à l aide d un chiffon doux Pour retirer les décolorations métalliques brillantes utilisez une solution d eau additionnée de vinaigre et nettoyez la surface vitrée avec un chiffon humid...

Страница 38: ...e la touche sensitive Le voyant de chaleur rési duelle ne s allume pas La zone de cuisson n est pas chaude parce qu elle n a fonctionné que peu de temps Si la zone de cuisson a eu as sez de temps pour chauffer faites appel à votre service après vente agréé La fonction Hob Hood ne fonctionne pas Vous avez couvert le ban deau de commande Retirez l objet du bandeau de commande La fonction de démarrag...

Страница 39: ... de di mensions appropriées Reportez vous au chapitre Caractéristiques techni ques et un chiffre s affichent Une erreur s est produite dans la table de cuisson Débranchez la table de cuis son de l alimentation électri que pendant quelques mi nutes Déconnectez le fu sible de l installation domes tique Rebranchez l appareil Si s affiche à nouveau faites appel au service après vente agréé s allume Un...

Страница 40: ...près vente et aux conditions de garantie figurent dans le livret de garantie 8 INSTALLATION AVERTISSEMENT Reportez vous aux chapitres concernant la sécurité 8 1 Avant l installation Avant d installer la table de cuisson notez les informations de la plaque signalétique ci dessous La plaque signalétique se trouve au bas de la table de cuisson Numéro de série 8 2 Tables de cuisson intégrées Les table...

Страница 41: ...12 mm 28 mm 38 mm B 57 mm 41 mm 31 mm min 30 mm min 500 mm 20 mm 20 mm min 2 mm A B A 12 mm 28 mm 38 mm B 57 mm 41 mm 31 mm min 500 mm R 5mm min 55mm 490 1 mm 750 1mm min 38 mm min 2 mm min 12 mm min 2 mm FRANÇAIS 41 ...

Страница 42: ...097 01 Type 60 GBD CN AU 220 240 V 50 60 Hz Induction 7 4 kW Fabriqué en Allemagne Numéro de série 7 4 kW AEG 9 2 Caractéristiques des zones de cuisson Zone de cuis son Puissance no minale niveau de cuisson max W Fonction Boos ter W Fonction Boos ter durée maxi male min Diamètre du ré cipient mm Avant gauche 2300 3200 10 125 210 Arrière gauche 2300 3200 10 125 210 Avant centrale 1400 2500 4 125 14...

Страница 43: ... 10 2 Économie d énergie Vous pouvez économiser de l énergie au quotidien en suivant les conseils suivants Si vous faites chauffer de l eau ne faites chauffer que la quantité dont vous avez réellement besoin Si possible couvrez toujours les récipients de cuisson avec un couvercle pendant la cuisson Activez toujours la zone de cuisson après avoir posé le récipient dessus Placez les plus petits réci...

Страница 44: ...www aeg com shop 867328345 A 182016 ...

Отзывы: