


INSTALLATION
23
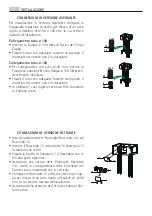
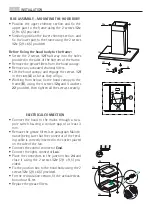
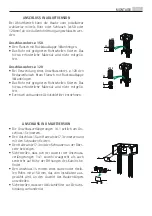
FLUE ASSEMBLY - MOUNTING THE HOOD BODY
• Position the upper chimney section and fix the
upper part to the frame using the 2 screws
12c
(2,9 x 6,5) provided.
• Similarly, position the lower chimney section and
fix the lower part to the frame using the 2 screws
12c
(2,9 x 6,5) provided.
Before fixing the hood body to the frame:
• Screw the 2 screws
12f
half way into the holes
provided in the sides of the bottom of the frame.
• Remove the grease filters from the hood canopy.
• Remove any activated charcoal filters.
• Lift the hood canopy and engage the screws
12f
in the slots (
A
) as far as they will go.
• Working from below, fix the hood canopy to the
frame (
B
), using the 4 screws
12q
and 4 washers
22
provided, then tighten all the screws securely.
ELECTRICAL CONNECTION
• Connect the hood to the mains through a two-
pole switch ha-ving a contact gap of at least 3
mm.
• Remove the grease filters (see paragraph Mainte-
nance) being sure that the connector of the feed-
ing cable is correctly inserted in the socket placed
on the side of the fan.
• Connect the control connector
Cmd
.
• Connect the lights connector
Lux
.
• Place the connectors in the junction box
24
and
close it using the 2 screws
12e
(2,9 x 9,5) pro-
vided.
• Fix the junction box to the hood body using the 2
screws
12c
(2,9 x 6,5) provided.
• For the recirculation version, fit the activated car-
bon odour fil-ter.
• Replace the grease filters.
�
�
��
���
���
���
���
��
���
���
���
���
Содержание DI7490-M
Страница 2: ......
Страница 6: ...CARATTERISTICHE 6 CARATTERISTICHE Ingombro ...
Страница 18: ...CHARACTERISTICS 18 CHARACTERISTICS Dimensions ...
Страница 28: ...28 INHALT 29 30 32 36 37 Empfehlungen Und Hinweise Charakteristiken Montage Bedienung Wartung Inhalt ...
Страница 30: ...CHARAKTERISTIKEN 30 CHARAKTERISTIKEN Platzbedarf ...
Страница 40: ...40 СОДЕРЖАНИЕ 5 6 8 12 13 Советы и рекомендации Характеристики Установка Эксплуатация Уход Содержание ...
Страница 42: ...ХАРАКТЕРИСТИКИ 42 ХАРАКТЕРИСТИКИ Габариты ...
Страница 52: ...52 ZAWARTOŚĆ 5 6 8 12 13 Uwagi i sugestie Właściwości techniczne Instalacja Użytkowanie Konserwacja Zawartość ...
Страница 54: ...WŁAŚCIWOŚCI TECHNICZNE 54 WŁAŚCIWOŚCI TECHNICZNE Wymiary ...
Страница 64: ...64 65 66 68 72 73 Рекомендації Та Поради ОсобливостІ Встановлення Використання ОБСЛУГОВУВАННЯ резюме РЕЗЮМЕ ...
Страница 66: ...Особливості 66 Особливості розмір ...
Страница 76: ...76 IÇERIK 77 78 80 84 85 Tavsiyeler Ve Öneriler Özellikler Montaj Kullanim Bakim Içerik ...
Страница 78: ...ÖZELLIKLER 78 ÖZELLIKLER Boyutlar ...
Страница 87: ......
Страница 88: ...www aeg electrolux com shop 436005006_05 110518 ...