background image

5

Deutsch

2. Geräteübersicht

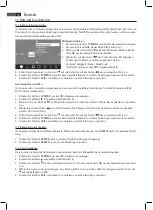
2.1 Bedienelemente und Anschlüsse

1

LCD Display

2

Ein-/Ausschalter

3

Empfänger für die Fernbedienungssignale

4

Betriebskontrollleuchte (Betrieb = blau, Standby = rot)

5

INPUT

Signalquelle wählen

6

MENU

OSD Menü öffnen/schließen

7

CH+/CH-

Kanal wählen (nächster/vorheriger Programmplatz). Im Menü eine Position nach oben/unten.

8

VOL+/VOL-

Lautstärke regeln. Im Menü eine Position nach rechts/links / Auswahl bestätigen.

9

POWER

Schaltet das Gerät in den Standby-Modus

10

RF

75 Ohm Antenneneingang

11

VGA

PC Eingang

12

PC AUDIO

Audioeingang

13

CI

Common Interface Anschluss (Optional) 

WICHTIG: 

Nur für verschlüsselte (Pay- TV) DVB-T 

Programme! Fragen Sie bei Ihrem Programmanbieter oder im Fachhandel nach, ob DVB-T Pay-TV in 

Ihrem Sendegebiet angeboten wird!

14

HEADPHONE

Kopfhöreranschluss

15

HDMI1

Eingang

16

HDMI2

Eingang

17

USB

USB Anschluss

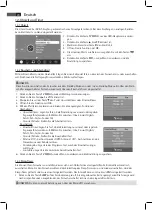
2.2 Rückansicht (Anschluss)

1  R/L – Audioeingänge (Rechts/Links)

2  AV - Videoeingang

3  Y / Pb / Pr Componenten Video Eingang

4  SCART Anschluss

Содержание CTV 1902 LED/DVB-T

Страница 1: ...Bedienungsanleitung Garantie Manuel d utilisation Instruction Manual PERFECT IN FORM AND FUNCTION CTV 1902 LED DVB T ...

Страница 2: ...geeigneten Standort für das Gerät geeignet wäre eine trockene ebene rutschfeste Fläche auf der Sie das Gerät gut bedienen können Um eine Beschädigung zu vermeiden den Bildschirm nicht mit Lösungsmitteln in Berührung bringen Berühren Sie das Display nicht unnötig üben Sie keinen Druck auf dessen Oberfläche aus und berühren Sie es nicht mit spitzen oder scharfen Gegenständen Das Gerät nicht weiter b...

Страница 3: ...tzanschluss 8 4 5 Erstes Einschalten 8 4 6 Quelle Auswählen 9 5 Externe Geräte anschließen 9 6 Grundlegende Bedienung 10 6 1 Fernseher ein und ausschalten 10 6 2 Fernsehprogramme auswählen 10 6 3 Lautstärke regeln 10 6 4 Schnellzugriff 10 6 5 Struktur des OSD Menüs 10 7 Sender suchen und bearbeiten 11 7 1 Sender speichern 11 7 2 DVB T Sender manuell speichern 11 7 3 Manuelle Sendersuche für analog...

Страница 4: ...2 3 Sleep Timer 20 12 4 Ausschaltautomatik Auto Sleep 21 12 5 Zeitzone 21 13 Teletext 21 14 Sonderfunktionen 22 14 1 Spracheinstellungen 22 14 2 PVR File System 22 14 3 Werkseinstellung 22 15 Sperrfunktionen 23 15 1 Sperren 23 15 2 Hotel Modus 23 16 Störungserkennung 24 17 Technische Daten 25 18 Garantiebedingungen 25 19 Garantieabwicklung 26 20 Bedeutung des Symbols Mülltonne 26 ...

Страница 5: ...ion nach rechts links Auswahl bestätigen 9 POWER Schaltet das Gerät in den Standby Modus 10 RF 75 Ohm Antenneneingang 11 VGA PC Eingang 12 PC AUDIO Audioeingang 13 CI Common Interface Anschluss Optional WICHTIG Nur für verschlüsselte Pay TV DVB T Programme Fragen Sie bei Ihrem Programmanbieter oder im Fachhandel nach ob DVB T Pay TV in Ihrem Sendegebiet angeboten wird 14 HEADPHONE Kopfhöreranschlu...

Страница 6: ...22 Rot Grün Gelb Blau Im Videotext zum Aufrufen der angezeigten Seiten Im Menü zum Bearbeiten von Programmen REVEAL Verborgene Videotextinformationen anzeigen HOLD Videotext auf der aktuellen Seite anhalten LIST Zum Festlegen von vier Favoriten Videotext Seiten INDEX Anzeige der Videotextzeit Anzeige der Indexseite 100 bei aktiviertem Videotext SUBPAGE Im Videotext zum Anwählen der Unterseiten SIZ...

Страница 7: ... Batterien niemals ins Feuer Es besteht Explosionsgefahr Entnehmen Sie erschöpfte Batterien aus dem Gerät Entnehmen Sie die Batterien wenn das Gerät für einen länge ren Zeitraum nicht benutz wird um ein Auslaufen von Batteriesäure zu vermeiden Kommen Sie mit Batteriesäure in Berührung so waschen Sie die Stelle gründlich 4 Erste Schritte 4 1 Lieferumfang Vergewissern Sie sich beim Auspacken dass fo...

Страница 8: ... Ohm Antennenkabel an Ihrem Antennenanschluss an 2 Stecken Sie das andere Ende in die Antennenbuchse RF Diese befindet sich auf der Rückseite des Fernsehers 3 Wählen Sie den Eingang ATV im Menü Eingangsquelle SOURCE Taste HINWEIS Zum Empfang eines Programmes muss zunächst eine Sendersuche durchgeführt werden siehe 4 5 Erstes Einschalten auf Seite 8 4 4 Netzanschluss Das Fernsehgerät ist für Wechse...

Страница 9: ... B eine Videokamera anschließen Schließen Sie das Gerät mit einem Cinch Kabel RCA an die Buchsen VIDEO L und R an WICHTIG Achten Sie beim Anschluss über ein AV Kabel darauf dass die Farben der Anschlüsse übereinstimmen Video gelb Audio L weiß und Audio R rot Wählen Sie den Eingang AV im Menü Eingangsquelle SOURCE Taste PC Anschluss Verbinden Sie mit einem VGA Kabel die Monitor Buchse des PCs und d...

Страница 10: ... oder die Zifferntasten 0 9 um das gewünschte Fernsehprogramm auszuwählen Drücken Sie die Taste RECALL auf der Fernbedienung um das vorherige Programm anzuschauen Eine Übersicht über die Programmbelegung erhalten Sie durch Drücken der Taste CH LIST Markieren Sie einen Programmplatz mit den Pfeiltasten und drücken OK um das Programm aufzurufen 6 3 Lautstärke regeln Verwenden Sie die Tasten VOL um d...

Страница 11: ...nü mit DTV angezeigt Analoge Sender werden im OSD Menü mit ATV angezeigt 7 1 Sender speichern 1 Drücken Sie die Taste TV MENU um das OSD Hauptmenü anzuzei gen 2 Wählen Sie im Menü KANALEINGABE mit der Taste Programm suchlauf 3 Drücken Sie OK Wählen Sie mit den Tasten eine der drei Such laufmethoden aus DTV ATV DTV ATV Drücken Sie anschließend die Taste 4 Wählen Sie nun mit den Tasten das Land in d...

Страница 12: ...rschieben tauschen oder übersprin gen Sender verschieben tauschen 1 Drücken Sie die Taste TV MENU um das OSD Hauptmenü anzuzeigen 2 Wählen Sie im Menü KANALEINGABE mit der Taste Programme Bearbeiten und drücken OK 3 Markieren Sie mit den Sender der verschoben getauscht werden soll 4 Drücken Sie die gelbe Taste Der Programmplatz wird gelb markiert 5 Geben Sie den gewünschten Programmplatz mit den Z...

Страница 13: ...Smartcard anzeigen lassen 1 Drücken Sie die Taste TV MENU um das OSD Hauptmenü anzuzeigen 2 Wählen Sie im Menü KANALEINGABE mit der Taste CI Information und drücken OK HINWEIS Verschlüsselte DVB T Programme werden nicht in allen Sendegebieten angeboten Informationen hierzu erhalten Sie bei den Programmanbietern oder im Fachhandel 7 6 Empfangsinformationen anzeigen Sie können zum aktuell angezeigte...

Страница 14: ...e die Werte gleich mit OK oder ändern sie vorher Es erscheint die Planungsliste mit der Übersicht aller gespeicherten Sendungen 7 Schließen Sie das Fenster mit EXIT 9 PVR Aufnahmen und Time Shift Funktion nur im DTV Betrieb optional Wichtig Bevor Sie Aufnahmen machen können muss das Speichermedium formatiert werden Vorhandene Dateien wer den gelöscht Kontrollieren Sie daher vorher ob sich nicht wi...

Страница 15: ...kein Speicherplatz zur Verfügung Max Aufnahmedauer Drücken Sie die Taste um eine Aufnahmezeit zwischen 1 und 6 Stunden zu wählen 9 2 Direkte PVR Aufnahme manuell 1 Wählen Sie im DTV Betrieb das Programm welches Sie Aufnehmen möchten 2 Drücken Sie die Taste REC REP Es erscheint ein Infobalken Die Aufnahmezeit wird rechts unten angezeigt Darunter sehen Sie in blauer Schrift die verbleibende Aufnahme...

Страница 16: ...rücken Sie die Taste INDEX und die getätigten Aufzeichnungen werden Ihnen angezeigt 2 Drücken Sie wiederholt die Taste INDEX und vorhandene Aufzeichnungen werden nach Programm Kanal Zeit sor tiert 3 Wählen Sie mit den Tasten die gewünschte Aufnahme aus 4 Starten Sie die Wiedergabe durch Drücken der Wiedergabetaste 19 5 Zum Unterbrechen der Wiedergabe drücken Sie die Taste HINWEIS Bei der Wiedergab...

Страница 17: ...Fehlfunktion des Gerätes Stecken Sie Ihr USB Speichermedium direkt in den USB Anschluss auf der Rück seite des Gerätes Drücken Sie die Taste TV MENU um das OSD Hauptmenü anzuzeigen Drücken Sie die Taste bis das Menü Applications aktiviert ist Drücken Sie die Taste OK Das USB Betriebsmenü erscheint auf dem Bildschirm Drücken Sie die Tasten zur Auswahl des Wiedergabemodus und bestätigen Sie Ihre Aus...

Страница 18: ...D Hauptmenü anzuzeigen 2 Drücken Sie die Taste bis das Menü BILD aktiviert ist 3 Markieren Sie mit der Taste den Punkt Farbtemperatur Drücken Sie die Taste OK um das Auswahlmenü einzublen den 4 Wählen Sie mit den Tasten den Punkt Benutzer Die folgenden Punkte werden aktiviert und können geändert werden Rot Grün Blau 5 Rufen Sie den gewünschten Punkt mit auf und stellen Sie mit den Tasten den gewün...

Страница 19: ...TV MENU um das OSD Hauptmenü anzuzeigen 2 Drücken Sie die Taste bis TON aktiviert ist 3 Markieren Sie mit der Taste den Punkt Effekt Drücken Sie die Taste OK um das Auswahlmenü einzublenden 4 Wählen Sie mit den Tasten den Punkt Benutzer Die folgenden Punkte werden aktiviert und können geändert werden Höhen Tiefen 5 Rufen Sie einen Punkt mit auf und stellen Sie mit den Tasten den gewünschten Wert e...

Страница 20: ...angezeigten Funktionen Abschaltzeit Ausschalttimer Legen Sie fest ob die Einstellung nur einmal oder regelmä ßig ausgeführt werden soll Wählen Sie zwischen Aus Einmal Täglich Mo Fr Mo Sa Sa So oder So Stunde Minute Stellen Sie die Abschaltzeit ein Einschaltzeit Einschalttimer Legen Sie fest ob die Einstellung nur einmal oder regelmä ßig ausgeführt werden soll Wählen Sie zwischen Aus Einmal Täglich...

Страница 21: ...Zeiten etc Teletext Ein Aus Mit der Taste TEXT auf der Fernbedienung können Sie die Teletext Funktionen einschalten ausschalten Mix Betrieb Drücken Sie die Taste MIX um den Mixbetrieb einzuschalten Hierbei erscheint das Fernsehbild hinter dem Teletext Drücken Sie diese Taste erneut um die Funktion auszuschalten Farbige Tasten Bei fast allen Teletextseiten befinden sich am unteren Bildschirmrand fa...

Страница 22: ...nktionen 14 1 Spracheinstellungen 1 Drücken Sie die Taste TV MENU um das OSD Hauptmenü anzuzeigen 2 Drücken Sie die Taste bis SONDERFUNK aktiviert ist 3 Markieren Sie mit der Taste den Punkt Menüsprache drücken Sie so oft OK bis die gewünschte Sprache für das OSD Menü angezeigt wird Audiosprachen drücken Sie OK und wählen Sie mit den Pfeiltas ten die Sprachen für den Ton Untertitelsprachen drücken...

Страница 23: ...ann nur angewählt werden wenn die Funktion System sperren aktiviert ist Ein 1 Markieren Sie den Punkt Progr blockieren und drücken OK 2 Wählen Sie mit den Taste oder das Programm aus das gesperrt werden soll 3 Drücken Sie die grüne Taste um das Programm zu sperren Es erscheint ein Schloss hinter dem Sendernamen 4 Sperren Sie weitere Programme oder drücken Sie EXIT um das Menü zu verlassen Die Prog...

Страница 24: ...es Fernsehers entspricht Überprüfen Sie ob die Einstellungen im PC Menü mit den Video Ausgangseinstellungen des PC übereinstimmen Stellen Sie die Werte neu ein Der Fernseher lässt sich nicht einschalten Überprüfen Sie ob das Netzkabel richtig an der Steckdose angeschlossen ist Überprüfen Sie ob der Netzschalter rechts unten am Gerät eingeschaltet ist Kein Ton Überprüfen Sie ob die Audiokabel korre...

Страница 25: ... reduziert sich auf 12 Monate sofern sie ein zur gewerblichen Nutzung geeignetes Gerät auch teilweise gewerblich nutzen 2 Voraussetzung für unsere Garantieleistungen sind der Kauf des Geräts in Deutschland bei einem unserer Vertrags händler sowie die Übersendung einer Kopie des Kaufbelegs und dieses Garantiescheins an uns Befindet sich das Gerät zum Zeitpunkt des Garantiefalls im Ausland muss es a...

Страница 26: ...en Aufkleber nur noch auf die Verpackung Ihres gut verpackten Gerätes zu kleben und das Paket bei der nächsten Annahmestelle der Deutschen Post DHL abzugeben Der Versand erfolgt für Sie kostenlos an unser Servicecenter bzw Servicepartner Bitte fügen Sie dem Paket eine Kopie Ihres Kaufbeleges Kassenbon Rechnung Lieferschein sowie eine kurze Fehlerbe schreibung bei Ohne den Garantienachweis Kaufbele...

Страница 27: ...s piles de la télécommande Maintenez toujours la fiche lorsque vous débranchez le câble d alimentation ne tirez pas sur le câble Installez l appareil dans un emplacement approprié tel qu une surface anti dérapante plate et sèche un emplacement où vous pouvez facilement utiliser l appareil Protégez l écran des solvants pour éviter tout dégât Ne touchez pas l écran inutilement n appuyez pas sur sa s...

Страница 28: ...u de l appareil 30 2 1 Emplacement des commandes et des connexions 30 2 2 Vue arrière Connexions 30 3 Télécommande 31 3 1 Fonctions des boutons 31 3 2 Insérer les piles 31 4 Avant installation 32 4 1 Éléments livrés 32 4 2 Monter l appareil 32 4 3 Brancher le câble d antenne 33 4 4 Branchement électrique 33 4 5 Installation initiale 33 4 6 Sélectionner Source 34 5 Brancher les appareils externes 3...

Страница 29: ... 1 Heure actuelle 44 12 2 Heure de mise en marche et Heure d arrêt 45 12 3 Minuterie de mise en veille 45 12 4 Mise en veille automatique Mise en veille automatique 45 12 5 Fuseau horaire 45 13 TELETEXT 46 14 Fonctions spéciales 47 14 1 Paramètres Langue 47 14 2 Système de fichier PVR 47 14 3 Défaut 47 15 Fonctions Verrouillage 47 15 1 Verrouillage 47 15 2 Mode Hôtel 48 16 Dépannage 49 17 Caractér...

Страница 30: ...uez via les boutons droite gauche confirmer sélection 9 POWER Met l appareil en mode veille 10 RF Entrée d antenne 75 Ohm 11 VGA Entrée PC 12 PC AUDIO Entrée audio 13 CI Connexion d interface commune optionelle IMPORTANT Uniquement pour les programmes cryp tés TV payante DVB T Demandez à vos fournisseurs de programmes ou à un magasin spécialisé si la TV payante DVB T est offerte dans votre zone de...

Страница 31: ...de USB 19 Démarre la lecture en mode USB 20 Effectue une avance rapide de la lecture USB 21 Effectue un retour rapide de la lecture USB 22 Rouge Vert Jaune Bleu Accède aux pages à code couleur en mode Télétexte et au menu édition de chaînes REVEAL Affiche les informations Télétexte cachées HOLD Maintient la page Télétexte LIST Règle quatre favoris Télétexte INDEX Affiche l heure Télétexte Affiche ...

Страница 32: ...être remplacées N utilisez pas des piles rechargeables Protégez les piles de la chaleur et des rayons directs du soleil Ne vous débarassez pas des piles en les brûlant danger d explosion Enlevez les piles épuisées de l appareil Enlevez les piles si vous n utilisez pas l appareil pendant des périodes plus longues pour éviter toute fuite Lavez vous bien après avoir toucher l acide contenue dans la p...

Страница 33: ...hez une câble d antenne 75 ohm à la prise murale d antenne 2 Branchez l autre extrémité à l entrée d antenne RF à l arrière de l appareil 3 Dans le menu source appuyez sur le boutonSOURCE sélectionnez ATV NOTE Pour voir la TV vous devez d abord rechercher les chaînes voir 4 5 Installation initiale à la page 33 4 4 Branchement électrique La télévision utilise un courant alternatif 100 240 V 50 60 H...

Страница 34: ...hez l appareil via le câble RCA à VIDEO L et R IMPORTANT Respectez le code de couleurs des câbles lorsque vous utilisez le câble AV vidéo jaune audio G blanc et audio D rouge Sélectionnez l entrée audio AV dans le menu source appuyez sur le boutonSOURCE Connecteur PC Utilisez un câble VGA pour brancher le connecteur moniteur du PC au connecteur VGA du téléviseur Utilisez un câble audio pour branch...

Страница 35: ...ues 0 9 pour sélectionner la chaîne souhaitée Appuyez sur le bouton RECALL de la télécommande pour revenir à la chaîne précédente Appuyez sur CH LIST pour afficher la liste des chaînes Appuyez sur les boutons fléchés pour éclairer une chaîne et appuyez sur OK pour afficher la chaîne à l écran 6 3 Régler Volume Appuyez sur les boutons VOL pour régler le volume Appuyez sur le bouton MUTE pour couper...

Страница 36: ...tilisez qu une sorte de réception Les chaînes DVB T affichent DTV dans le menu OSD Les chaînes analogiques affichent ATV dans le menu OSD 7 1 Recherche Chaîne 1 Appuyez sur le bouton TV MENU pour afficher le menu principal OSD 2 Appuyez sur dans le menu CHANNEL pour sélectionner Auto Tuning 3 Appuyez sur OK Appuyez sur pour sélectionner l une des trois méthodes de syntonisation DTV ATV DTV ATV App...

Страница 37: ...ne 1 Appuyez sur le bouton TV MENU pour afficher le menu principal OSD 2 Appuyez sur dans le menu CHANNEL pour sélectionner Programme Edit et appuyez sur OK 3 Appuyez sur pour éclairer la chaîne à déplacer permuter 4 Appuyez sur le bouton jaune La chaîne est écrite en jaune 5 Appuyez sur les touches numériques pour accéder au programme 6 Appuyez deux fois sur OK pour enregistrer la chaîne à la pos...

Страница 38: ... l aide du bouton et appuyez sur OK NOTE Les programmes cryptés DVB T ne sont pas offerts dans toutes les zones de diffusion Vous pouvez obtenir des informa tions sur ce sujet auprès de vos fournisseurs de service ou dans un magasin spécialisé 7 6 Afficher les informations Vous pouvez afficher d autres informations sur la chaîne en cours 1 Appuyez sur le bouton TV MENU pour afficher le menu princi...

Страница 39: ...s s affiche 7 Appuyez sur EXIT pour fermer la fenêtre 9 Enregistrement PVR et fonction Décalage Uniquement en mode DTV en option Important Avant d enregistrer vous devez formater le support Les fichiers existants sont supprimés Vérifiez pour vous assurer que le support ne contient aucune information importante enregistrée Formatez le support en respectant le paragraphe 9 1 Paramètres PVR voir page...

Страница 40: ...leu La barre des informations en bas à gauche affiche le numéro de chaîne avec le nom de la station NOTE Appuyez à nouveau sur REC REP pour cacher la barre des informations Le bouton REC reste en haut à gauche de l écran 3 Appuyez sur le bouton pour terminer l enregistrement NOTE Appuyez sur le bouton pour mettre en pause l enregistrement en cours voir 9 5 Fonction Décalage à la page 41 Enregistre...

Страница 41: ...gauche ne bouge pas Appuyez sur le bouton pour mettre la lecture en pause voir 9 5 Fonction Décalag à la page 41 9 5 Fonction Décalage La fonction de décalage vous permet d interrompre un programme pour reporter à plus tard son visionnage Vous devez brancher un dispositif USB d une capacité suffisante La liste des tailles de décalage se définit après formatage voir 9 1 Paramètres PVR à la page 39 ...

Страница 42: ...plusieurs fois sur pour que éclairer le menu Applications Appuyez sur OK Le menu USB s affiche Appuyez sur pour sélectionner le mode de lecture et OK pour confirmer Uniquement les fichiers sélectionnés s affichent Appuyez sur pour sélectionner le lecteur C et appuyez sur OK NOTE Appuyez sur EXIT pour revenir au mode de sélection de lecture Pour tout autre fonctionnement respectez les consignes au ...

Страница 43: ...à ce que le menu PICTURE soit activé 3 Appuyez sur pour éclairer l option Colour Temperature Appuyez sur OK pour afficher le menu 4 Appuyez sur pour sélectionner l option Utilisateur Les options suivantes sont activées et peuvent être modifiées Red Green Blue 5 Appuyez sur pour accéder à l option suivante et régler la valeur à l aide des boutons fléchés 6 Appuyez sur le bouton TV MENU pour accéder...

Страница 44: ...à l aide des boutons fléchés 6 Appuyez sur EXIT pour quitter le menu et enregistrer les modifications 11 6 Autres paramètres Son Utilisez Balance pour régler l équilibre sonore entre le haut parleur droit et le haut parleur gauche Sélectionnez Auto Volume pour régler un volume différent p ex lorsque vous modifier la chaîne Son Surround signifie que le son est lu grâce à un un type de son spatial 1...

Страница 45: ...z sur TV MENU pour quitter le menu et enregistrer les paramètres 12 3 Minuterie de mise en veille Vous pouvez régler l arrêt automatique de votre téléviseur après une période de temps préréglée La minuterie de mise en veille est supprimée et doit être à nouveau réglée si vous éteignez le téléviseur lorsque vous réglez la minuterie de mise en veille Réglez l intervalle de la minuterie de mise en ve...

Страница 46: ...e dure quelques secondes jusqu à ce que la page s affiche Accéder aux Sous pages 1 Sélectionnez la page Télétexte souhaitée avec sous pages 2 Appuyez sur les boutons fléchés pour sélectionner la sous page Le nombre de sous pages de la page Télétexte actuelle s affiche en bas de l écran Sélectionner Sous page 1 Sélectionnez la page Télétexte souhaitée avec sous pages 2 Appuyez sur SUBPAGE Entrez le...

Страница 47: ...évision transmet des sous titres ou une deuxième bande son de langue différente L Option Pays se règle dès que vous réglez Syntonisation automatique et ne peut pas être modifiée ici 14 2 Système de fichier PVR Voir page 39 9 1 Paramètres PVR 14 3 Défaut En cas de restauration des paramètres d usine tous les paramètres personnalisés sont supprimés Votre mot de passe personnel n est pas supprimé 1 A...

Страница 48: ...quer la chaîne à déverrouiller appuyez à nou veau sur le bouton vert Le bouton de verrouillage disparaît Contrôle parental L option du menu Parental Guidance n est pas valide car la chaîne de télévision DVB T ne transmet pas le signal requis 15 2 Mode Hôtel 1 Appuyez sur SOURCE et entrez 3690 à l aide des touches numériques 2 Le HOTEL MENU s affiche 3 Effectuez les paramètres à l aide des boutons ...

Страница 49: ...rifiez le volume Réglez le volume Vérifiez que le volume est limité dans le menu mode hôtel Image brouillée Vérifiez que l antenne ou le câble d antenne n est pas endommagé La télécommande ne fonc tionne pas Vérifiez l état des piles Vérifiez que les piles sont bien en contact et qu elles sont introduites en respectant la bonne polarité Assurez vous qu il n y ait aucun obstacle entre la télécomman...

Страница 50: ... électromagnétique et les directives de basse tension et a été fabriqué conformément aux dernières règles de sécurité 18 Sens du symbole Poubelle à roulettes Prenez soin de notre environnement ne jetez pas des appareils électriques avec les déchets ménagers Déposez les appareils électriques défectueux ou obsolètes aux points de collecte municipaux Veuillez empêcher les éventuels impacts sur l envi...

Страница 51: ...ch as a dry level and slip proof surface when you can easily operate the device Protect the screen from solvents to avoid damage Do not touch the display unnecessarily do not put pressure on its surface and do not touch it with pointed or sharp objects Stop using the device if it does not work as usual Immediately disconnect from mains power supply and contact the authorised service centre if you ...

Страница 52: ... 5 Initial Installation 57 4 6 Select Source 57 5 Connect External Devices 58 6 Basic Operation 58 6 1 Turn TV Set On Off 58 6 2 Select Channel 59 6 3 Adjust Volume 59 6 4 Shortcuts 59 6 5 OSD Menu Structure 59 7 Search and Edit Channel 60 7 1 Channel Search 60 7 2 DTV Manual Scan 60 7 3 ATV Manual Scan 60 7 4 Edit Channels 60 7 5 CI Displaying information only for encrypted Pay TV DVB T programs ...

Страница 53: ...8 12 3 Sleep Timer 68 12 4 Auto Sleep Auto Sleep 68 12 5 Time Zone 68 13 Teletext 69 14 Special Functions 70 14 1 Language Settings 70 14 2 PVR File System 70 14 3 Default 70 15 Lock Functions 70 15 1 Lock 70 15 2 Hotel Mode 71 16 Troubleshooting 72 17 Technical Specifications 73 18 Meaning of the Wheelie Bin Symbol 73 ...

Страница 54: ...one position right left confirm selection 9 POWER Switch device to standby mode 10 RF 75 Ohm antenna input 11 VGA PC Input 12 PC AUDIO Audio input 13 CI Common Interface Connection Optional IMPORTANT Only for encrypted Pay TV DVB T pro grams Ask your program suppliers or inquire within the specialist trade whether DVB T Pay TV is offered in your broadcasting area 14 HEADPHONE Headphone connector 1...

Страница 55: ...s INDEX Display Teletext time Display Index page 100 in Teletext mode SUBPAGE Select sub page in Teletext SIZE Enlarge current Teletext page MIX Superimpose Teletext on TV image 23 FAV Display favourite list 24 EPG Display Electronic Programme Guide in DTV mode 25 FREEZE Freeze current image 26 SLEEP Activate interval for auto off 27 PIC Select picture mode Standard Mild User Dynamic 3 2 Insert Ba...

Страница 56: ...anual 4 2 Assemble Device Mount the base plate onto the stand Manually secure the screw to the base Attach the stand with the three Phillips screws Remove the protective film from remote control and TV set if attached Place the TV set on a stable level surface Ensure that the surface can carry the TV s weight Protect the device from extreme heat and humidity Ensure sufficient ventilation on all si...

Страница 57: ...ed outlet CAUTION Connect all devices before connecting the TV set to mains power supply The wall outlet must be freely accessible at all times 4 5 Initial Installation When turning the TV set on for the first time a window is displayed to select the menu language and to start Channel Search 1 Turn on the device with the power switch located at the right bottom of the device When the indicator lig...

Страница 58: ...ur dealer with 3 RCA connectors to connect component output of the external device with the inputs Y Pb Pr on the TV set Use an audio cable to connect the audio output of the external device with the audio connectors AUDIO L and R on the TV set In the source menu pressSOURCE button select YPbPr HDMI Input Digital video and audio signals from an external device are transmitted in high quality via t...

Страница 59: ...rted by broadcaster 6 5 OSD Menu Structure The OSD On Screen Display menu serves to select and set the different functions 1 Press the TV MENU button to display the OSD menu See main menu items below 2 First press to select the desired main menu item The submenus are displayed next to them 3 Press to select a submenu and press OK to confirm 4 Press the TV MENU button to return to the main menu Sub...

Страница 60: ...se select a different channel 4 Press OK to start the manual scan 5 After finishing the manual scan the number of found channels is displayed Press EXIT to close the window 7 3 ATV Manual Scan To receive analogue channels an analogue antenna signal e g cable tuner must be connected Analogue channels are displayed as ATV TV in the OSD menu If previously DVB T channels were saved the new analogue ch...

Страница 61: ...d in the favourite list 4 Press the FAV button A heart icon is displayed behind the channel name 5 Press EXIT to exit the menu and save the changes To delete the channel from the favourite list select the highlighted channel and press the FAV button again Rename Channel only in ATV mode 1 Press the TV MENU button to display the OSD main menu 2 Press in CHANNEL menu to select Programme Edit and pre...

Страница 62: ...be viewed Time CHANNEL changes to date 2 The window again dis plays the individual channels 3 and their current program mes 4 INFO Display detail information about selected programmes yellow button Display schedule red button Open recording window see 9 3 Programmed Recording with EPG on page 64 blue button Open remind window see Save Programmes EXIT Exit EPG Save Programmes EPG allows you to save...

Страница 63: ...TION Existing files are deleted Connected PVR media must be formatted The device writes specific files to the disk The window on the right is displayed Select between FAT 32 and Hi Speed for matting Press to select the desired formatting mode Press OK to confirm A security prompt is displayed Press to start formatting The USB device is now formatted and the PVR files are created NOTE This can take...

Страница 64: ... the info bar is displayed Press REC REP to hide the info bar The REC button top left on screen remains Important The device does not automatically turn off after the recording is finished Different Programme Modes To change the recording mode of the programming via EPG select the bottom line in the Timer window Here select between the following modes Auto The preset times of the station are saved...

Страница 65: ...with playing back from USB storage media This is not a malfunction of the device NOTE MPEG4 It is not possible to guarantee full compatibility with all of the compression methods used worldwide particularly when more than one soundtrack or subtitles are involved Also MPEG 4 files with integrated special functions such as a menu subtitles etc are not always supported This is no malfunction of the p...

Страница 66: ...comes with 3 preset and one manually adjustable colour temperature settings Cold Medium Warm and User 1 Press the TV MENU button to display the OSD main menu 2 Press the arrow button until the menu PICTURE is activated 3 Press to highlight the item Colour Temperature Press OK to display the menu 4 Press to select the item User The following items are activated and can be changed Red Green Blue 5 P...

Страница 67: ...g items are activated and can be changed Treble Bass 5 Press to access the desired item and set the value with the arrow buttons 6 Press EXIT to exit the menu and save the changes 11 6 Further Sound Settings Use Balance to set the sound balance between left and right speaker Select Auto Volume to adjust different volume e g when changing the channel Surround Sound means that the sound is played ba...

Страница 68: ...volume that the TV set turns on with 6 Press TV MENU to exit the menu and save the settings 12 3 Sleep Timer You can set your TV set to automatically turn off after a preset period of time The sleep timer is deleted and must be set again if you turn the TV set off during sleep timer setting Set the sleep timer interval between Off and 240 Min Repeatedly press the SLEEP button on the remote control...

Страница 69: ... Teletext page with subpages 2 Press the arrow buttons to select the subpage The number of subpages for the current Teletext page is displayed at the bottom of the screen Select Sub Page 1 Select the desired Teletext page with sub pages 2 Press SUBPAGE Enter the desired sub page with 4 digits e g 0003 for the third sub page The page is displayed as soon as it is retrieved Hold Function Press the H...

Страница 70: ...ault settings all user defined settings are deleted Your personal password is not deleted 1 Press the TV MENU button to display the OSD main menu 2 Press the arrow button until OPTION is activated 3 Press the arrow button to highlight Restore Factory Default Setting and press OK A security prompt is displayed 4 Press for Yes or for No 15 Lock Functions 15 1 Lock This menu allows you to set differe...

Страница 71: ... Press SOURCE and enter 3690 with the numeric buttons 2 The HOTEL MENU is displayed 3 Perform the settings with the arrow buttons To make further adust ments press the TV MENU button Hotel Mode The settings selected in the menu are only active when you turn on this option On Panel Key Lock Once you have chosen the setting On the device can no longer be operated with the buttons on the device Max V...

Страница 72: ...operly connected Check the volume Volume too low Check the volume Set the volume Check if the volume is limited in the hotel mode menu Snowy image Check if antenna or antenna cable are damaged Remote control does not work Check if the batteries are exhausted Check if the batteries make proper contact and are inserted with the correct polarity Ensure that no obstacles are between remote control and...

Страница 73: ...ic compatibility and low voltage directives and has been constructed in accordance with the latest safety regulations 18 Meaning of the Wheelie Bin Symbol Take care of our environment do not dispose of electrical applicances via the household waste Dispose of obsolete or defective electrical appliances via municipal collection points Please help to avoid potential environmental and health impacts ...

Страница 74: ......

Страница 75: ......

Страница 76: ...CTV 1902 LED DVB T Stand 01 12 Elektro technische Vertriebsges mbH Industriering Ost 40 47906 Kempen PERFECT IN FORM AND FUNCTION CTV 1902 LED DVB T ...

Отзывы: