COMPETENCE D4100
Build-in Electric Multifunction Double Oven
Operating And InstallationInstructions
Страница 1: ...COMPETENCE D4100 Build in Electric Multifunction Double Oven Operating And Installation Instructions ...
Страница 2: ...p down oven doors Support the doors using the handles until fully open Never leave the cooker unattended when the oven door is open Do not place sealed cans or aerosols inside the oven They may explode if they are heated Ensure that all control knobs are in the OFF position when not in use Do not stand on the cooker or on the open oven doors Do not hang towels dishcloths or clothes from the cooker...
Страница 3: ...o Note 23 Hints And Tips 23 Speedcook 24 Using Speedcook 24 Things To Note 24 Hints And Tips 25 Thermal Griling 26 Using Thermal Grilling 26 Things To Note 26 Hints And Tips 27 Thermal Grilling Chart 27 Defrosting 28 Using Defrost Feature 28 Things To Note 28 Hints And Tips 28 Helpful Hints When Buying And Preparing Food 30 Care And Cleaning 31 Cleaning Materials 31 Cleaning The Outside Of The Ove...
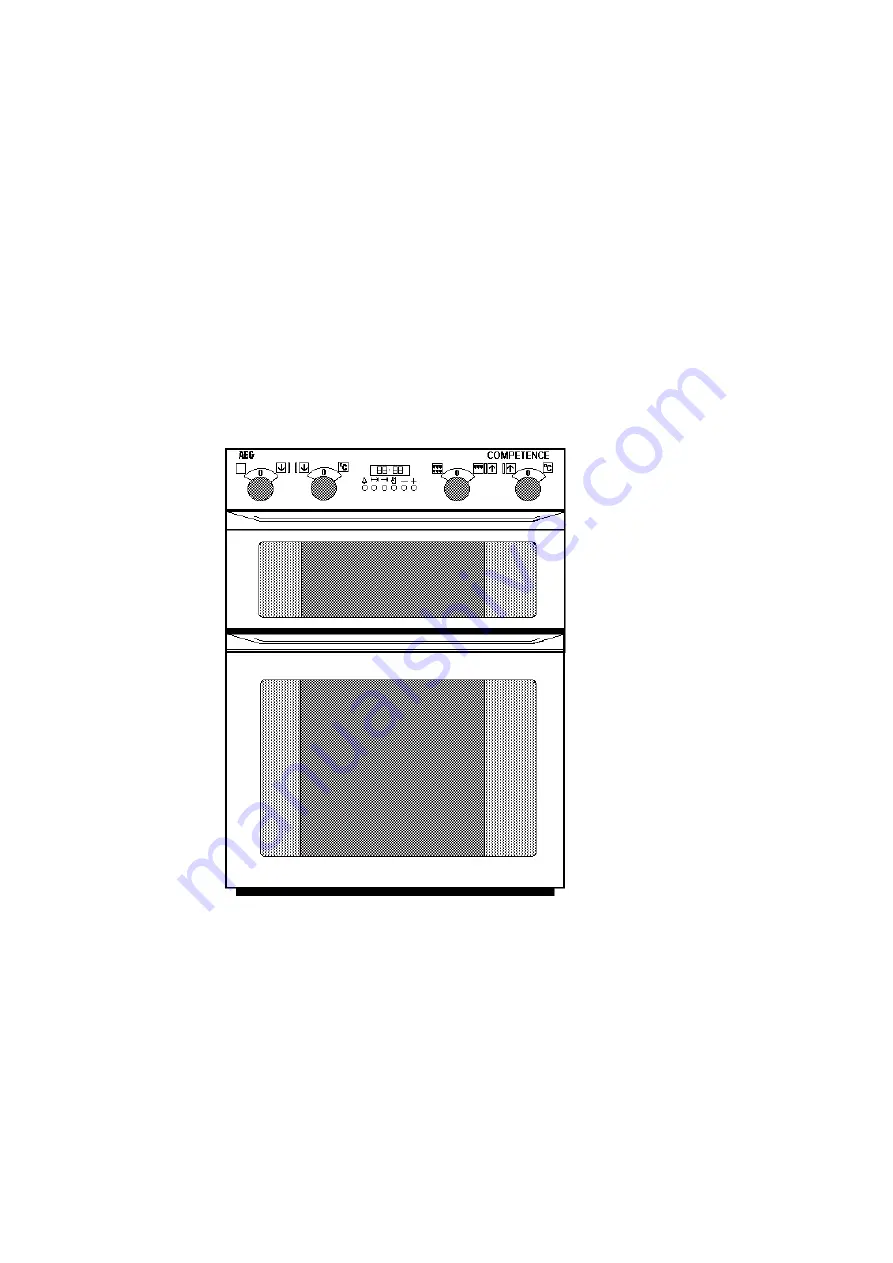
Страница 4: ...l second oven and dual grill in the top compartment The Multifunction main oven is the larger of the two ovens It comprises of a number of different cooking functions The Multifunction oven can be automatically controlled by the electronic timer 3 Electronic Timer Control Panel Top Oven Main Oven To help you the following symbols will be found in the text Safety Instructions Step by Step Instructi...
Страница 5: ...an may turn ON and OFF this is quite normal Control Panel Indicator Neons These lights indicate whether the grill or ovens are switched ON In the case of the ovens the neons also indicate when the set temperature has been reached The indicator neon will go out when the oven has reached the set temperature It will turn on and off during cooking to show that the oven temperature is being maintained ...
Страница 6: ...lf for grilling and second oven cooking 2 cranked shelves for main oven cooking The grill deflector sits above the element in the grill and oven and prevents fat splashing onto the oven roof The deflector may be easily removed for cleaning Telescopic Runners Your cooker may be fitted with telescopic runners in the grill and main oven To fit the shelf into the telescopic runner 1 Ensure the telesco...
Страница 7: ...e should be repeated with the grill for approximately 5 10 minutes During this period an odour may be emitted it is therefore advisable to open a window for ventilation Condensation and Steam When food is heated it produces steam in the same way as a boiling kettle does The ovens are vented to allow some of this steam to escape However always stand back from the cooker when opening the oven doors ...
Страница 8: ...t Note The increase and decrease control buttons operate slowly at first and then more rapidly They should be pressed separately 2 THE MINUTE MINDER The minute minder gives an audible reminder at the end of any period of cooking up to 23 hrs 59 mins It is not part of the automatic control To set press the minute minder button and the display will read 0 00 as Fig 3 While holding it down depress th...
Страница 9: ... supply is switched ON and that the correct time of day is displayed e g 9 a m as Fig 6 ii Place food in oven iii To set the length of cooking time press the cooking hours button while holding it down press the increase control until the required length of cooking time is displayed e g 2 hrs 15 mins as Fig 7 If necessary depress the decrease control until the correct time interval is achieved iv R...
Страница 10: ...e during the cooking period simply press the stop time button and the stop time will be displayed as Fig 11 4 TO CANCEL AN AUTOMATIC PROGRAMME i To cancel an automatic programme press button The AUTO display will go out and the cookpot symbol will light as Fig 12 Turn off oven controls 5 TO RETURN THE COOKER TO MANUAL At the end of a timed cooking period the AUTO display will flash and an alarm wi...
Страница 11: ... to zero and all programming will be cancelled 7 AUTOMATIC COOKING It is advisable to leave food in the oven for as short a time as possible before automatic cooking Always ensure commercially prepared food is well within its use by date and that home prepared food is fresh and of good quality When cooking is complete do not leave food to stand in the oven but remove and cool it quickly if the foo...
Страница 12: ...ore fitting the shelf 2 Holding the front edge of the shelf with both hands place the rear shelf forms over the telescopic runners 3 Slide the shelf into position lifting slightly at the front so that the shelf locates into the retaining hooks To remove raise the front edge and withdraw the shelf Ensure the shelf is positively located before using Note Should you wish to purchase a telescopic runn...
Страница 13: ...e fats and juices Food such as fish liver and kidneys may be placed directly on the trivet or grill pan base if preferred l Use the trivet to keep fat splashing to a minimum when grilling meat items l Adjust the grid and grill pan runner position to allow for different thicknesses of food Position the food close to the element for faster cooking and further away for more gentle cooking l Food shou...
Страница 14: ...ou require an additional handle for your grill pan this can be ordered from your local AEG Service Centre by quoting part number 311479800 6 GRILLING CHART FOOD GRILL TIME mins in total Toast 4 6 Bacon Rashers Beefburgers Chicken Joints Chops Lamb Pork Fish Whole Trout Mackerel Fillets Plaice Cod Kebabs Kidneys Lamb Pig Sausages Steaks Rare Medium Well Done Toasted Sandwiches 10 10 15 30 40 15 20 ...
Страница 15: ...TO FIT THE SECOND OVEN SHELF The cranked shelf should be fitted with the straight rods uppermost on the frame and the forms towards the back of the oven USING THE SECOND OVEN The second oven is the smaller of the two ovens It is heated by elements in the top and bottom of the oven It is designed for cooking smaller quantities of food It gives especially good results if used to cook fruit cakes swe...
Страница 16: ...terial and finish of the baking tray and dishes will affect the degree of base browning of the food Enamelware dark heavy or non stick utensils increase base browning Shiny aluminium or polished steel trays reflect the heat away and give less base browning l Because of the smaller cooking space lower temperatures and shorter cooking times are sometimes required Be guided by the recommendations on ...
Страница 17: ... Scones Roasting Meat Poultry 2crk 1crk 1crk 2 crk 2crk 1crk 1crk 1crk 1crk 1crk 1crk 1crk 1crk Depending on dish 2crk 1crk 2crk 1crk 180 190 210 220 130 140 180 190 160 170 140 150 130 140 130 140 90 100 170 190 190 200 140 150 160 170 190 180 210 220 170 180 crk Cranked shelf or on a straight shelf from the main oven on the base Shelf positions are counted from the bottom of the oven upwards 16 ...
Страница 18: ...e telescopic runners 3 Slide the shelf into position lifting slightly at the front so that the shelf locates into the retaining hooks To remove raise the front edge and withdraw the shelf Ensure the shelf is positively located before using Note Should you wish to purchase a telescopic runner kit this can be ordered from your local AEG Service Centre by quoting part number BAZD01 948341000 The fan ...
Страница 19: ...e evenly spaced to suit the load being cooked A slight increase in cooking time may be necessary l DO NOT place baking trays directly on the oven floor as it interferes with the oven air circulation and can lead to base burning use the lower shelf position However non critical dishes may be placed on the oven base when more space is required l The use of excessively high temperatures can cause une...
Страница 20: ... cooling fan for the controls operates after a period of time l The internal oven light will come on l If an automatic programme has been set the oven fan and light do not come on until cooking begins This form of cooking gives you the opportunity to cook without the fan in operation It is particularly suitable for dishes which require extra base browning such as pizzas quiches and flans Gratins l...
Страница 21: ...sure even browning l Stand dishes on suitably sized baking trays to prevent spillage onto the base of the oven and make cleaning easier l Do not place dishes tins or baking trays directly on the oven base as it becomes very hot and damage to the oven enamel and bakeware will occur l For faster preheating use the speedcook or fan oven function to preheat the oven until the oven indicator neon goes ...
Страница 22: ...s Pastry Choux Shortcrust Flaky Puff Plate Tarts Quiches Flans Scones Roasting Meat and Poultry Shelf positions are not critical but ensure that oven shelves are evenly spaced when more than one is used 180 190 210 220 130 140 160 170 160 170 140 150 130 140 130 140 90 100 170 190 190 200 130 140 190 200 180 190 170 180 210 220 160 180 2 2 2 2 2 2 2 1 2 2 3 3 2 3 2 2 3 2 180 190 210 220 150 180 17...
Страница 23: ...n per kg 1lb up to 3 kg 7lb then 10 min per kg 1lb Duck 160 180 C 25 35 min per kg 1lb and 25 30 min over Pheasant 160 180 C 35 40 min per kg 1lb and 35 40 min over Rabbit 160 180 C 20 min per kg 1lb and 20 min over Potatoes with meat 160 180 C according to size Potatoes without meat 180 190 C according to size The roasting temperatures and times given in the chart should be adequate for most join...
Страница 24: ...Be guided by the cook times and temperatures given on any packaging l Some pizzas should be cooked directly on the oven shelf To prevent soiling the oven base place a baking tray in one of the lower shelf positions l The material and finish of the baking trays and dishes used will affect base browning Enamelware dark heavy or non stick utensils increase base browning while oven glassware shiny alu...
Страница 25: ... time It may run on after the controls are switched off until the cooker has cooled See page 4 for more details on the operation of the cooling fan Speedcook is ideal for quick preheating of the oven before selecting an alternative cooking function It can also be used for cooking chilled and frozen convenience foods without the need for preheating COOKING TIMES Cooking times for convenience foods ...
Страница 26: ...s where crispness is required l The material and finish of the baking trays and dishes used will affect base browning Enamelware dark heavy or non stick utensils increase base browning while oven glassware shiny aluminium or polished steel trays reflect the heat away and give less base browning l Always place dishes centrally on the shelf to ensure even browning l Stand dishes on suitably sized ba...
Страница 27: ...en door closed and with the grill pan handle removed Thermal grilling offers an alternative method of cooking food items normally associated with conventional grilling The grill element and the oven fan operate together circulating hot air around the food The need to check and turn food is reduced Thermal grilling helps to minimise cooking smells in the kitchen and allows you to grill in the main ...
Страница 28: ...ons 3 and 4 are suitable for most foods Be prepared to make suitable adjustments during cooking to suit individual requirements If thermal grilling on more than one level it may be necessary to interchange the food on the shelves during cooking COOKING TIMES Cooking is more gentle therefore food generally takes a little longer to cook when thermal grilling compared with conventional grilling One o...
Страница 29: ... and poultry slowly in the fridge However this process can be accelerated by using the defrost function Small or thin fish fillets frozen peeled prawns cubed or minced meat liver thin chops steaks etc can be thawed in 1 2 hours l A 1kg 2 lb oven ready chicken will be thawed in approximately 5 hours Remove the giblets as soon as possible during the thawing process This main oven function enables yo...
Страница 30: ...oughly immediately after thawing l DO NOT leave food at room temperature once it is defrosted Cook raw food immediately or store cooked food in the fridge l Care must always be taken when handling foods in the home Always follow the basic rules of food hygiene to prevent bacterial growth and cross contamination when defrosting preparing cooking cooling and freezing foods 29 ...
Страница 31: ...enerally requires 20 25 C lower temperature than conventional ovens 6 Always ensure that cooked chilled foods are thoroughly reheated until they are piping hot throughout 7 It is preferable to defrost frozen foods slowly in the refrigerator Alternatively a microwave cooker or the Defrost function on your oven may be used 8 Always cook defrosted foods immediately after thawing Thawed food should ne...
Страница 32: ...ed to remove fingermarks REMOVING AND REPLACING WIREWORK SIDE RUNNERS Remove all shelves and furniture from the oven If fitted ensure the telescopic runners are pushed back into place in the oven cavity Hold the bottom of the wirework runners and draw the runners towards the centre of the oven Unhook from the top and remove The telescopic runners should be dried carefully after washing in hot wate...
Страница 33: ...your other hand hold the outer door to ensure it does not spring shut on removing the inner panel 5 Close the oven door To prevent damaging or weakening the door glass panels avoid the use of the following l Household detergents and bleaches l Impregnated pads unsuitable for non stick saucepans l Brillo Ajax pads or steel wool pads l Chemical oven pads or aerosols l Rust removers l Bath Sink stain...
Страница 34: ...nto position under the hinge location points at the rear Ensure the glass is properly located CLEANING THE GRILL AND OVEN FURNITURE All removable parts except the grill pan handle and telescopic runners can be washed in the dishwasher Alternatively soak them in hot soapy water if heavily soiled They will then clean more easily The grill pan meat tin trivet and grill deflector may be cleaned using ...
Страница 35: ... 3 Pull the glass bulb cover towards you and then pull it off If necessary use a screwdriver to carefully lever off the cover taking care not to damage the oven cavity 4 Unscrew the bulb by turning it to the left 5 Fit a new bulb and then replace the glass bulb cover 6 Replace the oven shelves 7 Restore the electricity supply and reset the time of day 34 Disconnect the cooker from the electricity ...
Страница 36: ...n set on the clock See page 7 Check that the oven is set for manual cooking See page 9 The Grill does not work or cuts out after being used for a long period of time Ensure that the grill door is open when grilling Ensure the cooling fan is running when the grill is on If the cooling fan fails the grill will not work Contact your nearest Service Centre Leave the grill door open and allow the grill...
Страница 37: ...e cook time begins The oven fan is noisy Check that the oven is level Check that shelves and bakeware are not vibrating in contact with the oven back panel The oven temperature is too high or low Check that the recommended temperatures and shelf positions are being used See pages 16 and 21 Be prepared to adjust up or down by 10 C to achieve the results you want 36 ...
Страница 38: ...ot extend the guarantee period for the appliance Parts removed during guarantee repairs become the property of AEG 6 The Purchaser s statutory rights are not affected by this guarantee European Guarantee If you should move to another country within Europe then your guarantee moves with you to your new home subject to the following qualifications The guarantee starts from the date you first purchas...
Страница 39: ...d the details under the heading If Something Doesn t Work When you contact the Service Centre you will need to give the following details 1 Your name address and post code 2 Your telephone number 3 Clear and concise details of the fault 4 The model product and serial number of the appliance found on the rating plate 5 The purchase date 38 SERVICE AND SPARE PARTS CUSTOMER CARE DEPARTMENT For genera...
Страница 40: ...E WHALSAY OWN SALES Leask Electrical Harlsdale Symbister Whalsay Shetland ZE2 9AA NORTHERN IRELAND BELFAST M27 Owenmore House Kilwee Business Park Upper Dunmury Lane Belfast BT17 0HD WALES CARDIFF M28 Guardian Industrial Estate Clydesmuir Road Tremorfa Cardiff CF2 2QS CLYWD M14 Unit 6 7 Coed Parc Abergele Road Rhuddlan Clwyd Wales LL18 5UG DYFED M77 West Wales Appliance Service Maes Y Coed High Me...
Страница 41: ...NDEN M46 Unit 4 Riverside Estate Coldharbour Lane Harpenden AL5 4UN LETCHWORTH M50 16 17 Woodside Ind Est Works Road Letchworth Herts SG6 1LA LONDON M76 2 4 Royal Lane Yiewsley West Drayton Middlesex UB7 8DL MAIDENHEAD M60 Reform Road Maidenhead Berkshire SL6 8BY MOLESEY M61 10 Island Farm Avenue West Molesey Surrey KT8 2UZ NEWBURY M24 PO Box 5627 Newbury Berkshire RG14 5GF IPSWICH M48 Unit 2B Elt...
Страница 42: ... 2 5kW Fan Motor 0 03kW Dual Grill 2 8kW Base Element 1 3kW Oven light 0 05kW Wattage 5 6 6 2kW Height 897mm Width 592mm Depth 563mm Weight 57kg INSTALLATION INSTRUCTIONS TECHNICAL DETAILS This appliance complies with European Council Directive 72 23 EEC This appliance carries the C E mark excluding handles and knobs 41 ...
Страница 43: ...parately to the cooker point Oven and hob units should be separately connected to a control panel See Fig 2 NOTE It is good practice to Fit an Earth Leakage Circuit Breaker to your house wiring Wire your appliance to the latest IEE regulations This cooker must be installed by a qualified electrician competent person Safety may be impaired if installation is not carried out in accordance with these...
Страница 44: ...er in case of an emergency To protect the hands wear gloves when lifting the oven into its housing NOTE HOUSE CIRCUIT Earth leakage and continuity tests must be carried out before the cooker is connected to the mains supply and re checked after fitting PREPARING CABINET FOR FITTING OF OVEN Make sure the cabinet is the correct size for the appliance to be fitted Ref Fig 3 page 44 If the size is bet...
Страница 45: ...IONS IN MILLIMETRES 2 0 0 0 R e co m m e n d e d 600 min 560 min 570 max 550 min 8 7 2 558 5 8 7 4 8 7 9 Cross section through cabinet showing oven positioned Fig 3 Built In Installation 542 5 897 872 44 1 6 9 907 min See Below ...
Страница 46: ... use a new length of cable to ensure your safety Ensure you have the correct length of cable appropriate to the wiring method you are using When fitting new cable allow sufficient cable for removal of the unit at a later date should it be necessary Score but do not cut through around the sheathing with a knife 100mm 4in from each end of the cable and break through to the encased wires by bending t...
Страница 47: ... to gain access to terminal block First remove retaining screw with pozidrive screwdriver See Fig 4 Prise cover loose using screwdriver in position 1 then lever off with screwdriver in position 2 at either side See Fig 5 Lift cover and remove screw from cable clamp See Fig 6 Fig 4 Fig 5 Fig 6 46 ...
Страница 48: ...n is inside the terminal block and that the wires are not taut but not so slack as to cause any fouling See Fig 7 Place fuse miniature circuit breaker in circuit and switch on at mains CONNECTING TO A HOB OR COOKER POINT Either follow in general terms the instructions for connecting to the terminal block or refer to the hob suppliers installation instructions CHECKING ELECTRICAL CONNECTIONS Correc...
Страница 49: ... of the cooker Tilt the cooker so that your hands can support the underside of the cooker Keeping your back straight raise the appliance to the cabinet by straightening at the knees Rest the rear underside of the cooker on the cabinet floor while your hands support the front The cooker can be pushed fully into the cabinet Take care to avoid Damaging the mains lead Ensure the cooker is central in t...
Страница 50: ...COMPETENCE D4100 311494101 ...
Страница 51: ... NOTICE In line with our continuing policy of research and development we reserve the right to alter models and specifications without prior notice This handbook is accurate at the date of printing but will be superseded and should be disregarded if specifications or appearance are changed ...
Страница 52: ...4 PART NUMBER 311494101 AEG DOMESTIC APPLIANCES 55 77 HIGH STREET SLOUGH BERKSHIRE SL1 1DZ TELEPHONE 0870 5 350350 ...
Страница 53: ...board monitors software tv dvd and othes Manual users user manuals user guide manual owners manual instruction manual manual owner manual owner s manual guide manual operation operating manual user s manual operating instructions manual operators manual operator manual product documentation manual user maintenance brochure user reference pdf manual ...