background image

11. 

HINTS AND TIPS

WARNING!

Refer to Safety chapters.

The temperature and baking

times in the tables are

guidelines only. They

depend on the recipes and

the quality and quantity of

the ingredients used.

11.1 

Inner side of the door

In some models, on the inner side of

the door you can find:

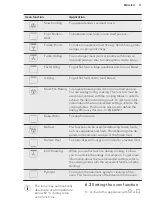
• the numbers of the shelf positions.

• information about the oven functions,

recommended shelf positions and

temperatures for typical dishes.

11.2 

Baking

• Your oven may bake or roast

differently to the appliance you had

before. Adapt your usual settings

(temperature, cooking times) and

shelf positions to the values in the

tables.

• The manufacturer recommends that

you use the lower temperature the

first time.

• If you cannot find the settings for a

special recipe, look for the one that is

almost the same.

• You can extend baking times by 10 –

15 minutes if you bake cakes on more

than one shelf position.

• Cakes and pastries at different

heights do not always brown equally

at first. If this occurs, do not change

the temperature setting. The

differences equalize during the

baking procedure.

• With longer baking times, you can

deactivate the oven approximately 10

minutes before the end of the baking

time and then use the residual heat.

When you cook frozen food, the trays in

the oven can twist during baking. When

the trays become cold again, the

distortions are gone.

11.3 

Tips on baking

Baking results

Possible cause

Remedy

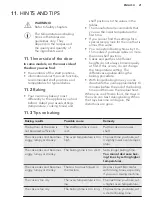
The bottom of the cake is
not browned sufficiently.

The shelf position is incor-
rect.

Put the cake on a lower
shelf.

The cake sinks and becomes
soggy, lumpy or streaky.

The oven temperature is too
high.

The next time you bake, set
a slightly lower oven temper-
ature.

The cake sinks and becomes
soggy, lumpy or streaky.

The baking time is too short. Set a longer baking time. 

You cannot decrease bak-
ing times by setting higher
temperatures.

The cake sinks and becomes
soggy, lumpy or streaky.

There is too much liquid in
the mixture.

Use less liquid. Be careful
with mixing times, especially
if you use a mixing machine.

The cake is too dry.

The oven temperature is too
low.

The next time you bake, set
a higher oven temperature.

The cake is too dry.

The baking time is too long. The next time you bake, set

a shorter baking time.

ENGLISH

21

Содержание BP7314021M

Страница 1: ...EN User Manual Oven BP7314021M BP731402EM BP731402WM BP731410EM BP731410FM BP731417IM ...

Страница 2: ...minutes reading to get the very best from it Visit our website for Get usage advice brochures trouble shooter service information www aeg com webselfservice Register your product for better service www registeraeg com Buy Accessories Consumables and Original spare parts for your appliance www aeg com shop CUSTOMER CARE AND SERVICE Always use original spare parts When contacting our Authorised Serv...

Страница 3: ...nd dispose of it appropriately Keep children and pets away from the appliance when it operates or when it cools down Accessible parts are hot If the appliance has a child safety device this should be activated Children shall not carry out cleaning and user maintenance of the appliance without supervision Children aged 3 years and under must be kept away from this appliance when it is in operation ...

Страница 4: ...g Do not install or use a damaged appliance Follow the installation instruction supplied with the appliance Always take care when moving the appliance as it is heavy Always use safety gloves and enclosed footwear Do not pull the appliance by the handle Keep the minimum distance from the other appliances and units Make sure that the appliance is installed below and adjacent safe structures The side...

Страница 5: ...he appliance as a work surface or as a storage surface Open the appliance door carefully The use of ingredients with alcohol can cause a mixture of alcohol and air Do not let sparks or open flames to come in contact with the appliance when you open the door Do not put flammable products or items that are wet with flammable products in near or on the appliance WARNING Risk of damage to the applianc...

Страница 6: ...ing is a high temperature operation that can release fumes from cooking residues and construction materials as such consumers are strongly advised to provide good ventilation during and after each Pyrolytic cleaning provide good ventilation during and after the first use at maximum temperature operation Unlike all humans some birds and reptiles can be extremely sensitive to potential fumes emitted...

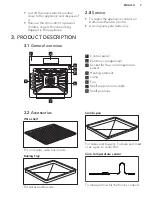
Страница 7: ...y 3 PRODUCT DESCRIPTION 3 1 General overview 2 7 1 8 4 3 5 6 5 4 3 2 1 1 Control panel 2 Electronic programmer 3 Socket for the core temperature sensor 4 Heating element 5 Lamp 6 Fan 7 Shelf support removable 8 Shelf positions 3 2 Accessories Wire shelf For cookware cake tins roasts Baking tray For cakes and biscuits Combi pan For cakes and biscuits To bake and roast or as a pan to collect fat Cor...

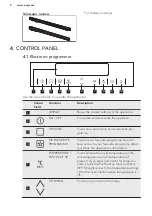
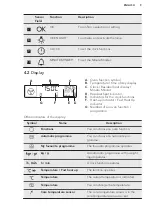
Страница 8: ...tomatic pro gramme 4 MY FAVOURITE PROGRAMME To store your favourite programme Use it to have access to your favourite programme direct ly or when the appliance is deactivated 5 TEMPERATURE FAST HEAT UP To set and see the cavity temperature or the core temperature sensor temperature if present If you press and hold it for three sec onds it turns the Fast heat up function ON or OFF Straight access t...

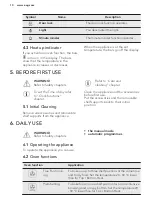
Страница 9: ...r Fast Heat Up indicator G Number of an oven function programme Other indicators of the display Symbol Name Description Functions You can choose an oven function Automatic programme You can choose an automatic pro gramme My favourite programme The favourite programme operates kg g An automatic programme with a weight input operates h min A clock function operates Temperature Fast heat up The funct...

Страница 10: ...and removable shelf supports from the appliance Refer to Care and cleaning chapter Clean the appliance and the accessories before first use Put the accessories and the removable shelf supports back to their initial position 6 DAILY USE WARNING Refer to Safety chapters 6 1 Operating the appliance To operate the appliance you can use the manual mode automatic programmes 6 2 Oven functions Oven funct...

Страница 11: ...about the recommended settings refer to the cooking tables This function was used to define the energy efficiency class acc to EN 60350 1 Keep Warm To keep food warm Defrost This function can be used for defrosting frozen foods such as vegetables and fruits The defrosting time de pends on the amount and size of the frozen food Bottom Heat To bake cakes with crispy bottom and to preserve food ECO R...

Страница 12: ...eat up function is not available with every oven function An acoustic signal sounds if the Fast heat up function is not available for the set function if Faulty tone is activated in the settings menu Refer to Using the settings menu The Fast heat up function decreases the heat up time To activate the Fast heat up function touch and hold for more than three seconds If you activate the Fast heat up ...

Страница 13: ... the display The appliance deactivates 7 Touch a sensor field or open the oven door to stop the acoustic signal 8 Turn off the appliance 7 4 Setting the END 1 Set an oven function and temperature 2 Touch again and again until starts to flash 3 Use or to set the END and or to confirm First you set the minutes and then the hours When the set time ends an acoustic signal sounds for 2 minutes and the ...

Страница 14: ...tch between options First you set the seconds then the minutes and the hours 3 Use or to set the MINUTE MINDER and to confirm 4 Touch or the MINUTE MINDER starts automatically after 5 seconds When the set time ends an acoustic signal sounds for 2 minutes and 00 00 and flash in the display 5 Touch a sensor field or open the oven door to stop the acoustic signal 7 8 COUNT UP TIMER 1 To reset the Cou...

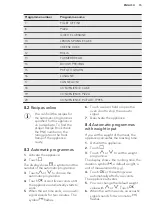
Страница 15: ... Touch or to choose the automatic programme 4 Touch or wait five seconds until the appliance automatically starts to work 5 When the set time ends an acoustic signal sounds for two minutes The symbol flashes 6 Touch a sensor field or open the oven door to stop the acoustic signal 7 Deactivate the appliance 8 4 Automatic programmes with weight input If you set the weight of the meat the appliance c...

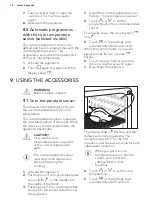
Страница 16: ...WARNING Refer to Safety chapters 9 1 Core temperature sensor There are two temperatures to be set the oven temperature and the core temperature The core temperature sensor measures the core temperature of the meat When the meat is at the set temperature the appliance deactivates CAUTION Only use the core temperature sensor supplied or the correct replacement parts The core temperature sensor must ...

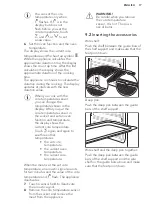
Страница 17: ...the display shows the current core temperature Touch again and again to see three other temperatures the set core temperature the current oven temperature the current core temperature When the meat is at the set core temperature an acoustic signal sounds for two minutes and the value of the core temperature and flash The appliance deactivates 7 Touch a sensor field to deactivate the acoustic signa...

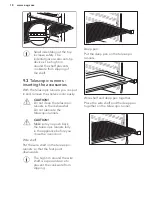
Страница 18: ...runners in the dishwasher Do not lubricate the telescopic runners CAUTION Make sure you push back the telescopic runners fully in the appliance before you close the oven door Wire shelf Put the wire shelf on the telescopic runners so that the feet point downwards The high rim around the wire shelf is a special device to prevent the cookware from slipping Deep pan Put the deep pan on the telescopic...

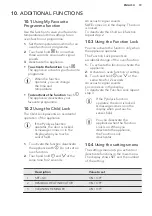
Страница 19: ... and at the same time for 2 seconds An acoustic signal sounds SAFE comes on in the display The door is locked To deactivate the Child Lock function repeat step 2 10 3 Using the Function Lock You can activate the function only when the appliance operates The Function Lock prevents an accidental change of the oven function 1 To activate the function activate the appliance 2 Activate an oven function...

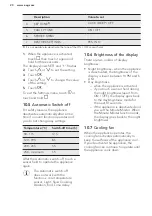
Страница 20: ... sensor field to operate the appliance again The Automatic switch off does not work with the functions core temperature sensor Light Slow Cooking Duration End Time delay 10 6 Brightness of the display There are two modes of display brightness Night brightness when the appliance is deactivated the brightness of the display is lower between 10 PM and 6 AM Day brightness when the appliance is activat...

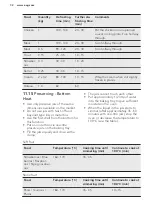
Страница 21: ...ng The differences equalize during the baking procedure With longer baking times you can deactivate the oven approximately 10 minutes before the end of the baking time and then use the residual heat When you cook frozen food the trays in the oven can twist during baking When the trays become cold again the distortions are gone 11 3 Tips on baking Baking results Possible cause Remedy The bottom of ...

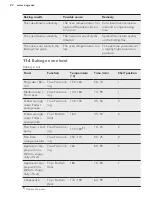
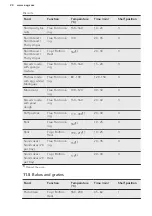
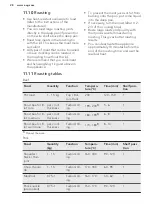
Страница 22: ...ns Food Function Temperature C Time min Shelf position Ring cake Brio che True Fan Cook ing 150 160 50 70 1 Madeira cake Fruit cakes True Fan Cook ing 140 160 70 90 1 Fatless sponge cake Fatless sponge cake True Fan Cook ing 140 150 35 50 2 Fatless sponge cake Fatless sponge cake Top Bottom Heat 160 35 50 2 Flan base short pastry True Fan Cook ing 170 1801 10 25 2 Flan base sponge mixture True Fan...

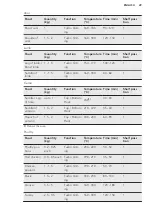
Страница 23: ...eat 190 2101 20 35 3 Swiss roll Top Bottom Heat 180 2001 10 20 3 Cake with crum ble topping dry True Fan Cook ing 150 160 20 40 3 Buttered al mond cake Sugar cakes Top Bottom Heat 190 2101 20 30 3 Fruit flans made with yeast dough sponge mixture 2 True Fan Cook ing 150 35 55 3 Fruit flans made with yeast dough sponge mixture 2 Top Bottom Heat 170 35 55 3 Fruit flans made with short pastry True Fan...

Страница 24: ...ngues True Fan Cook ing 80 100 120 150 3 Macaroons True Fan Cook ing 100 120 30 50 3 Biscuits made with yeast dough True Fan Cook ing 150 160 20 40 3 Puff pastries True Fan Cook ing 170 1801 20 30 3 Rolls True Fan Cook ing 1601 10 25 3 Rolls Top Bottom Heat 190 2101 10 25 3 Small cakes Small cakes 20 per tray True Fan Cook ing 1501 20 35 3 Small cakes Small cakes 20 per tray Top Bottom Heat 1701 2...

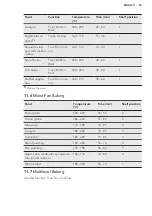
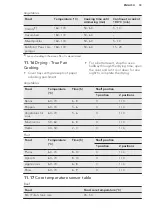
Страница 25: ...60 1 Stuffed vegeta bles True Fan Cook ing 160 170 30 60 1 1 Preheat the oven 11 6 Moist Fan Baking Food Temperature C Time min Shelf position Pasta gratin 200 220 45 55 3 Potato gratin 180 200 70 85 3 Moussaka 170 190 70 95 3 Lasagne 180 200 75 90 3 Cannelloni 180 200 70 85 3 Bread pudding 190 200 55 70 3 Rice pudding 170 190 45 60 3 Apple cake made with sponge mix ture round cake tin 160 170 70 ...

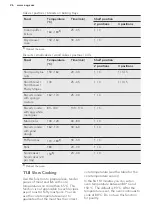
Страница 26: ... 40 80 1 4 Biscuits made with yeast dough 160 170 30 60 1 4 Puff pastries 170 1801 30 50 1 4 Rolls 180 20 30 1 4 Small cakes Small cakes 20 per tray 1501 23 40 1 4 1 Preheat the oven 11 8 Slow Cooking Use this function to prepare lean tender pieces of meat and fish with core temperatures no more than 65 C This function is not applicable to such recipes as pot roast or fatty roast pork You can use ...

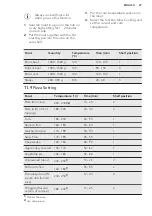
Страница 27: ...1500 g 120 90 150 3 Roast veal 1000 1500 g 120 120 150 1 Steaks 200 300 g 120 20 40 3 11 9 Pizza Setting Food Temperature C Time min Shelf position Pizza thin crust 200 2301 2 15 20 2 Pizza with a lot of topping 180 200 20 30 2 Tarts 180 200 40 55 1 Spinach flan 160 180 45 60 1 Quiche Lorraine 170 190 45 55 1 Swiss Flan 170 190 45 55 1 Cheesecake 140 160 60 90 1 Apple cake covered 150 170 50 60 1 ...

Страница 28: ...ral times during roasting This gives better roasting results You can deactivate the appliance approximately 10 minutes before the end of the roasting time and use the residual heat 11 11 Roasting tables Beef Food Quantity Function Tempera ture C Time min Shelf posi tion Pot roast 1 1 5 kg Top Bot tom Heat 230 120 150 1 Roast beef or fil let rare per cm of thickness Turbo Grill ing 190 2001 5 6 1 R...

Страница 29: ...e min Shelf posi tion Saddle Leg of hare up to 1 Top Bottom Heat 2301 30 40 1 Saddle of venison 1 5 2 Top Bottom Heat 210 220 35 40 1 Haunch of venison 1 5 2 Top Bottom Heat 180 200 60 90 1 1 Preheat the oven Poultry Food Quantity kg Function Temperature C Time min Shelf posi tion Poultry por tions 0 2 0 25 each Turbo Grill ing 200 220 30 50 1 Half chicken 0 4 0 5 each Turbo Grill ing 190 210 35 5...

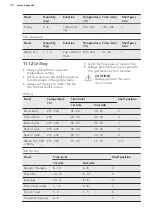
Страница 30: ... flat pieces of meat or fish Always preheat the empty oven with the grill functions for 5 minutes CAUTION Always grill with the oven door closed Grilling Food Temperature C Time min Shelf position 1st side 2nd side Roast beef 210 230 30 40 30 40 2 Filet of beef 230 20 30 20 30 3 Back of pork 210 230 30 40 30 40 2 Back of veal 210 230 30 40 30 40 2 Back of lamb 210 230 25 35 20 25 3 Whole Fish 500 ...

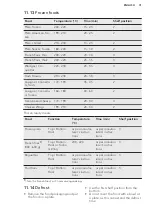
Страница 31: ... Temperature C Time min Shelf position Frozen pizza Top Bottom Heat as per manufac turer s instruc tions as per manufac turer s instruc tions 3 French fries1 300 600 g Top Bottom Heat or Turbo Grilling 200 220 as per manufac turer s instruc tions 3 Baguettes Top Bottom Heat as per manufac turer s instruc tions as per manufac turer s instruc tions 3 Fruit flans Top Bottom Heat as per manufac turer ...

Страница 32: ...or metal tins Use the first shelf from the bottom for this function Put no more than six one litre preserve jars on the baking tray Fill the jars equally and close with a clamp The jars cannot touch each other Put approximately 1 2 litre of water into the baking tray to give sufficient moisture in the oven When the liquid in the jars starts to simmer after approximately 35 60 minutes with one litr...

Страница 33: ...oven halfway through the drying time open the door and let it cool down for one night to complete the drying Vegetables Food Temperature C Time h Shelf position 1 position 2 positions Beans 60 70 6 8 3 1 4 Peppers 60 70 5 6 3 1 4 Vegetables for sour 60 70 5 6 3 1 4 Mushrooms 50 60 6 8 3 1 4 Herbs 40 50 2 3 3 1 4 Fruit Food Temperature C Time h Shelf position 1 position 2 positions Plums 60 70 8 10...

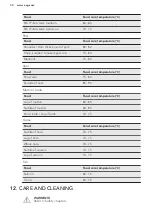
Страница 34: ...re temperature C Roast veal 75 80 Knuckle of veal 85 90 Mutton lamb Food Food core temperature C Leg of mutton 80 85 Saddle of mutton 80 85 Roast lamb Leg of lamb 70 75 Game Food Food core temperature C Saddle of hare 70 75 Leg of hare 70 75 Whole hare 70 75 Saddle of venison 70 75 Leg of venison 70 75 Fish Food Food core temperature C Salmon 65 70 Trouts 65 70 12 CARE AND CLEANING WARNING Refer t...

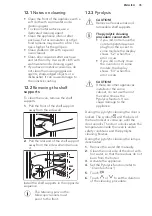
Страница 35: ...runners must point to the front 12 3 Pyrolysis CAUTION Remove all accessories and removable shelf supports The pyrolytic cleaning procedure cannot start if you did not remove the core temperature sensor plug from the socket In some models the display shows C2 when this error occurs if you did not fully close the oven door In some models the display shows C3 when this error occurs CAUTION If there ...

Страница 36: ...ferent models WARNING Be careful when you remove the door from the appliance The door is heavy 1 Open the door fully 2 Fully press the clamping levers A on the two door hinges A A 3 Close the oven door to the first opening position approximately 70 angle 4 Hold the door with one hand on each side and pull it away from the appliance at an upwards angle 5 Put the door with the outer side down on a s...

Страница 37: ...It prevents damage to the lamp glass cover and the cavity WARNING Danger of electrocution Disconnect the fuse before you replace the lamp The lamp and the lamp glass cover can be hot 1 Deactivate the appliance 2 Remove the fuses from the fuse box or deactivate the circuit breaker The top lamp 1 Turn the lamp glass cover counterclockwise to remove it 2 Clean the glass cover 3 Replace the lamp with ...

Страница 38: ...fied electrician The lamp does not operate The lamp is defective Replace the lamp The display does not show the time during the off sta tus The display is deactivated Touch and at the same time to activate the display again The core temperature sensor does not operate The plug of the core tem perature sensor is not cor rectly installed into the sock et Put the plug of the core tem perature sensor ...

Страница 39: ...with the house fuse or the safety switch in the fuse box and activate it again If the display shows the error code again contact the Customer Care De partment The appliance is activated and does not heat up The fan does not operate The display shows Demo The demo mode is activa ted Refer to Using the settings menu in Additional func tions chapter 13 2 Service data If you cannot find a solution to ...

Страница 40: ...M 39 5 kg BP731417IM 39 5 kg EN 60350 1 Household electric cooking appliances Part 1 Ranges ovens steam ovens and grills Methods for measuring performance 14 2 Energy saving The appliance contains features which help you save energy during everyday cooking General hints Make sure that the oven door is closed properly when the appliance operates and keep it closed as much as possible during the coo...

Страница 41: ... the temperature in the oven cavity may differ from the temperature indicated on the display during a cooking cycle and cooking times may be different from the cooking times in other programmes When you use Moist Fan Baking the lamp automatically deactivates after 30 seconds You may activate the lamp again but this action will reduce the expected energy savings Deactivating the display If necessar...

Страница 42: ...www aeg com 42 ...

Страница 43: ...ENGLISH 43 ...

Страница 44: ...www aeg com shop 867309401 E 402016 ...

Отзывы: