background image

Overall dimensions

1)

H 1

mm

819

W 1

mm

596

D 1

mm

547

1) 

the height, width and depth of the appliance

without the handle and feet

Space required in use

1)

H 2

mm

820

W 2

mm

596

D 2

mm

550

1) 

the height, width and depth of the appliance

including the handle, plus the space necessary for
free circulation of the cooling air

Overall space required in use

1)

H 2

mm

820

W 3

mm

777

D 3

mm

1120

1) 

the height, width and depth of the appliance

including the handle, plus the space necessary for
free circulation of the cooling air, plus the space
necessary to allow door opening to the minimum
angle permitting removal of all internal equip-
ment

3.2 

Location

To ensure appliance's best functionality,

you should not install the appliance in

the nearby of the heat source (oven,

stoves, radiators, cookers or hobs) or in a

place with direct sunlight. Make sure that

air can circulate freely around the back of

the cabinet.

3.3 

Positioning

This appliance should be installed in a

dry, well ventilated indoor position.
This appliance is intended to be used at

ambient temperature ranging from 10°C

to 43°C.

If you have any doubts

regarding where to install

the appliance, please turn to

the vendor, to our customer

service or to the nearest

Authorised Service Centre.

It must be possible to

disconnect the appliance

from the mains power

supply. The plug must

therefore be easily

accessible after installation.

3.4 

Electrical Connection

CAUTION!

Any electrical work required

to install this appliance

should be carried out by a

qualified electrician or

competent person.

WARNING!

This appliance must be

earthed.

The manufacturer declines

any liability should these

safety measures not be

observed.

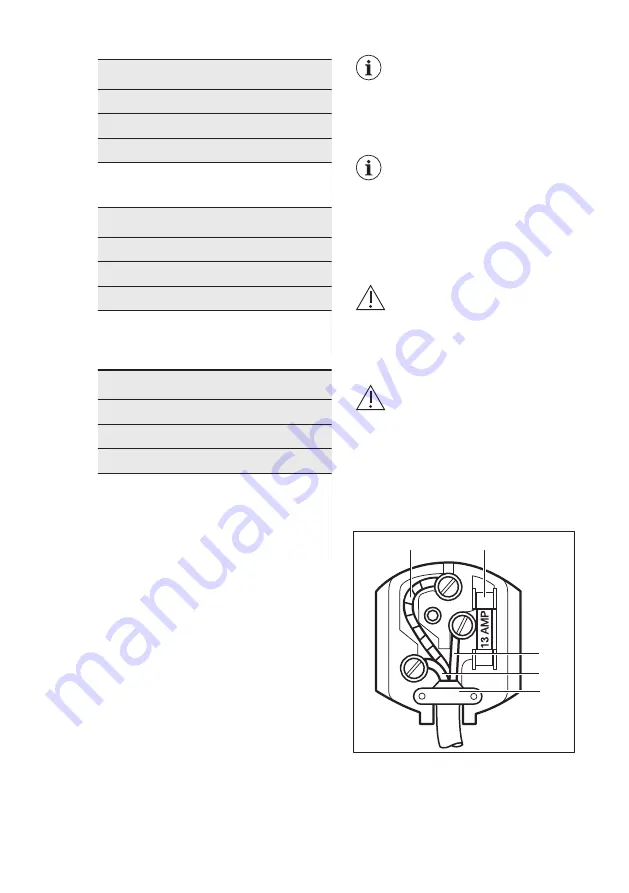
The wires in the mains lead are coloured

in accordance with the following code:

A

B

C

D

E

A

 - green and yellow: Earth

C

 - brown: Live

D

 - blue: Neutral

As the colours of the wires in the mains

lead of this appliance may not

ENGLISH

7

Содержание 5000 Series

Страница 1: ...USER MANUAL EN User Manual Freezer ABK682F1AF ...

Страница 2: ...e shooter service and repair information www aeg com support Register your product for better service www registeraeg com Buy Accessories Consumables and Original spare parts for your appliance www aeg com shop CUSTOMER CARE AND SERVICE Always use original spare parts When contacting our Authorised Service Centre ensure that you have the following data available Model PNC Serial Number The informa...

Страница 3: ...ies provided that they have been properly instructed Children of less than 3 years of age should be kept away from the appliance unless continuously supervised Do not let children play with the appliance Children shall not carry out cleaning and user maintenance of the appliance without supervision Keep all packaging away from children and dispose of it appropriately 1 2 General Safety This applia...

Страница 4: ... the supply cord is damaged it must be replaced by the manufacturer its Authorised Service Centre or similarly qualified persons in order to avoid a hazard 2 SAFETY INSTRUCTIONS 2 1 Installation WARNING Only a qualified person must install this appliance Remove all the packaging Do not install or use a damaged appliance Do not use the appliance before installing it in the built in structure due to...

Страница 5: ...rant circuit containing isobutane Do not change the specification of this appliance Do not put electrical appliances e g ice cream makers in the appliance unless they are stated applicable by the manufacturer If damage occurs to the refrigerant circuit make sure that there are no flames and sources of ignition in the room Ventilate the room Do not let hot items to touch the plastic parts of the ap...

Страница 6: ...inued 2 6 Disposal WARNING Risk of injury or suffocation Disconnect the appliance from the mains supply Cut off the mains cable and discard it Remove the door to prevent children and pets to be closed inside of the appliance The refrigerant circuit and the insulation materials of this appliance are ozone friendly The insulation foam contains flammable gas Contact your municipal authority for infor...

Страница 7: ... air can circulate freely around the back of the cabinet 3 3 Positioning This appliance should be installed in a dry well ventilated indoor position This appliance is intended to be used at ambient temperature ranging from 10 C to 43 C If you have any doubts regarding where to install the appliance please turn to the vendor to our customer service or to the nearest Authorised Service Centre It mus...

Страница 8: ... cut off plug inserted into a 13 amp socket is a serious safety shock hazard Ensure that it is disposed of safely 3 5 Ventilation requirements CAUTION Refer to the installation instructions for the installation 3 6 Door reversibility Please refer to the separate document with instructions on installation and door reversal CAUTION At every stage of reversing the door protect the floor from scratchi...

Страница 9: ...eezing To switch on the function 1 Press the Frostmatic button for 2 3 seconds to activate the Frostmatic function The Frostmatic light will switch on 2 Place the food in the freezing compartment and keep the Frostmatic function switched on for further 24 hours Refer to Freezing fresh food section This function stops automatically after 52 hours It is possible to deactivate the function at any tim...

Страница 10: ... pieces may even be cooked still frozen 6 HINTS AND TIPS 6 1 Hints for energy saving The internal configuration of the appliance is the one that ensures the most efficient use of energy Do not open the door frequently or leave it open longer than necessary The colder the temperature setting the higher the energy consumption Ensure a good ventilation Do not cover the ventilation grilles or holes 6 ...

Страница 11: ...not damaged the food could be deteriorated If the package is swollen or wet it might have not been stored in the optimal conditions and defrosting may have already started To limit the defrosting process buy frozen goods at the end of your grocery shopping and transport them in a thermal and insulated cool bag Place the frozen foods immediately in the freezer after coming back from the shop If foo...

Страница 12: ...nd wipe them clean to ensure they are clean and free from debris 3 Rinse and dry thoroughly 7 3 Defrosting of the freezer CAUTION Never use sharp metal tools to scrape off frost from the evaporator as you could damage it Do not use a mechanical device or any artificial means to speed up the thawing process other than those recommended by the manufacturer About 12 hours prior to defrosting set a lo...

Страница 13: ...hen the ventilation grid B C A B 2 Clean the ventilation grid 3 Carefully pull the air deflector out C checking that there is no water left from the defrosting 4 Clean the lower part of the appliance with a vacuum cleaner 7 5 Period of non operation When the appliance is not in use for long period take the following precautions 1 Disconnect the appliance from electricity supply 2 Remove all food 3...

Страница 14: ...perature again The room temperature is too high Refer to Installation chap ter Food products placed in the appliance were too warm Allow food products to cool to room temperature before storing The door is not closed cor rectly Refer to Closing the door section The Frostmatic function is switched on Refer to Frostmatic func tion section The compressor does not start immediately after pressing the ...

Страница 15: ...ive tray Temperature cannot be set The Frostmatic function is switched on Switch off Frostmatic func tion manually or wait until the function deactivates au tomatically to set the tem perature Refer to Frost matic function section The temperature in the ap pliance is too low too high The temperature is not set correctly Set a higher lower tempera ture The door is not closed cor rectly Refer to Clo...

Страница 16: ...ing the temperature Contact a qualified electri cian or the nearest Author ized Service Centre If the advice does not lead to the desired result call the nearest Authorized Service Centre 8 2 Closing the door 1 Clean the door gaskets 2 If necessary adjust the door Refer to installation instructions 3 If necessary replace the defective door gaskets Contact the Authorised Service Centre 9 NOISES SSS...

Страница 17: ...e rating plate of the appliance 11 INFORMATION FOR TEST INSTITUTES Installation and preparation of the appliance for any EcoDesign verification shall be compliant with EN 62552 Ventilation requirements recess dimensions and minimum rear clearances shall be as stated in this User Manual at Chapter 3 Please contact the manufacturer for any other further information including loading plans 12 ENVIRON...

Страница 18: ...www aeg com 18 ...

Страница 19: ...ENGLISH 19 ...

Страница 20: ...www aeg com shop 211625475 A 042020 ...

Отзывы: