background image

TPC-xx51T-x3BE User Manual

74

C.1.5

Boot

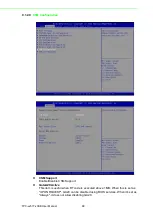
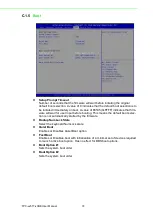
Setup Prompt Timeout

Number of seconds that the firmware will wait before initiating the original 

default boot selection. A value of 0 indicates that the default boot selection is to 

be initiated immediately on boot. A value of 65535(0xFFFF) indicates that firm

-

ware will wait for user input before booting. This means the default boot selec

-

tion is not automatically started by the firmware.

Bootup NumLock State

Select the keyboard NumLock state

Quiet Boot

Enables or Disables Quiet Boot option

Fast Boot

Enables or Disables boot with initialization of a minimal set of devices required 

to launch active boot option. Has no effect for BBS boot options.

Boot Option #1

Sets the system boot order

Boot Option #2

Sets the system boot order


Содержание TPC 51T 3BE Series

Страница 1: ...User Manual TPC xx51T x3BE Industrial Touch Panel Computers with Intel Atom Processors or Intel Celeron Processors...

Страница 2: ...rized by Advantech or which have been subject to misuse abuse accident or improper installation Advantech assumes no liability under the terms of this warranty as a consequence of such events Because...

Страница 3: ...uipment has been tested and found to comply with the limits for a Class A digital device pursuant to part 15 of the FCC Rules These limits are designed to provide reasonable protection against harmful...

Страница 4: ...messages Warnings Cautions and Notes Document Feedback To assist us in making improvements to this manual we would welcome comments and constructive criticism Please send all such in writing to suppo...

Страница 5: ...personnel 15 If one of the following situations arises get the equipment checked by service personnel The power cord or plug is damaged Liquid has penetrated into the equipment The equipment has been...

Страница 6: ...tery is incorrectly replaced Replace only with the same or equivalent type recommended by the manufacturer Dis pose of used batteries according to the manufacturer s instructions Danger d explosion si...

Страница 7: ...Power Connector and Power Lines 12 Figure 2 3 Power Receptor Button Pin Assignment 12 2 2 1 Installing SSD DD 13 2 2 2 Installing an iDoor Module 14 2 2 3 Installing the Drivers 16 2 3 Panel Mounting...

Страница 8: ...54000056 D SUB Conn 9P 90D M DIP 070241MR009S200ZU 33 A 3 8 COM2 RS232 422 485 Connector CN16 34 Table A 10 1654000056 D SUB Conn 9P 90D M DIP 070241MR009S200ZU 34 Appendix B Driver Installation Confi...

Страница 9: ...Chapter 1 1 General Information...

Страница 10: ...provide flexibility in harsh environments Bright Display The TFT LED LCD display suits industrial demands for clear interfaces Wide Operating Temperature Isolation Protection 1 2 Specifications 1 2 1...

Страница 11: ...ble 1 1 LCD Specifications TPC 1251T TPC 1551T TPC 1751T Display Type TFT LED LCD TFT LED LCD TFT LED LCD Size 12 1 15 17 Maximum Resolution 1024 x 768 XGA 1024 x 768 XGA 1280 x 800 SXGA Maximum Color...

Страница 12: ...Controller USB Interface Lifespan 1 million touches at single point 1 5 Power Input Voltage 24VDC 20 the fuse will become an open circuit if the input level exceeds 32 VDC Typical TPC 1251T 24 VDC 1...

Страница 13: ...every clamp and fasten them These screws will push the mounting panel and fix the unit 4 The suggested mounting panel thickness is less than 6 mm 236 in 1 8 Dimensions and Cutout TPC 1251T Series Weig...

Страница 14: ...TPC xx51T x3BE User Manual 6 Figure 1 2 TPC 1251T Dimensions 301 6 227 6 269 15 6 100 100 150 7 55 4 192 28 9 311 8 247 2 186 3 238 150 180 180...

Страница 15: ...7 TPC xx51T x3BE User Manual Chapter 1 General Information Figure 1 3 TPC 1551T Dimensions 306 1 230 1 383 2 307 3 7 55 9 100 100 10 372 89 296 89...

Страница 16: ...TPC xx51T x3BE User Manual 8 Figure 1 4 TPC 1751T Dimensions 100 100 10 333 38 399 88 7 56 9 272 9 339 9 410 4 343 4...

Страница 17: ...Chapter 2 2 System Setup...

Страница 18: ...ure may impact the unprotected unit Damaged packaging indi cates that ambient conditions have already had a massive impact on the device Therefore please use the original packaging during transportati...

Страница 19: ...ystem Setup 2 2 System Setup You can easily get TPC started by following the steps below 1 Unpack the TPC package Check the packing list at the beginning of this man ual to make sure all items have be...

Страница 20: ...e Figure 2 2 Power Connector and Power Lines Figure 2 3 Power Receptor Button Pin Assignment 3 Plug the power lines into the system s power receptor 4 Attach power to the system 5 Calibrate the touchs...

Страница 21: ...Chapter 2 System Setup 2 2 1 Installing SSD DD 1 Unscrew the cover by removing screws on the rear of the box 2 Slide the rear cover of the rear of the box 3 Remove the rear cover from rear box 4 Unsc...

Страница 22: ...l 14 5 Fasten SSD HDD with holder plate 6 Fasten holder plate on the rear cover 7 Connect SATA cable with SSD HDD and on board SATA signal CN12 and power CN8 port 2 2 2 Installing an iDoor Module 2 1...

Страница 23: ...E User Manual Chapter 2 System Setup 2 2 Insert iDoor module 2 3 Fasten iDoor module to rear cover using two screws 2 4 Insert mPCIe module to mPCIe socket MPCIE1 2 5 Connect signal with iDoor module...

Страница 24: ...driv ers 2 3 Panel Mounting 1 Position the TPC against the panel 2 Insert the clamps into the side of the TPC Note The drivers and utilities used for the panel PCs are subject to change without notic...

Страница 25: ...2 4 VESA Mounting 1 TPC xx51T x3BE supports VESA 100x100 standard 2 M4 x 10 screws are recommended for mounting TPC xx51T E3BE with VESA mounting equipment 3 Affix your VESA mounting equipment to the...

Страница 26: ...round should be connected together 1 Install the TPC system into the cabinet Step A Connect the cabinet to the earth ground Step B Embed null TPC system into the cabinet without any I O cable and powe...

Страница 27: ...TPC prevents damage to USB devices ESD and EMI Solutions are designed to use Power GND as a vent path to ensure Power GND and Chassis GND will not have potential difference abnormalities For differen...

Страница 28: ...TPC xx51T x3BE User Manual 20...

Страница 29: ...Chapter 3 3 Features in Windows Embedded...

Страница 30: ...Note that there is no disk based overlay support for Windows Embedded Standard 7 EWF works at the sector level on protected disks and allows you to commit changes so that they persist when the device...

Страница 31: ...instead of the sector level on protected disks By default FBWF protects the whole disk but selective write through exceptions can be granted to specific files and folders Writes to folders with write...

Страница 32: ...isabled You can run OSUnLock to disable EWF 2 Enable hibernation support Open the command prompt and type powercfg h on 3 Run power options in control panel and then select Enable Hibernation in hiber...

Страница 33: ...25 TPC xx51T x3BE User Manual Chapter 3 Features in Windows Embedded...

Страница 34: ...TPC xx51T x3BE User Manual 26...

Страница 35: ...Appendix A A Serial Port Settings...

Страница 36: ...oard Placement A 2 Jumper Setting and Description A 2 1 CMOS Clear Function CN1 Table A 1 CMOS Clear Function CN1 CMOS Clear Function Description This jumper is used to select CMOS Clear Enable Disabl...

Страница 37: ...2 1654004659 Serial ATA 7P 1 27mm 180D M DIP WATM 07DBN4A3B83 12 Pin Signal Description 1 GND GND 2 A Signal Pair A TX 3 A Transmit 4 GND GND 5 B Signal Pair B RX 6 B Receive 7 GND GND Table A 3 WAFER...

Страница 38: ...38 USB_D USB serial data inter face compliant to 37 GND 36 USB_D the USB 2 0 specifi cation 35 GND 34 GND 33 PETp0 PCI Express differential trans mit pair 32 SMB_DATA SMBus data signal compliant to t...

Страница 39: ...V PCI1 1 was 3 3V PCI1 2 was 3 3Vaux 1 WAKE Open Drain active Low signal This signal is used to request that the system return from a sleep sus pended state to service a function initiated wake event...

Страница 40: ...ed for the receive pair 2 MDI0 3 MDI1 In BASE T Media Dependent Interface 1 1000BASE T In MDI configuration MDI 1 corresponds to BI_DB and in MDI X configuration MDI 1 corresponds to BI_DA 10BASE T an...

Страница 41: ...iption 1 10 USB VBUS USB Power output USB2 0 5V 0 5A and USB3 0 5V 0 9A 2 11 USB_P USB 2 0 date 3 12 USB_P USB 2 0 date 4 13 GND Ground for Power return 5 SSRX USB 3 0 RX 6 SSRX USB 3 0 RX 7 GND_DRAIN...

Страница 42: ...al 34 A 3 8 COM2 RS232 422 485 Connector CN16 Table A 10 1654000056 D SUB Conn 9P 90D M DIP 070241MR009S200ZU Pin RS232 RS422 RS485 1 DCD TX D 2 RX TX D 3 TX RX 4 DTR RX 5 GND GND GND 6 DSR 7 RTS 8 CT...

Страница 43: ...Appendix B B Driver Installation and Configuration...

Страница 44: ...re Installation Utility Installation Follow the steps below to install the Intel Chipset Software Installation Utility 1 Launch Driver Root Path Intel Chipset Software Installation Util ity Setup Chip...

Страница 45: ...37 TPC xx51T x3BE User Manual Appendix B Driver Installation and Configuration 4 Click Accept 5 Click Install 6 Click Finish...

Страница 46: ...ser Manual 38 B 2 Intel Graphics Driver Installation Follow the steps below to install the Intel Graphics driver 1 Launch folder Driver Root Path Graphics Driver Intel EMGD win7 XX bit 2 Install Setp...

Страница 47: ...39 TPC xx51T x3BE User Manual Appendix B Driver Installation and Configuration 4 Click Yes 5 Click Next 6 Click Install...

Страница 48: ...TPC xx51T x3BE User Manual 40 7 Click Next 8 Choose Yes then click Finish to restart...

Страница 49: ...ppendix B Driver Installation and Configuration B 3 LAN Driver Installation Follow the steps below to install the LAN driver 1 Launch folder Driver Root Path LAN Win7 Install_Win7_7077_XXX _XXXXXXXX 2...

Страница 50: ...TPC xx51T x3BE User Manual 42 4 Click Install 5 Click Finish...

Страница 51: ...onfiguration B 4 Intel Trusted Execution Engine Driver Installation Follow the steps below to install the Intel Trusted Execution Engine driver 1 Launch folder Driver Root Path TXE Intel TXE Firmware...

Страница 52: ...TPC xx51T x3BE User Manual 44 5 Click Next 6 Click Next 7 Choose Yes then click Finish to restart...

Страница 53: ...B Driver Installation and Configuration B 5 Windows 7 USB 3 0 Driver Installation Follow the steps below to install the Windows 7 USB 3 0 driver 1 Launch folder Driver Root Path USB3 Win7 SetupUSB3_X...

Страница 54: ...TPC xx51T x3BE User Manual 46 4 Click Yes 5 Click Next 6 Click Next...

Страница 55: ...47 TPC xx51T x3BE User Manual Appendix B Driver Installation and Configuration 7 Choose Yes then click Finish to restart...

Страница 56: ...xx51T x3BE User Manual 48 B 6 Advantech EC Driver Installation Follow the steps below to install the EC drivers 1 Launch folder Driver Root Path EC Vx xx xxxx 2 Install AdvEC_Vx xx xxxx exe 3 Click N...

Страница 57: ...49 TPC xx51T x3BE User Manual Appendix B Driver Installation and Configuration 4 Click Install 5 Click Finish 6 Choose Yes then click OK to restart...

Страница 58: ...Control Tool Installation Follow the steps below to install the EC brightness control tool 1 Launch folder Driver Root Path EC Brightness Vx xx xxxx 2 Install AdvECBrightness_Vx xx xxxx exe 3 Click N...

Страница 59: ...51 TPC xx51T x3BE User Manual Appendix B Driver Installation and Configuration 4 Click Install 5 Click Finish...

Страница 60: ...OK to restart B 8 Advantech EC Watchdog Timer Driver Installation Follow the steps below to install the EC Watchdog Timer driver 1 Launch folder Driver Root Path WDT Vx xx xxxx 2 Install AdvWDT_Vx xx...

Страница 61: ...53 TPC xx51T x3BE User Manual Appendix B Driver Installation and Configuration 3 Click Next 4 Choose Advantech EC WDT then click Next...

Страница 62: ...TPC xx51T x3BE User Manual 54 5 Click Install 6 Click Finish...

Страница 63: ...ion and Configuration 7 Choose Yes then click OK to restart B 9 Advantech LMsensor Driver Installation Follow the steps below to install the LMsensor driver 1 Launch folder Driver Root Path Lmsensor V...

Страница 64: ...upport page for the detailed driver user manual Note The drivers and utilities used for the panel PCs are subject to change without notice If in doubt check Advantech s website or contact our applicat...

Страница 65: ...Appendix C C BIOS Setup...

Страница 66: ...is a number assigned to the patch code it means that the BIOS supports your CPU If there is no number assigned to the patch code please contact an Advantech application engineer to obtain an up to da...

Страница 67: ...tion is selected in the left frame it is highlighted in white Often a text message will accom pany it System time System date Use this option to change the system time and date Highlight System Time o...

Страница 68: ...select any item in the left frame of the screen such as CPU Con figuration to go to the sub menu for that item Users can display an Advanced BIOS Setup option by highlighting it using the Arrow keys...

Страница 69: ...configuration Enable Hibernation This item allows users to enable or disable system ability to hibernate OS S4 sleep State This option may be not effective with some OS ACPI Sleep State This item allo...

Страница 70: ...er Manual 62 C 1 2 2 Super I O Configuration Serial Port 1 Configuration Set Parameters of Serial Port 1 COMA Serial Port 2 Configuration Set Parameters of Serial Port 2 COMB C 1 2 3 Embedded Controll...

Страница 71: ...This page displays all information regarding system Temperature Voltage Cur rent iManager Watchdog IRQ This item allows users to set the IRQ number of the EC watchdog EC Watch Dog Function This item a...

Страница 72: ...ake on alarm event Select FixedTime system will wake on the hr min sec specified C 1 2 5 CPU Configuration Execute Disable Bit This item allows users to enable or disable Execute Disable Bit XD can pr...

Страница 73: ...Windows XP SP2 RedHat Enterprise 3 update 3 Intel Virtualization Technology This item allows users to enable or disable Intel Virtualization Technology When enabled a VMM can utilize the additional h...

Страница 74: ...1 SATA Mode This item allows users to select SATA mode selection Determines how SATA controller s operate Serial ATA Port 0 Port1 Enable Disable Serial ATA Port0 Port1 SATA Port 0 Port1 HotPlug Enable...

Страница 75: ...ser Manual Appendix C BIOS Setup C 1 2 8 LAN Controller LAN A Controller Enable or disable on board NIC LAN B Controller Enable or disable on board NIC Wake on LAN Enable Enable Disable integrated LAN...

Страница 76: ...guration CSM Support Enable Disable CSM Support GateA20 Active This item is useful when RT code is executed above 1MB When this is set as UPON RQUEST GA20 can be disabled using BIOS services When it s...

Страница 77: ...ols Legacy UEFI ROMs priority Network Controls the execution of UEFI and Legacy PXE OpROM Storage Controls the execution of UEFI and Legacy Storage OpROM Video Controls the execution of UEFI and Legac...

Страница 78: ...EHCI Hand Off This is a workaround for OS without EHCI hand off support The EHCI owner ship change should be claimed by EHCI driver USB Mass Storage Driver Support This item allows you to Enable or Di...

Страница 79: ...71 TPC xx51T x3BE User Manual Appendix C BIOS Setup C 1 2 11COM Configuration COM Configuration Configure Serial Ports to RS 232 RS 485 RS422...

Страница 80: ...T x3BE User Manual 72 C 1 3 Chipset Configuration GOP Driver Enable GOP Driver will unload VBIOS Disable it will load VBIOS C 1 3 1 Intel IGD Configuration Intel IGD Configuration Configure Intel IGD...

Страница 81: ...e Setup main BIOS setup menu All Security Setup options such as password protection and virus protection are described in this sec tion To access the sub menu for the following items select the item a...

Страница 82: ...ates that firm ware will wait for user input before booting This means the default boot selec tion is not automatically started by the firmware Bootup NumLock State Select the keyboard NumLock state Q...

Страница 83: ...anges This item allows you to save changes done so far to any of the options Discard Changes This item allows you to discard changes done so far to any of the options Restore Defaults This item allows...

Страница 84: ...ions are subject to change without notice No part of this publication may be reproduced in any form or by any means electronic photocopying recording or otherwise without prior written permis sion fro...

Отзывы: