


POC-127 User Manual
18
3.2
Installation of Intel (R) Rapid Storage
Technology Driver
Complete the following steps to install the Chipset driver. Follow the procedures in
the flow chart that apply to the operating system that you are using within your POC-
127.
3.2.1
Installation for Windows XP
Because SATA controller default is configured as AHCI mode, you must pre-install
the Intel(R) Rapid Storage Technology driver using the F6 installation method
described below.
Step 1.
At the beginning of the operating system installation, press F6 to install a third
party SCSI or RAID driver.
Step 2.
When prompted, select 'S' to Specify Additional Device.
Step 3.
When prompted, insert the media (floppy, CD/DVD or USB) included Intel
Rapid Storage Technology driver and press Enter.
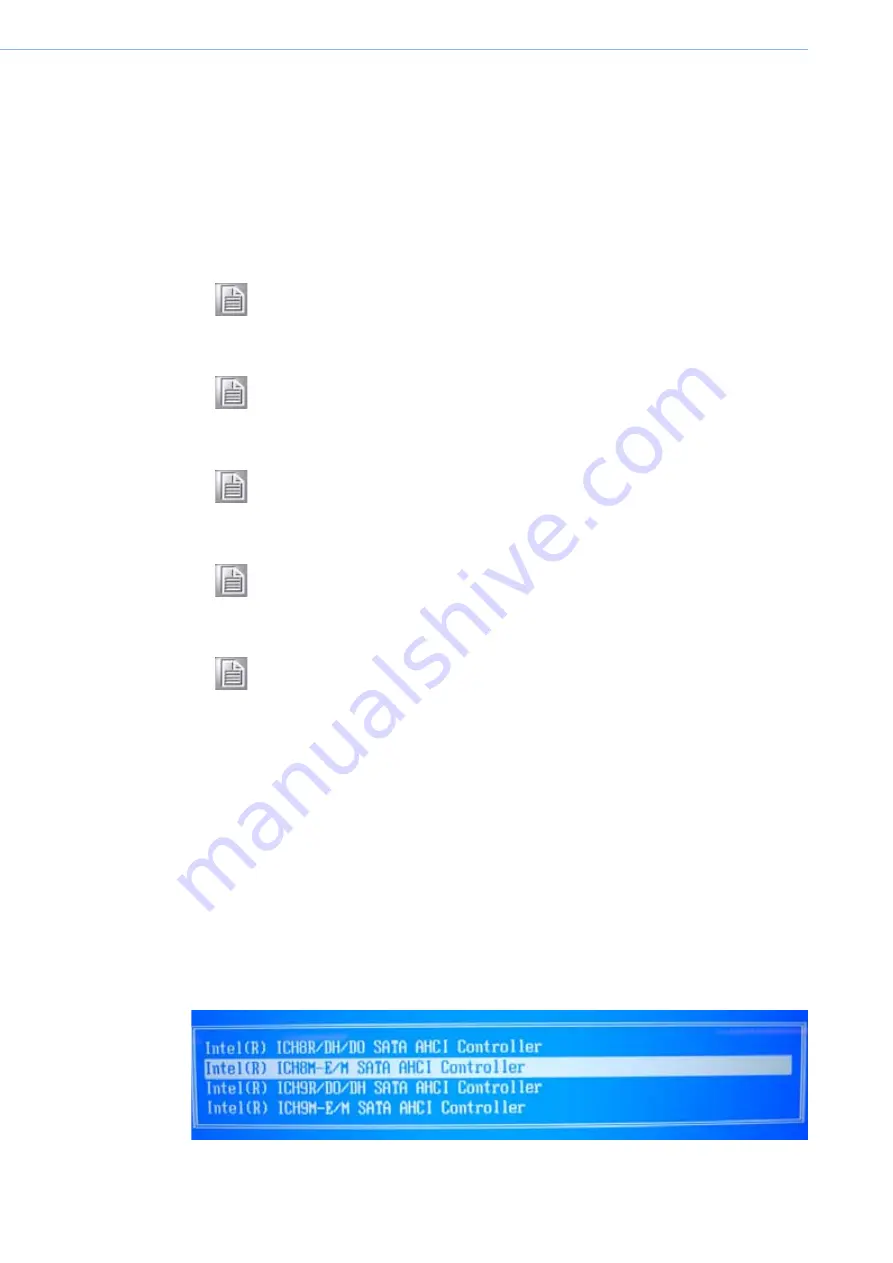
Step 4.
At this point you should be presented with a selection for ICH8M listed in the
picture. Highlight the selection and press Enter.
Note!
The following windows illustrations are examples only. You must follow
the flow chart instructions and pay attention to the instructions which
appear on your screen.
Note!
The CD-ROM drive is designated as °×D°± throughout this chapter.
Note!
<Enter> means pressing the °×Enter°± key on the keyboard.
Note!
Before you install the graphic driver of POC-127, please ensure you
have installed the “Intel Chipset Software Installation Utility”. You can
find this driver in the Utility CD-ROM.
Note!
The resolution of window display will be fix on 640 x 480 before you
install Graphics driver. Depend on your monitor native resolution, the
black area might be different.
Содержание POC127
Страница 1: ...User Manual POC 127 Intel Pineview M N450 CPU based Point of Care Terminal with 12 1 LED panel...
Страница 13: ...Chapter 1 1 General Information...
Страница 18: ...POC 127 User Manual 6...
Страница 19: ...Chapter 2 2 System Setup...
Страница 26: ...POC 127 User Manual 14...
Страница 27: ...Chapter 3 3 Chipset...
Страница 32: ...POC 127 User Manual 20 Step 4 Read file information and click Next to proceed...
Страница 36: ...POC 127 User Manual 24 Step 6 When the Click Next to continue message appears click Next to proceed...
Страница 38: ...POC 127 User Manual 26...
Страница 39: ...Chapter 4 4 Audio Interface...
Страница 43: ...Chapter 5 5 PCI Express Ethernet...
Страница 48: ...POC 127 User Manual 36...
Страница 49: ...Chapter 6 6 Touch Panel...
Страница 57: ...Chapter 7 7 Optional Devices...
Страница 68: ...POC 127 User Manual 56 Step 3 Read and accept End User License Agreement Click Install to continue...
Страница 76: ...POC 127 User Manual 64...
Страница 77: ...Chapter 8 8 Utility and Hot fix...
Страница 79: ...Chapter 9 9 Operation and Safety information...
Страница 81: ...Appendix A A MB Connector Map and Table...
Страница 84: ...POC 127 User Manual 72...
Страница 85: ...Appendix B B PCM 8708 MB Jumper setting...
Страница 88: ...POC 127 User Manual 76...
Страница 89: ...Appendix C C POC 127 Cleaning and Disinfecting...
Страница 91: ...79 XXX XXXX User Manual Appendix C POC 127 Cleaning and Disinfecting...


