background image

ENGLISH / A-19

FORM NO. - 56041972 - Warrior

 ST, Warrior

 EcoFlex

 - 

A-19

CHARGING WET BATTERIES

EcoFlex - Charge the batteries each time the machine is used or when the Battery Indicator 

(D5)

 is reading less than full.

Standard - Charge the batteries each time the machine is used or when the Battery Indicator 

(J1)

 is 

À

 ashing RED.

 WARNING!

Do not 

¿

 ll the batteries before charging.

Charge batteries in a well-ventilated area.
Do not smoke while servicing the batteries.

When Servicing Batteries...
*


Remove all jewelry

*


Do not smoke

*


Wear safety glasses, rubber gloves and a rubber apron

*


Work in a well-ventilated area

*


Do not allow tools to touch more than one battery terminal at a time

ALWAYS disconnect the negative (ground) cable 

¿

 rst when replacing batteries to prevent sparks.

ALWAYS connect the negative cable last when installing batteries.

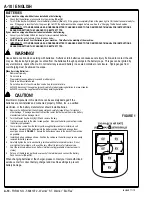
If your machine shipped with an onboard battery charger do the following:

Turn the Key Switch 

(A)

 OFF.  Unwind the electrical cord from the side of the onboard charger and plug it into a properly grounded outlet.  Refer to the OEM product manual for more 

detailed operating instructions.

If your machine shipped without an onboard battery charger do the following:

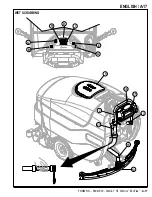
Disconnect the batteries from the machine and push the connector from the charger into the Battery Pack Connector 

(18)

.  Follow the instructions on the battery charger.  

SERVICE


NOTE:

Make sure you plug the battery charger into the connector with the handle attached to it.

 CAUTION!

To avoid damage to 

À

 oor surfaces, wipe water and acid from the top of the batteries after charging.

CHECKING THE BATTERY WATER LEVEL

Check the water level of the batteries at least once a week.
After charging the batteries, remove the vent caps and check the water level in each battery cell. Use distilled or demineralized water in a battery 

¿

 lling dispenser (available at most auto parts stores) to 

¿

 ll each cell to the level indicator (or to 10 mm over the top of the separators).  DO NOT 

over-

¿

 ll the batteries!

 CAUTION!

Acid can spill onto the 

À

 oor if the batteries are over

¿

 lled.

Tighten the vent caps.  Wash the tops of the batteries with a solution of baking soda and water (2 tablespoons of baking soda to 1 liter of water).

CHARGING GEL (VRLA) BATTERIES

EcoFlex - Charge the batteries each time the machine is used or when the Battery Indicator 

(D5)

 is reading less than full.

Standard - Charge the batteries each time the machine is used or when the Battery Indicator 

(J1)

 is 

À

 ashing RED.

 WARNING!

Charge batteries in a well-ventilated area.
Do not smoke while servicing the batteries.

When Servicing Batteries...
*


Remove all jewelry

*


Do not smoke

*


Wear safety glasses, rubber gloves and a rubber apron

*


Work in a well-ventilated area

*


Do not allow tools to touch more than one battery terminal at a time

ALWAYS disconnect the negative (ground) cable 

¿

 rst when replacing batteries to prevent sparks.

ALWAYS connect the negative cable last when installing batteries.

 CAUTION!

Your voltage regulated lead acid (VRLA) battery will deliver superior performance and life ONLY IF IT RECHARGED PROPERLY!  Under or 
overcharging will shorten battery life and limit performance.  Be sure to FOLLOW PROPER CHARGING INSTRUCTIONS!  DO NOT ATTEMPT 
TO OPEN THIS BATTERY!  If a VRLA battery is opened, it loses its pressure and the plates become oxygen contaminated.  THE WARRANTY 
WILL BE VOIDED IF THE BATTERY IS OPENED.

If your machine shipped with an onboard battery charger do the following:

Turn the Key Switch 

(A)

 OFF.  Unwind the electrical cord from the side of the onboard charger and plug it into a properly grounded outlet.  Refer to the OEM product manual for more 

detailed operating instructions.

If your machine shipped without an onboard battery charger do the following:

Disconnect the batteries from the machine and push the connector from the charger into the Battery Pack Connector 

(18)

.  Follow the instructions on the battery charger.  

SERVICE


NOTE:

Make sure you plug the battery charger into the connector with the handle attached to it.

IMPORTANT:  Make sure you have an appropriate charger for use on Gel cell batteries.  Use only “voltage-regulated” or “voltage-limited” chargers.  Standard constant 
current or taper current chargers MUST NOT be used.  A temperature-sensing charger is recommended, as manual adjustments are never accurate and will damage any 
VRLA battery.

Содержание 56307250

Страница 1: ...evised 7 2016 Form No 56041972 REV B Instructions for Use Advance Models 56315036 56307250 28D 56315037 32D 56315038 28C 56315538 28D C 56315539 32D C 56315540 28C C 56315039 32C C 56381014 X28D C 563...

Страница 2: ...EcoFlex A 14 A 15 Operating the Machine Wet Scrubbing A 16 A 17 Wet Vacuuming A 16 A 17 After Using the Machine A 18 Maintenance Schedule A 18 Servicing the Vacuum Motor A 18 Lubricating the Machine...

Страница 3: ...future reference Model _________________________________________ Serial Number ___________________________________ UNPACKING THE MACHINE When the machine is delivered carefully inspect the shipping pa...

Страница 4: ...hine on or near these agents or operate in areas where ammable liquids exist Do not clean this machine with a pressure washer Do not operate this machine on ramps or inclines of more than a 2 percent...

Страница 5: ...sans y avoir plac au pr alable des blocs de s curit ou des tais destin s soutenir la machine Ne d versez pas d agents nettoyants in ammables ne faites pas fonctionner la machine proximit de ces agent...

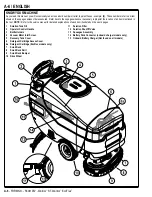
Страница 6: ...d in the text NOTE Refer to the service manual for detailed explanations of each item illustrated on the next 4 pages 1 Solution Tank Fill 2 Operator Control Handle 3 Bottle Holders 4 Vacuum Motor Inl...

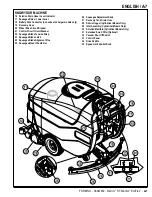
Страница 7: ...Control Circuit Circuit Breaker 22 Squeegee Blade Tension Strap 23 Squeegee Blade Latch 24 Squeegee Blade Alignment Pins 25 Squeegee Mount Thumb Nut 26 Squeegee Adjustment Knob 27 Recovery Tank Drain...

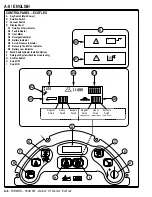
Страница 8: ...ution Flow Indicator D2 Fault Indicator D3 Hour Meter D4 Detergent Indicator D5 Battery Indicator D6 Scrub Pressure Indicator D7 Recovery Tank FULL Indicator D8 Battery Low Indicator E Wand Switch Dea...

Страница 9: ...in Power B Solution Switch C Vacuum Switch D1 Solution Flow Indicator E Wand Switch Dealer Installed Option H Scrub OFF I Scrub ON J Display J1 Battery Indicator J2 Hour Meter Scrub Pressure Indicator...

Страница 10: ...bber apron Work in a well ventilated area Do not allow tools to touch more than one battery terminal at a time ALWAYS disconnect the negative ground cable rst when replacing batteries to prevent spark...

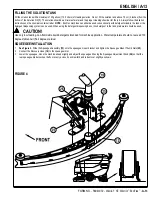
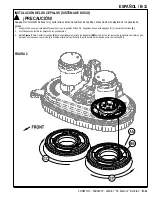
Страница 11: ...ing any access panels 1 Make sure the Brush Deck 7 is in the RAISED position Make sure the Key Switch A is off O 2 If using pads install the pads on the pad holders 3 See Figure 2 To mount the Brushes...

Страница 12: ...d before opening any access panels 1 Make sure the Brush Deck is in the RAISED position Make sure the Key Switch A is off O 2 See Figure 3 To access the brushes loosen the black knobs one on each side...

Страница 13: ...nsing system can be used When using the detergent dispensing do not mix detergent in the tank plain water should be used CAUTION Use only low foaming non ammable liquid detergents intended for machine...

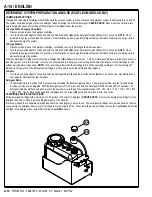
Страница 14: ...mes on you should be able to simply pour an entire gallon bottle of detergent into the Cartridge to re ll without worrying about measuring NOTE Only reset the system when the cartridge is full When sw...

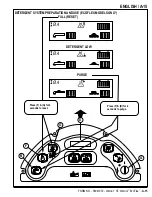
Страница 15: ...O 56041972 Warrior ST Warrior EcoFlex A 15 4 4 4 A F D B max 2 G DETERGENT SYSTEM PREPARATION AND USE ECOFLEX MODELS ONLY Press F G for 2 seconds to reset Press F B for 2 seconds to purge FULL RESET D...

Страница 16: ...sure solution ow and the detergent ratio This will cause the indicator to ash green for one minute solution ow rate will increase to the next level scrub pressure will increase to the next level and t...

Страница 17: ...ENGLISH A 17 FORM NO 56041972 Warrior ST Warrior EcoFlex A 17 34 35 17 27 19 2 13 A E I D H G 5 B WET SCRUBBING...

Страница 18: ...equired maintenance before storage MAINTENANCE SCHEDULE MAINTENANCE ITEM Daily Weekly Monthly Yearly Charge Batteries X Check Clean Tanks Hoses clean recovery tank switches vacuum inlet screen X Check...

Страница 19: ...e vent caps Wash the tops of the batteries with a solution of baking soda and water 2 tablespoons of baking soda to 1 liter of water CHARGING GEL VRLA BATTERIES EcoFlex Charge the batteries each time...

Страница 20: ...se or Replace the Front Squeegee Blade 1 Raise the squeegee tool off the oor loosen the 2 Thumb Nuts 25 disconnect the Recovery Hose 19 and remove the Squeegee Assembly 13 from the mount 2 Remove both...

Страница 21: ...f when the tank is full If daily rinsing of the recovery tank does not suf ce to keep the switches clean you may need to disassemble them for cleaning It is very important that they be reassembled cor...

Страница 22: ...the 3 different levels of slots the skirt was installed at 3 To lower the skirt move it down to the next level of slots as shown Service Note Install the skirt starting at the rst alignment pin on th...

Страница 23: ...n out drive motor bearings 3 Continuous use on ramps POOR WATER PICKUP 1 Recovery tank full vacuum shut off switch activated or dirty 2 Blocked vacuum system squeegee and hoses 3 Disconnected or damag...

Страница 24: ...1 245 565 Vibrations at the Hand Controls ISO 5349 1 m s2 0 61m s2 0 61m s2 Gradeability Transport 2 1 15 2 1 15 Cleaning 2 1 15 2 1 15 Model Warrior 28C Warrior 32C Warrior 28C C Warrior X28C C Warr...

Страница 25: ......

Страница 26: ...en h medo B 16 B 17 Despu s de la utilizaci n de la m quina B 18 Programa de mantenimiento B 18 Mantenimiento del motor de aspiraci n B 18 Lubricaci n de la m quina B 18 Mantenimiento Recarga de las b...

Страница 27: ...ara anotar el Modelo y el N mero de Serie de su m quina para futuras consultas Modelo _____________________________________________ N mero de Serie _____________________________________ DESEMBALAJE DE...

Страница 28: ...sustancias limpiadoras in amables ni utilice la m quina sobre estas sustancias cerca de ellas ni en zonas en las que haya l quidos in amables No lave la m quina con una limpiadora a presi n No haga fu...

Страница 29: ...jeto ilustrado en las siguientes 4 p ginas 1 Llenado del dep sito de soluci n 2 Manilla de control del operario 3 Portabotellas 4 Criba de entrada del motor de aspiraci n 5 Tapa del dep sito de recupe...

Страница 30: ...si n de la cuchilla de la boquilla 23 Pestillo de la cuchilla de la boquilla 24 Pasadores de alineaci n de la cuchilla de la boquilla 25 Tuerca de palomilla de montaje de la boquilla 26 Bot n de ajust...

Страница 31: ...de error D3 Cron metro D4 Indicador de detergente D5 Indicador de bater a D6 Indicador de la presi n del fregado D7 Indicador de llenado del dep sito de recuperaci n D8 Indicador de bater a baja E Int...

Страница 32: ...raci n D1 Indicador de flujo de la soluci n E Interruptor de vara opci n instalada por el distribuidor H Fregado apagado I Fregado encendido J Pantalla J1 Indicador de bater a J2 Cron metro Indicador...

Страница 33: ...las herramientas toquen simult neamente m s de un terminal de bater a Al sustituir las bater as desconecte SIEMPRE en primer lugar el cable de tierra negativo para evitar chispas Al instalar las bater...

Страница 34: ...de que el portacepillos 7 se encuentre en la posici n ELEVADA Aseg rese de que est apagado O el conmutador de llave A 2 Si utiliza bayetas instale las bayetas en los portabayetas 3 Ver la Figura 2 Par...

Страница 35: ...acceso 1 Aseg rese de que el portacepillos se encuentre en la posici n ELEVADA Aseg rese de que est apagado O el conmutador de llave A 2 Ver la Figura 3 Para acceder a los cepillos a oje los botones n...

Страница 36: ...n de detergente EcoFlex no mezcle detergente en el dep sito utilice agua PRECAUCI N Utilice nicamente detergentes l quidos no in amables de bajo poder espumante que est n dise ados para aplicaciones...

Страница 37: ...icie el sistema Cuando se encienda este indicador s lo tiene que verter una botella completa de 3 7 litros de detergente en el cartucho para rellenarlo sin preocuparse de las medidas NOTA reinicie el...

Страница 38: ...Warrior ST Warrior EcoFlex B 15 4 4 4 A F D B max 2 G REPARACI N Y USO DEL SISTEMA DE DETERGENTE ECOFLEX Pulse F y G durante 2 segundos para reiniciar Pulse F y B durante 2 segundos para purgar LLENO...

Страница 39: ...esi n de fregado el ujo de la soluci n y la mezcla de detergente Esto har que el indicador parpadee en amarillo durante un minuto el ujo de la soluci n aumentar al siguiente nivel la presi n de fregad...

Страница 40: ...ESPA OL B 17 FORM NO 56041972 Warrior ST Warrior EcoFlex B 17 34 35 17 27 19 2 13 A E I D H G 5 B FREGADO EN H MEDO...

Страница 41: ...PROGRAMA DE MANTENIMIENTO OPERACI N DE MANTENIMIENTO Diaria Semanal Mensual Anual Recarga de bater as X Comprobar y limpiar dep sitos y tuber as interruptores de dep sito de recuperaci n y criba de e...

Страница 42: ...picar cido al suelo Apriete las cubiertas de ventilaci n Limpie la parte superior con una soluci n de levadura qu mica y agua 2 cucharadas de levadura qu mica en 1 litro de agua RECARGA DE BATAR AS DE...

Страница 43: ...cuchilla de la boquilla delantera 1 Eleve la boquilla del suelo a oje las 2 tuercas de palomilla 25 desconecte la tuber a de recuperaci n 19 y retire el conjunto de la boquilla 13 del soporte 2 Retire...

Страница 44: ...cuando el dep sito est lleno Si el enjuagado diario del dep sito de recuperaci n no basta para mantener los interruptores limpios es posible que tenga que desmontarlos para la limpieza Es muy importan...

Страница 45: ...3 diferentes niveles de ranura estaba instalado el z calo 3 Para bajar el z calo despl celo hasta el siguiente nivel de ranuras como se muestra Nota del servicio Instale el z calo comenzando en el pr...

Страница 46: ...as MALA RECOGIDA DE AGUA 1 Dep sito de recuperaci n lleno interruptor de cierre de aspiraci n activado o sucio 2 Sistema de aspiraci n bloqueado boquilla y mangueras 3 Mangueras de aspiraci n desconec...

Страница 47: ...245 565 Vibraci n en los controles manuales ISO 5349 1 m s2 0 61m s2 0 61m s2 Capacidad ascendente Transporte 2 1 15 2 1 15 Limpieza 2 1 15 2 1 15 Modelo Warrior 28C Warrior 32C Warrior 28C C Warrior...

Страница 48: ......

Страница 49: ......

Страница 50: ...9435 Winnetka Ave North Minneapolis MN 55445 www advance us com Phone 800 989 2235 Fax 800 989 6566 2016 Nilfisk Inc A Nilfisk Brand...

Отзывы: