


Specifications
HDSL4 for General Distribution Installation and Maintenance Practice
62
61223HDSL4L2-5C
H4TU-C Troubleshooting
H4TU-R Troubleshooting
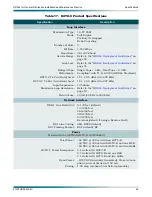
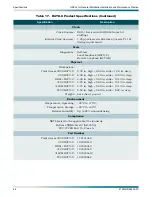
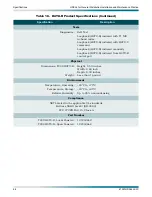
SPECIFICATIONS
lists the product specifications for each H4TU-C included in this practice.
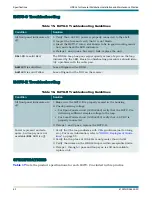
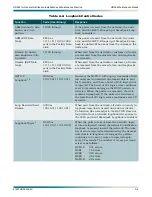
Table 15. H4TU-C Troubleshooting Guidelines
Condition
Solution
All front panel indicators are
off
.
1. Verify that –48 VDC power is properly connected to the shelf.
2. Inspect the fuse and verify that it is not blown.
3. Insert the H4TU-C into a slot known to be in good working condi-
tion, and check the LED indicators.
4. If steps
and
fails, replace the unit.
DSL
LED is solid Red.
The HDSL4 Loop has poor signal quality or loss of sync on the loop
indicated by the LED. Basic troubleshooting procedures should iden-
tify a problem with the cable pair.
ALM
LED is solid Red.
Loss of Signal on the DSX-1.
ALM
LED is solid Yellow
Loss of Signal on the DS1 on the remote.
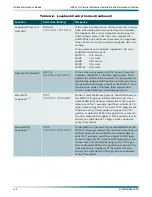
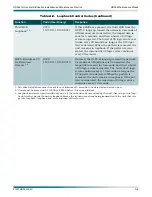
Table 16. H4TU-R Troubleshooting Guidelines
Condition
Solution
All front panel indicators are
off.
1. Make sure the H4TU-R is properly seated in the housing.
2. Check powering voltage:
• For Span Powered unit (1223426L2) verify that the H4TU-C is
delivering sufficient simplex voltage to the loop.
• For Local Powered unit (1223424L2) verify that –48 VDC is
properly connected.
3. If steps
pass, replace the H4TU-R.
Power is present and ade-
quate, but loop sync is not
available (
DS
L
LED is
off
).
1. Verify that the loop conforms with CSA guidelines (not too long,
etc.). For more information, refer to
2. Verify that loop loss at 196 kHz is not greater than 35 dB.
3. Verify that noise on the HDSL4 loop is within acceptable limits.
4. If steps
through
pass and loop sync is still not available,
replace unit.