

A-ADT8H/16H QUICK REFERENCE GUIDE
FEATURES AND FUNCTIONS (1)
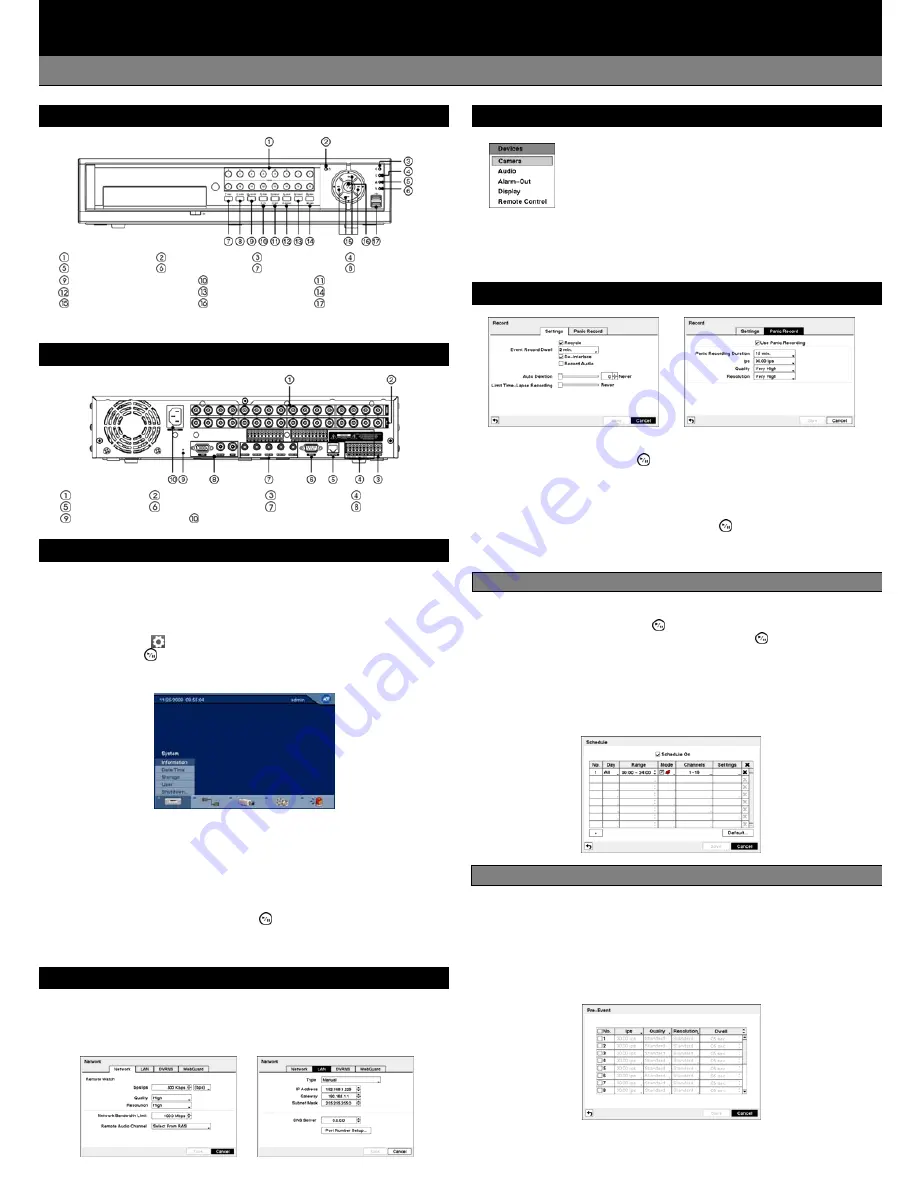
FRONT PANEL
Camera Buttons
Power LED
HDD LED
Alarm Out LED
Network LED
Clip Copy LED
Panic Button
Alarm Button
Clip Copy Button
Zoom/PTZ Button
Display/SPOT Button
Group/Sequence Button
Playback Button
Menu/Cameo Button
Arrow Buttons
Play/Pause Button
USB Connector
*Select camera buttons (1-16) to view individual cameras full screens.
REAR PANEL
Video Input
Video Loop Through
RS485 Port
Alarm In/Out
Network Port
RS232C Port
Audio In/Out
Video Out
Factory Reset Switch
Power Cord Connector
SYSTEM SETUP
1. After connecting the power cord, the unit will be operational in 60 seconds.
*NOTE: There is no record button on the unit. Please refer to the
Configuring Record Settings section for the proper record settings.
2. Press the “MENU” button or move the mouse pointer to the top of the screen
and then select
(Setup) in the Live Monitoring menu, enter the password
then press the
button. There is no default password when logging in the
admin user for the first time. To assure the secure management of the system,
setting up a password is strongly recommended.
3. Go to <System> <Information> to name the site location, assign a System
ID number, select the language the screens are displayed in, display software
version number, upgrade the software, show the System Log, show Event
Status, display recorded time data, and clear all data.
4. Go to <System> <Date/Time> to enter a new date and time.
5. Go to <System> <User> to add and delete groups and users.
*NOTE: Before powering down the DVR (or logging out the current user)
highlight System Shutdown, press the
button (or pressing the “Menu”
button) and confirm whether or not you want to shut the system down
(or logging out the current user).
NETWORK SETUP
1. Go to <Network> <Network> to set the transfer speed and remote quality to
limit bandwidth used to the remote site.
2. Go to <Network> <LAN> to select the type of network configuration first then
set up LAN parameters for the selected network configuration.
CONFIGURING INPUT DEVICES
1. Go to <Devices> <Camera> to turn On or Off each camera,
assign camera titles and hide the video of covert cameras.
2. Go to <Devices> <Audio> to select which camera you
want associated with what audio input and enable audio
out.
3. Go to <Devices> <Alarm-Out> to establish a schedule and set titles for
each alarm output from the DVR.
4. Go to <Devices> <Display> to select what information will be displayed
on the monitor and set up the main monitor.
CONFIGURING RECORD SETTINGS
1. Go to <Record> <Settings> to configure recording settings. Highlighting
Recycle and pressing the
button toggles between On and Off. In
the Recycle mode, the DVR records over the oldest video data once all
available storage space has been used. When Recycle is turned off,
the DVR stops recording once all available storage space has been used.
2. Go to <Record> <Panic Record> to configure panic recording settings.
Highlight Use Panic Recording and press the
button to toggle between
On and Off. When setting to On, set the length of time of the duration,
images per second and quality for panic recording.
Recording Schedule
1. Go to the <Record> <Schedule> to set up the recording schedule.
2. Highlight the + and press the
button to add a schedule item, and
highlight the box under the X heading and press the
button to delete
the recording settings.
3. You can change the days and time range that the scheduled recording
will take place, change the recording mode (No Record, Time, Event
or Time & Event mode), and select which camera will be recorded.
*NOTE: Refer to the User’s Manual for each schedule mode for details.
Pre-Event Recording
1. Go to <Record> <Pre-Event> to set up pre-event recording.
2. You can turn individual cameras On or Off for pre-event recording and
set the image speed, image quality, resolution and the amount of time
to record prior to the event (dwell).
*NOTE: When the DVR is in the Time or Time & Event mode, it ignores
the pre-event settings and follows the time settings.


