


Chapter 2 - Installation
20
Adept IO Blox User’s Guide, Rev B
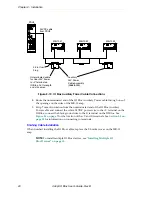
Figure 2-10. IO Blox Auxiliary Power Cable Connections
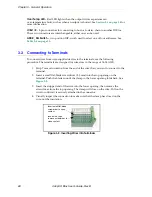
4. Route the unterminated end of the IO Blox Auxiliary Power cable through one of
the openings on the sides of the MB-10 amp.
5. Strip 7 mm of insulation from the unterminated end of the IO Blox Auxiliary
Power cable and connect the white 24 VDC power wire to the +V terminal on the
IO Blox; connect the black ground wire to the G terminal on the IO Blox. See
for the location of the +V and G terminals. See
for information on connecting to terminals.
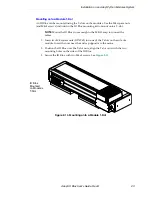
Finishing Cable Installation
When finished installing the IO Blox cables, replace the T-bracket cover on the MB-10
amp.
NOTE:
To install multiple IO Blox devices, see
.
AMP
PWR
XDCS
PWR
AC
AMP
ES2
IN
1
AUX
ES1
XSLV1/
AC
CH1
CH2
24V
AUX DC RESET
XSLV2
PDU3
2
AMP DC RESET
C
I
R
C
U
I
T
B
R
E
A
K
E
R
PDU3
24VDC cable
from PDU3
MB-10 #1
2-Pin User
Plug
Auxilliary
24V Power
Cable Assembly
(05668-000)
Unterminated cable
for User 24V Power
to +V terminal on
IO Blox. Cut to length
and strip wires.
MB-10 #2
MB-10 #3
Содержание IO Blox
Страница 26: ...Chapter 2 Installation 26 Adept IO Blox User s Guide Rev B...
Страница 51: ......
Страница 52: ...3011 Triad Drive Livermore CA 94551 925 245 3400 P N 04638 000 Rev B...