


Chapter 2 - Installation
18
Adept IO Blox User’s Guide, Rev B
2.7
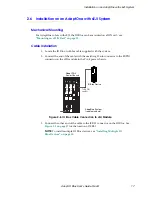
Installation on an Adept Python Modules System
NOTE:
When attaching an IO Blox to a Python module, make sure the
device does not restrict joint motion or cause robot motion errors. T-slots
and threaded holes are provided on each module for the purpose of
mounting user equipment.
Cable Installation
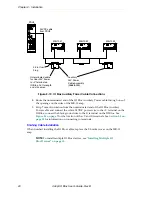
Up to four IO Blox devices can be connected per MB-10 amp on Python systems. IO Blox
can be connected to one MB-10 or two MB-10 amps on a multi-axis system. If connecting
to a three-axis or four-axis system, IO Blox can be connected to the first and last MB-10
amps in the system.
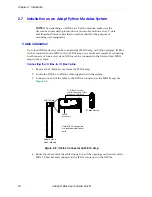
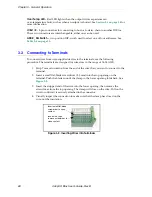
Connecting the IO Blox-to-IO Blox Cable
1. Remove the T-bracket cover from the MB-10 amp.
2. Locate the IO Blox-to-IO Blox cable supplied with the system.
3. Connect one end of the cable to the IO Blox connector on the MB-10 amp. See
Figure 2-9. IO Blox Connector on MB-10 Amp
4. Route the other end of the cable through one of the openings on the sides of the
MB-10 T-bracket and connect it to the JCBL1 connector on the IO Blox.
Adept Python
Linear Module
IO Blox Device
To IO Blox Connector
on MB-10 anp and JCBL1
Connector on IO Blox
MB-10 Amp
Note: MB-10 connectors
are located on bottom of
amp.
24 VDC
Connectors
Содержание IO Blox
Страница 26: ...Chapter 2 Installation 26 Adept IO Blox User s Guide Rev B...
Страница 51: ......
Страница 52: ...3011 Triad Drive Livermore CA 94551 925 245 3400 P N 04638 000 Rev B...