adept technology Cobra Dual Скачать руководство пользователя страница 9

Adept Technology, Inc.

Dual Adept Cobra Robot Configuation Procedure, Rev A 

9

4.0

Configuring SmartServo Nodes with DC_SETUP

Use the DC_SETUP utility to configure each robot as a unique node on the SmartServo 
network.

1. Load the DC_SETUP utility by typing the following command at the V+ monitor prompt:

load \util\dc_setup

2. Execute the DC_SETUP utility by typing the following command at the V+ monitor 

prompt:

exe 1 a.dc_setup 

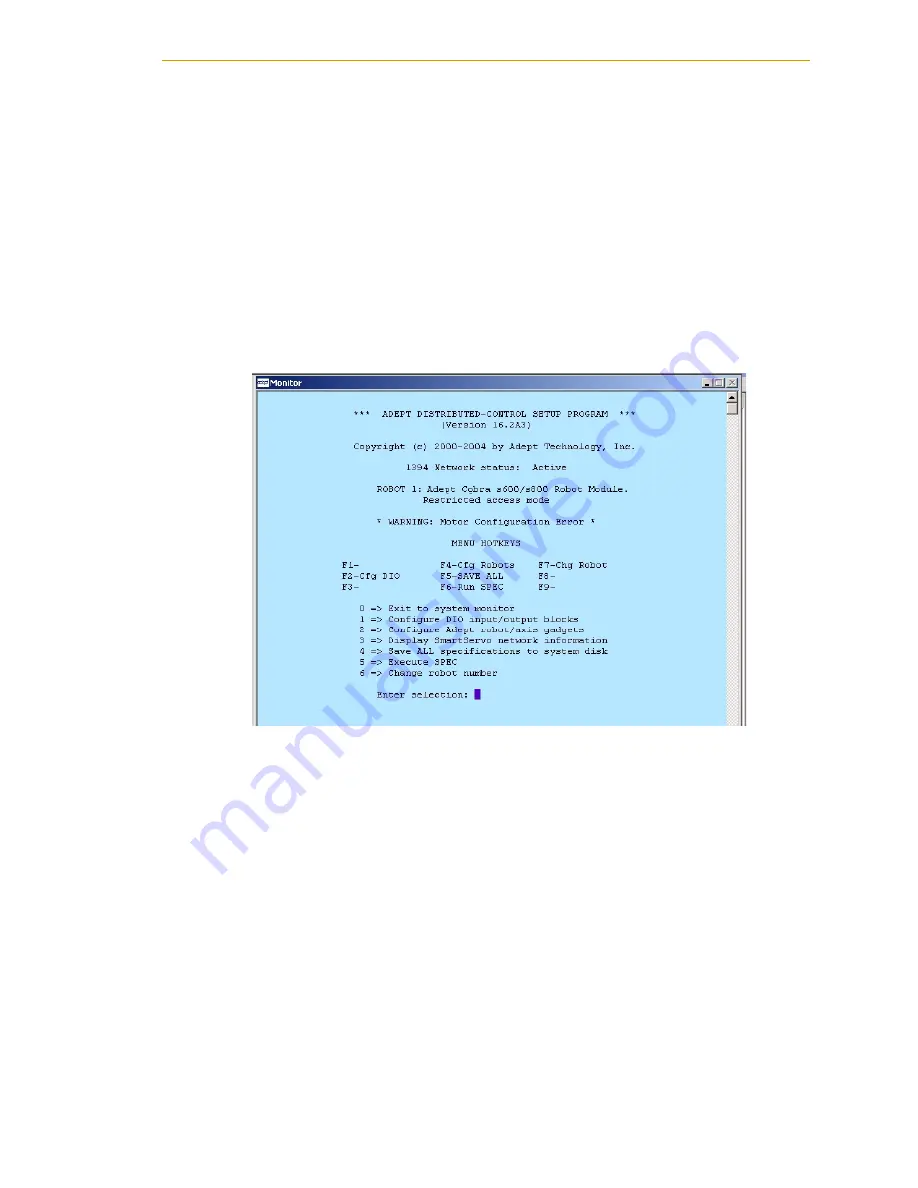
The main DC_SETUP menu appears, as shown in the figure below.

Figure 11. DC_SETUP Main Menu

3. In DC_SETUP, select option 2 “Configure Adept robot/axis gadgets.” Follow the 

instructions on the screen. After several screens, you will see a screen similar to the 
figure below. 

NOTE: 

If the Adept Cobra s600/s800/s800 Inverted robots were shipped 

from the factory configured as single robot systems, both robots will be 
configured as Robot 1. As this stage, you must hit the SPACE bar to cycle 
through each robot to remove the Robot 1 configuration before you 
continue. If you do not visit each servo node, there will be no servo nodes 
presented to you later in the procedure when you will configure Robot 2.

Содержание Cobra Dual

Страница 1: ...Dual Adept Cobra Robot Configuration Procedure Rev A April 2007...

Страница 2: ...ted Adept Cobra Smart600 Adept Cobra Smart800 Adept DeskTop Adept FFE Adept FlexFeeder 250 Adept IC Adept iSight Adept Impulse Feeder Adept LineVision Adept MB 10 ServoKit Adept MC Adept MotionBlox 10...

Страница 3: ...ain steps in the configuration process are 1 Use the CONFIG_C utility to load the Cobra s600 s800 device modules for each robot Save the data and reboot the system See Section 3 0 on page 5 for detail...

Страница 4: ...able Adept SmartController Adept Cobra s600 s800 Robot 1 Adept Cobra s600 s800 Robot 2 User Supplied 24VDC Power Supply User Supplied 200 240 VAC single phase User Supplied 200 240 VAC single phase Co...

Страница 5: ...robot 1 Install the robots and controller as per the Dual Robot System Cable Diagram shown in Figure 1 on page 4 2 Power up both robots and then the controller The following will be displayed on boot...

Страница 6: ...e Rev A The following will be displayed Figure 3 CONFIG_C Main Menu 5 Select option 3 Robots and Device Modules The following will be displayed Figure 4 Robots and Device Modules Menu 6 Select option...

Страница 7: ...be displayed Figure 6 Device Module Selection 8 Enter 6 at the Enter selection number prompt The following will be displayed Figure 7 Module Confirmation 9 Enter Y at the Are you sure you want to sele...

Страница 8: ...dule Y N prompt 13 Enter N at the Do you want robot number 3 Y N prompt The above information will now be saved to the system 14 Press Enter to continue 15 Select option 0 Return to main menu 16 Selec...

Страница 9: ...shown in the figure below Figure 11 DC_SETUP Main Menu 3 In DC_SETUP select option 2 Configure Adept robot axis gadgets Follow the instructions on the screen After several screens you will see a scre...

Страница 10: ...identify the flashing LED on the top of robot 1 Press Enter to configure the robot NOTE As of V 17 0 Edit A the selected servo node LED could be flashing green red or amber based on the product type...

Страница 11: ...e instructions on the screen Figure 13 Logical Blocks Description 2 After you have read the information press Enter to proceed 3 The next screen appears This is where you will configure the DIO for ea...

Страница 12: ...iguation Procedure Rev A 7 Cycle the power off and on to the controller and each robot The dual robot system is now ready for use The following will be displayed after the system has completed the boo...

Отзывы: