background image

Grounding the Robot

AdeptViper s650/s850 Robot User’s Guide, Rev A 

31

5. Set the robot unit into place on the robot mount. When transporting the robot 

unit, follow the instructions given in 

Section 3.3 on page 27

.

6. Secure the robot unit to the mount with four bolts and plain washers.

• Bolt: M10 x 30 mm (strength class: 12.9)

• Tightening torque: 70 +/- 14 Nm

3.5

Grounding the Robot 

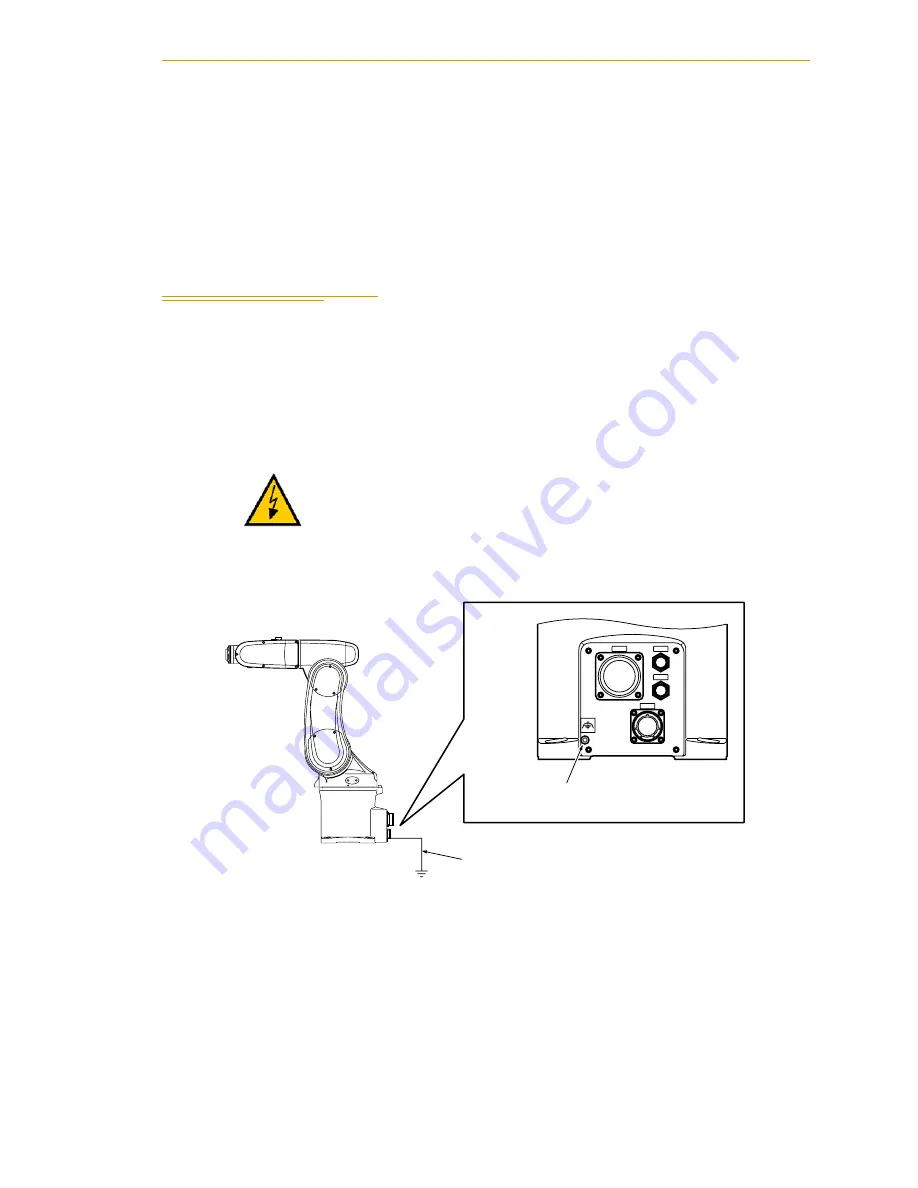
Ground the grounding terminal of the robot unit with a wire of 12 AWG or more. Ground 
resistance must be less than 100 milliohms.

NOTE: 

Use a dedicated grounding wire and grounding electrode. Do not 

share them with any other electric power or power equipment such as a 
welder.

Figure 3-3. Ground Point on Robot

WARNING: 

Wiring must be performed by authorized or 

certified personnel. Failure to observe this caution may 
result in fire or electric shock.

C N 2 2

C N 2 0

A I R 1

A I R 2

Grounding terminal (M5)

12 AWG or more

Содержание AdeptViper s650

Страница 1: ...AdeptViper s650 s850 Robot User s Guide...

Страница 2: ......

Страница 3: ...August 2005 3011 Triad Drive Livermore CA 94551 USA Phone 925 245 3400 Fax 925 960 0452 Otto Hahn Strasse 23 44227 Dortmund Germany Phone 49 231 75 89 40 Fax 49 231 75 89 450 41 rue du Saule Trapu 913...

Страница 4: ...ept MV4 Adept MV 5 Adept MV 8 Adept NanoBonder EBS Adept NanoBonder LWS Adept NanoCell Adept NanoStage L1P2 Adept NanoStage L3 Adept NanoStage L3P2 Adept OC Adept SmartAmp Adept SmartAxis Adept SmartC...

Страница 5: ...Robot 14 Safety Barriers 14 Impact and Trapping Points 14 Hazards From Expelling a Part or Attached Tooling 15 Additional Safety Information 15 2 3 Risk Assessment 17 Exposure 17 Severity of Injury 1...

Страница 6: ...fector 35 Center of Gravity Position of End Effector 35 Moment of Inertia Around J4 J5 and J6 36 4 System Installation 39 4 1 System Cable Diagram 39 4 2 Installing the SmartController 40 4 3 Installi...

Страница 7: ...odes on sDAI Module 55 6 Maintenance 57 6 1 Installing and Using Brake Release Box 57 6 2 Replacing Encoder Backup Battery 58 6 3 Installing User Supplied Hardstops 61 7 Technical Specifications 63 7...

Страница 8: ...Table of Contents 8 AdeptViper s650s 850 Robot User s Guide Rev A...

Страница 9: ...and many other operations requiring fast and precise automation NOTE The descriptions and instructions in this manual apply to both the AdeptViper s650 and the AdeptViper s850 except for instances wh...

Страница 10: ...A 4 CAT 3 Power Chassis The PA 4 CAT 3 includes AC DC power conversion electronics that supports a range of Adept power amplifiers and robot control modules In addition the PA 4 CAT 3 includes dual re...

Страница 11: ...rtificates to find the document which you can then download Table 1 1 Installation Overview Task to be Performed Reference Location 1 Mount the robot on a flat secure mounting surface See Section 3 4...

Страница 12: ...electing Document Library from the home page To go directly to the Adept Document Library type the following URL into your browser http www adept com Main KE DATA adept_search htm To locate informatio...

Страница 13: ...rmation emphasizes a point or procedure or gives a tip for easier operation DANGER This indicates an imminently hazardous situation which if not avoided will result in death or serious injury WARNING...

Страница 14: ...s safety gates safety floor mats etc are installed The robot workcell must comply with applicable local and national standards see Section 2 7 on page 21 The height and the distance of the safety fenc...

Страница 15: ...ld by the end effector in a manner that prevents the payload from being expelled accidentally The safety fence or barrier constructed around the robot must be designed to withstand the impact of any i...

Страница 16: ...lobal com Document Center Inc 1504 Industrial Way Unit 9 Belmont CA 94002 USA Phone 415 591 7600 Fax 415 591 7617 http www document center com DIN Deutsches Institut f r Normung e V German Institute f...

Страница 17: ...ly permitted exception is for teaching the robot in Manual Mode by a skilled programmer see Qualification of Personnel on page 22 who must wear safety equipment see Safety Equipment for Operators on p...

Страница 18: ...afety and Electromagnetic Compatibility EMC In situations with low exposure consideration factors European Standard EN 1050 specifies use of a Category 1 Control System per EN 954 EN 954 defines a Cat...

Страница 19: ...lete industrial automation system The controller subassembly must be installed inside a suitable enclosure The controller subassembly must not come into contact with liquids Additionally the robot mus...

Страница 20: ...pumps cameras lighting etc to the robot tool mount flange Attaching hoses pneumatic lines or cables to the robot These should be designed so they do not restrict joint motion or cause robot motion err...

Страница 21: ...ained as well as complying with the applicable local and national regulations including SEMI S2 In the USA applicable standards include ANSI RIA R15 06 and ANSI UL 1740 In Canada applicable standards...

Страница 22: ...cribed safety practices during the installation operation and testing of all electrically powered equipment To avoid injury or damage to equipment always remove power by disconnecting the AC power fro...

Страница 23: ...tuations could cause hazards The following situations may result in risks that cannot be avoided Failure of software or electronics that may cause high speed robot motion in Manual Mode Failure of har...

Страница 24: ...A 2 15 What to Do in an Emergency Situation Press any E Stop button a red push button on a yellow background field and then follow the internal procedures of your company or organization for an emerg...

Страница 25: ...heet please compare the actual items received not just the packing slip with your equipment purchase order and verify that all items are present and that the shipment is correct and free of visible da...

Страница 26: ...s2 3G or less Safe Installation Environment The robot should not be installed in an environment where there are flammable gases or liquids there are any acidic alkaline or other corrosive gases there...

Страница 27: ...safety shoes and gloves during transport Do not hold the first arm elbow either side of the 2nd arm 2nd axis cover or 3rd axis cover or apply force to any of them See Figure 1 1 on page 9 Figure 3 1 R...

Страница 28: ...e robot is in the transport position so this job is not required Transport Position Axis Angle First axis J1 0 Second axis J2 145 Third axis J3 243 Fourth axis J4 90 Fifth axis J5 90 2 Disconnect the...

Страница 29: ...it from getting overturned 6 Worker B Operate the crane and move the robot unit to the target site 7 Worker B Put the robot unit down in the target position Worker A Temporarily secure the robot unit...

Страница 30: ...hole 6 H7 for internally threaded positioning pin 10 mm deep or more 2 Locate two alignment pins one round and one diamond shaped supplied in the accessory kit 3 Drive the diamond shaped pin into the...

Страница 31: ...70 14 Nm 3 5 Grounding the Robot Ground the grounding terminal of the robot unit with a wire of 12 AWG or more Ground resistance must be less than 100 milliohms NOTE Use a dedicated grounding wire an...

Страница 32: ...ired directly to corresponding pins 1 to 10 on CN21 on the upper arm Pins 12 to 18 are for solenoid control See Section 3 7 on page 33 AIR 1 air piping connector PT1 4 for three solenoids in robot See...

Страница 33: ...UT CN20 pin No Used for 12 0V 13 Solenoid 1A solenoid valve 1 14 Solenoid 1B solenoid valve 1 15 Solenoid 2A solenoid valve 2 16 Solenoid 2B solenoid valve 2 17 Solenoid 3A solenoid valve 3 18 Solenoi...

Страница 34: ...ective cross section Cv value 1 2 mm2 Lubrication Oilless Operating pressure range 0 1 to 0 7 Mpa Response time 15 ms or less at 0 5 Mpa Maximum operating frequency 10 Hz Valve Ambient temperature 5 t...

Страница 35: ...nd effector including workpiece must be less than or equal to maximum payload capacity 5 kg Center of Gravity Position of End Effector Design an end effector so that the center of gravity position of...

Страница 36: ...around J4 and J5 0 295 kgm2 Maximum allowable moment of inertia around J6 0 045 kgm2 When calculating the moment of inertia around J4 J5 and J6 of the end effector use the formulas given in Table 3 3...

Страница 37: ...f inertia around J6 of S I3 from 1 and 5 in Table 2 3 Moment of inertia around J6 of entire end effector IJ6 2 Moment of inertia around J4 and J5 For the end effector shown below the moment of inertia...

Страница 38: ...Chapter 3 Robot Installation 38 AdeptViper s650 s850 Robot User s Guide Rev A...

Страница 39: ...U T LOW VOLTS ON HV SAG OVER TEMP FAULT DO NOT REMOVE OR INSTALL THIS SHORT FAULT OPEN CKT FAULT MODULE UNLESS HIGH VOLTS LED IS COMPLETELY DISTINGUISHED PWM ON CH1 HIGH VOLTS ON CH2 A M P L I F I E...

Страница 40: ...ng the PA 4 Power Chassis Refer to the Adept PA 4 Power Chassis User s Guide for complete information on the PA 4 chassis This list summarizes the main steps 1 Mount the PA 4 chassis NOTE For the PA 4...

Страница 41: ...R P O W E R O U T P U T J AMP J AMP J AMP LOW VOLTS ON HV SAG OVER TEMP FAULT DO NOT REMOVE OR INSTALL THIS SHORT FAULT OPEN CKT FAULT MODULE UNLESS HIGH VOLTS LED IS COMPLETELY DISTINGUISHED PWM ON C...

Страница 42: ...se Power Requirements Nominal Voltage Range Frequency Phasing Minimum Operating Voltage Maximum Operating Voltage Recommended External Circuit Breaker user supplied 200 to 240 VAC 50 60Hz 3 phase 180...

Страница 43: ...Table 4 3 3 Phase AC Power Cord Specifications for PA 4 Cord length 3 meters 0 1 m 9 ft 10 in 4 in Cord rating 25 amps Number and size of conductor size 5 x 2 5 mm2 Color code 200 240 VAC line 1 line...

Страница 44: ...se AC Power Installation Diagrams Figure 4 3 Typical 3 Phase 200 240 VAC Connection for PA 4 System Figure 4 4 Typical 3 Phase 380 415 VAC Connection for PA 4 System PE PE L3 L3 L2 L2 L1 L1 3 200 240V...

Страница 45: ...or of the power cord securely to your AC power source using the color code shown in Table 4 5 See Figure 4 6 on page 47 for a typical power installation diagram The installation must meet all applicab...

Страница 46: ...rce Figure 4 5 1 Phase AC Cable Wiring DANGER The installation of the power cord must be done by a skilled person The power supply can injure or kill the person who installs the cord An incorrect inst...

Страница 47: ...PA 4 AdeptViper s650 s850 Robot User s Guide Rev A 47 Typical Single Phase 220 VAC Power Installation Diagrams Figure 4 6 Typical 1 Phase 200 240 VAC Connection PE L2 PE L2 L1 L1 Facility Supply 1 200...

Страница 48: ...Chapter 4 System Installation 48 AdeptViper s650 s850 Robot User s Guide Rev A...

Страница 49: ...ect to the controller via AdeptWindows and boot the system from the D default drive Refer to the AdeptWindows Installation Guide for complete details on working with AdeptWindows 4 Wait for the system...

Страница 50: ...ng to Program the Robot To learn how to use and program the robot go to the V Operating System User s Guide to find information on basic operation of the V Operating System Also refer to the Instructi...

Страница 51: ...J AMP J AMP J AMP LOW VOLTS ON HV SAG OVER TEMP FAULT DO NOT REMOVE OR INSTALL THIS SHORT FAULT OPEN CKT FAULT MODULE UNLESS HIGH VOLTS LED IS COMPLETELY DISTINGUISHED PWM ON CH1 HIGH VOLTS ON CH2 A M...

Страница 52: ...uts 0065 0096 sDIO Module 3 recommended a a For sDIO modules 3 and 4 you must configure the signals using CONFIG_C to have the system support those modules See the Adept SmartController User s Guide f...

Страница 53: ...s directional labels that can be installed on the robot See Table 5 3 Also refer to Figure 1 1 on page 9 for a drawing of the axis identification The yellow X Y label can be used to indicate the X and...

Страница 54: ...s to rotation of Joint 4 When power is turned off do not manually rotate Joint 4 more than the Joint Limits of 190 If Joint 4 is rotated beyond these limits the internal wiring can be damaged Figure 5...

Страница 55: ...dditional information on the sDAI module Table 5 4 Status Panel Codes LED Status Code LED Status Code OK No Fault H High Temp Encoder Joint ON High Power ON Status hV High Voltage Bus Fault MA Manual...

Страница 56: ...Chapter 5 System Operation 56 AdeptViper s650 s850 Robot User s Guide Rev A...

Страница 57: ...Brake on the sDAI board 3 Press one of the E Stops Pendant Front Panel or external NOTE An E Stop must be activated in order for the brake release box to work 4 Using the axis selector switch select...

Страница 58: ...ry two years Replace the batteries according to the procedure below 1 Prepare a new set of 3 backup batteries for replacement 2 Turn off AC power to the PA 4 and DC power to the controller 3 Remove th...

Страница 59: ...sconnect old backup batteries before connecting anew one to the pin from which the dummy connector cap is removed If you do so the encoder positional data may be lost Figure 6 4 6 Disconnect the old b...

Страница 60: ...the old backup battery that is right next to the new battery connected in Step 6 and then connect a new battery 3rd one Figure 6 6 8 Remove the last old battery and connect the dummy connector cap dis...

Страница 61: ...oints 1 2 and 3 on the AdeptViper robots can be changed by installing user supplied hardstop devices In addition the default softstops or software limits must be modified after the hardstops have been...

Страница 62: ...Chapter 6 Maintenance 62 AdeptViper s650 s850 Robot User s Guide Rev A...

Страница 63: ...obot Dimensions Figure 7 1 AdeptViper s650 Side Dimensions and Work Envelope 65 105 90 270 390 95 203 164 34 108 295 80 375 115 578 42 575 68 73 46 335 75 R578 42 R158 79 R219 74 R 3 0 8 4 2 R 3 0 8 4...

Страница 64: ...Viper s650 s850 Robot User s Guide Rev A Figure 7 2 AdeptViper s650 Top Dimensions and Work Envelope 1A 2A 3A 1B 2B 3B A I R 2 C N 2 1 J6 360 J4 190 59 51 67 79 R 6 5 3 4 2 R 2 3 3 7 9 187 7 Point P J...

Страница 65: ...A 65 Figure 7 3 AdeptViper s850 Side Dimensions and Work Envelope 218 485 779 88 779 88 120 Point P 80 405 65 120 J5 105 1 3 5 79 209 R779 88 R166 34 R 4 1 4 8 8 J2 1 0 0 J3 R323 35 R 4 1 4 8 8 75 36...

Страница 66: ...Viper s650 s850 Robot User s Guide Rev A Figure 7 4 AdeptViper s850 Top Dimensions and Work Envelope 1A 2A 3A 1B 2B 3B A I R 2 C N 2 1 J6 360 J4 190 59 51 R 8 5 4 8 8 R 2 4 1 3 4 187 7 Point P J1 170...

Страница 67: ...ge Dimensions AdeptViper s650 s850 Robot User s Guide Rev A 67 7 2 Robot Flange Dimensions Figure 7 5 Robot Flange Dimensions 40 h8 20 H7 6 Deep 4X M5 x 0 08 8 Deep 31 5 B C 5 H7 7 Deep 0 0 039 0 021...

Страница 68: ...0 sec Maximum composite speed at the center of an end effector mounting face 8200 mm s 7600 mm s Maximum payload 5 kg 5 kg Position repeatability Note 1 In each of X Y and Z directions 0 02 mm In each...

Страница 69: ...05 Pa 4 9 105 Pa Degree of Protection IP 40 IP 40 Weight Approx 28 kg Approx 29 kg Note 1 Position repeatability is the value at constant ambient temperature Note 2 Only the 4x6 air piping system may...

Страница 70: ...Chapter 7 Technical Specifications 70 AdeptViper s650 s850 Robot User s Guide Rev A...

Страница 71: ...onnectors on robot description 32 current voltage ratings power chassis 1 phase 45 power chassis 3 phase 42 Customer Service assistance 12 D definition of a Manipulating Industrial Robot 14 dimensions...

Страница 72: ...g sling 27 intended uses 19 interface panel 32 modifications 20 mounting hole pattern 30 mounting procedure 30 operating requirements 26 performance specifications 68 programming 50 s650 dimensions si...

Страница 73: ...chassis 3 phase AC 42 minimum operating power chassis 1 phase AC 45 power chassis 3 phase AC 42 W What to do in an emergency situation 24 work envelope s650 robot side view 63 s650 robot top view 64 s...

Страница 74: ...Index 74 AdeptViper s650 s850 Robot User s Guide Rev A...

Страница 75: ......

Страница 76: ...3011 Triad Drive Livermore CA 94551 925 245 3400 P N 05173 000 Rev A...

Отзывы: