

www.adeept.com
66
<TimeLapse Mode>
The name of this mode comes from a kind of photography technology. Compared with the
<Keys
and Setps>
mode, this mode can customize the time required for the movement between any
two positions and the number of motion decomposition in addition to the position information.
After locating, long-press I to input the time required to move to the next position, then
long-press I again to enter the number of motion decomposition to move to the next position,
and then input the next position, theoretically it can save more than 10 million positions. After
the input is completed, long-press II to exit the loop and enter the menu interface of the
selection mode.
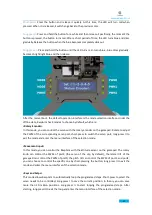
When RaspArm is turned on, it will automatically search for known Wi-Fi. If there is one , it will
automatically connect to it. You can remotely control RaspArm through the GUI program on the
PC(You can download it from https://github.com/adeept/rasparm/). If RaspArm is not connected
to Wi-Fi after booting, it will automatically create a Wi-Fi hotspot which you can connect through
the computer. The default address of the server is 192.168.12.1, and the rest of the operation
remains unchanged.
5.Afterword
Thanks for purchasing our product and reading the manual! If you spot any errors or have any
ideas or questions for the product and this guide, welcome to contact us! We will correct them if
any as quickly as possible.
After completing all projects in the guide, you should have some knowledge of the Raspberry Pi
and Robot, thus you can try to change the robot into other projects by adding more Adeept
modules or changing the code for extended functions.
For more information about Arduino, Raspberry Pi, Smart car robot, or robotics, etc., please
follow our website
. We will introduce more cost-effective, innovative and
intriguing products!
Thanks again for choose Adeept product and service!
Содержание RaspArm
Страница 1: ...www adeept com 1...
Страница 14: ...www adeept com 11 If a warning window prompts click Yes...
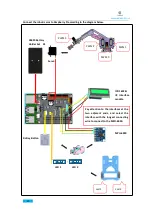
Страница 25: ...www adeept com 22 2 Connect the battery holder and Raspberry Pi Note that the switch is OFF...
Страница 38: ...www adeept com 35 Assemble the following components Effect diagram after assembling M3 25 Screw X3 M3 Nut X3...
Страница 40: ...www adeept com 37 Assemble the following components Effect diagram after assembling M3 25 Screw X2 M3 Nut X2...
Страница 49: ...www adeept com 46 Assemble the following components Effect diagram after assembling M3 35 Screw X6 M3 Nut X6...
Страница 51: ...www adeept com 48 Assemble the following components Effect diagram after assembling M3 Nut X4 M3 16 Screw X4...
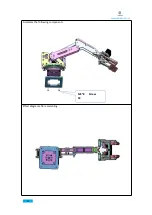
Страница 55: ...www adeept com 52 Assemble the following components Effect diagram after assembling M3 8 Screw X4...
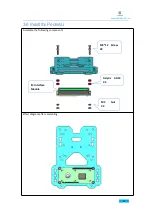
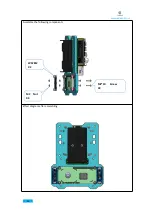
Страница 58: ...www adeept com 55 Assemble the following components Effect diagram after assembling M2 5 8 Screw X4...
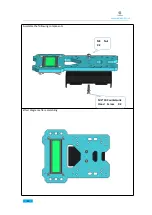
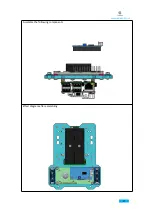
Страница 60: ...www adeept com 57 Assemble the following components Effect diagram after assembling...
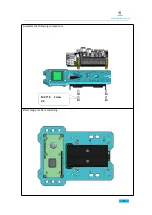
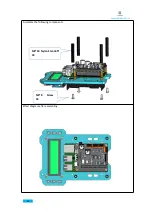
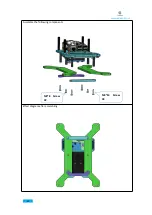
Страница 64: ...www adeept com 61 Assemble the following components Effect diagram after assembling Cap Nut X4 Sucking Disc X4...
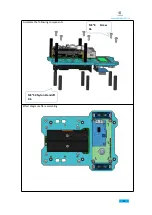
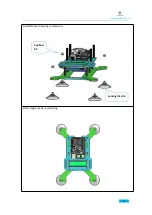
Страница 66: ...www adeept com 63 Assemble the following components Effect diagram after assembling M3 8 Screw X4...
Страница 70: ...www adeept com 67...