background image

19

INST

ALLA

TION

CONFIGURA

TION

OPERA

TION

FUR

THER

INFORMA

TION

INDEX

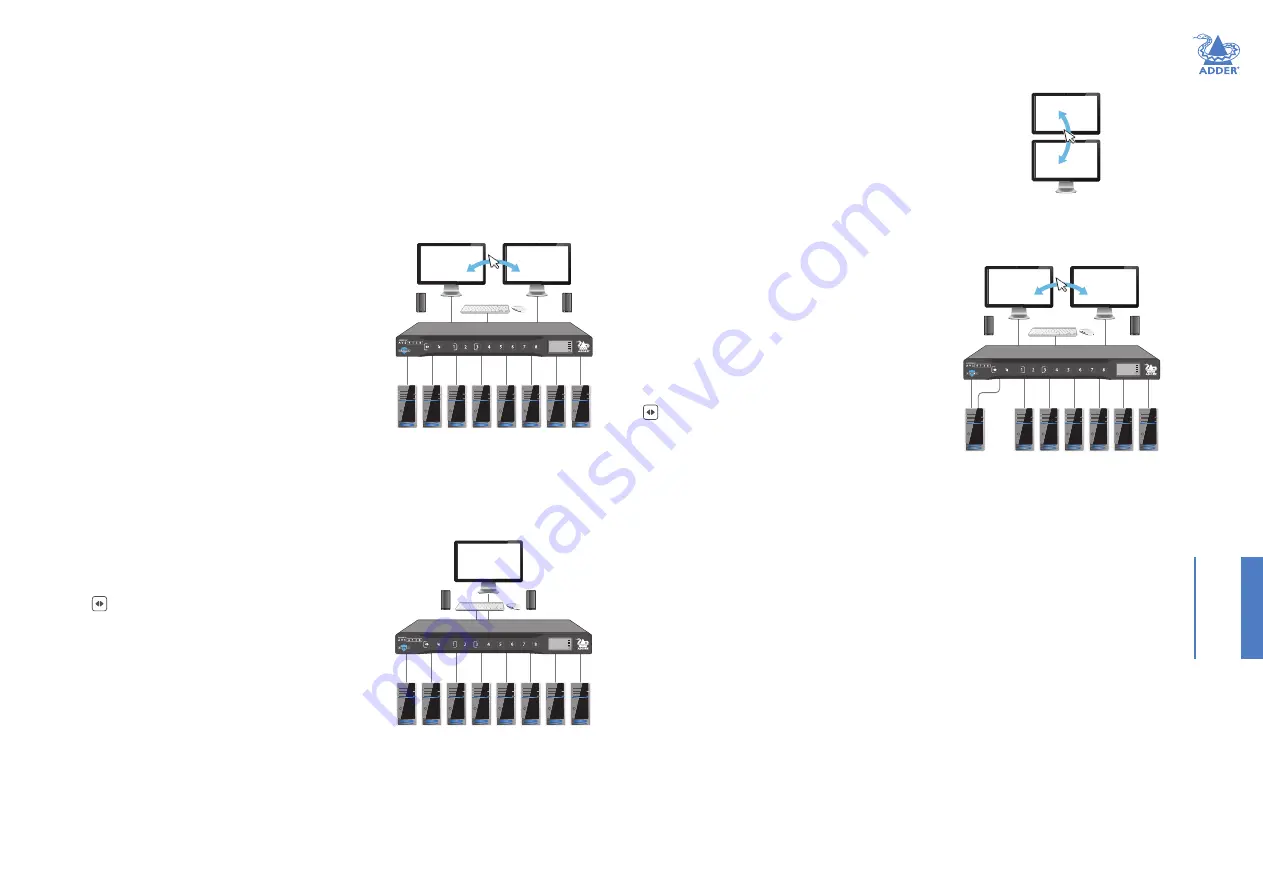
Eight-host layout with top/bottom displays

This layout operates as per the standard 8-host arrangement 
except that the displays are treated as being arranged one above 
the other for the purposes of Free-Flow switching (with the 
primary display at the top).

To configure this layout

Use the following keypress sequence:

•  Left Ctrl


then


Left Ctrl


then


F11


then


F2 

(Note: F11 and F2 are function keys)

One dual-head host plus six single-head hosts

This layout provides hybrid dual-head and single-head 

operation which permits one host to present two 

video channels while the other six supply a single 
video channel each. When channel 1 is chosen, its dual 
outputs will be shown on the two displays. When any 
other channel is chosen (except channel 2, which is 
not used), its output will be sent to either the left or 
right display, as determined by the current setting of 

the 

 button (see page 13

).

If Free-Flow is used for automated switching of focus 
between the two displays, they will be assumed to be 
arranged side-by-side, with the primary display on the 

left side.

To configure this layout

Use the following keypress sequence:

•  Left Ctrl


then


Left Ctrl


then


F11


then


F3 

(Note: F11 and F3 are function keys)

Appendix B - Alternative layouts

This section lists the various ways that host computers and video displays can be 
arranged on the switch. The keypresses that enable each mode need only be enacted 
once to set the configuration and will persist through complete power cycles. A factory 

reset operation will return to the 

Standard eight-host single-head layout

.  

Note that each layout uses Absolute mouse mode. If the uses changes to Relative mouse mode, 

then the unit will be returned to the default eight-host single-head layout.

Other bespoke layouts can be created for you by Adder Professional Services on request.

Default eight-host, single-head, dual-display layout

The standard layout allows you to control up to eight 

host computers and view their video outputs on 

either single or dual displays. When dual displays are 
used, each display can show the video output from 
any of the connected host computers, as selected 
either by front panel switches or keyboard hotkeys 
(see Appendix C on page 21

). If Free-Flow is used 

for automated switching of focus between the two 
displays, they will be assumed to be arranged side-by-
side, with the primary display on the left side.

To configure this layout

If the switch has been used in any other configuration, you can restore the standard 
layout with the following keypress sequence:

•  Left Ctrl


then


Left Ctrl


then


F11


then


F1 

(Note: F11 and F1 are function keys)

Default eight-host, single-head, single-display layout

This variation is similar to the standard layout above, 
except that only a single video display is used. 

Notes: 
•  The   button should remain with its left indicator lit.
•  Free-Flow is not enabled.

To configure this layout

If the switch has been used in any other 
configuration, you can restore the standard layout 
with the following keypress sequence:

•  Left Ctrl


then


Left Ctrl


then


F11


then


(Note: F11 is a function key)

1

3

4

5

6

7

8

L:

LONDON

1

UNCL

FOUO

RC

R:

NEW YORK

2

AUDIO:

HOLD

1

1 2 3 4 5 6 7 8

L:

LONDON

1

UNCL

FOUO

RC

R:

NEW YORK

2

AUDIO:

HOLD

1

1 2 3 4 5 6 7 8

L:

LONDON

1

UNCL

FOUO

RC

R:

NEW YORK

2

AUDIO:

HOLD

1

continued

Содержание ADDERView Secure AVS-4128

Страница 1: ...ADDERView Secure AVS 4128 User Guide Experts in Connectivity Solutions KVM Switching Solutions ...

Страница 2: ...anging the hotkeys 12 Channel names and security levels 12 Operation Front panel channel switching 13 Hotkey channel switching 13 Free Flow 13 Guard mode 14 Audio hold 14 Status display 14 Channel indications 14 Further information Getting assistance 15 Appendix A Terminal mode configuration 16 Appendix B Alternative layouts 19 Default eight host single head dual display layout 19 Default eight ho...

Страница 3: ... keyboard and mouse processor is powered down and reset at each switchover to thwart shared data leakages Automatic switching of keyboard and mouse focus between currently selected host computers configurable Free Flow mode Simply move the mouse between displays Clear channel identification to reduce the chances of operator error by displaying a user defined name and security classification for ea...

Страница 4: ...r Peripheral Sharing Devices PSD Video resolutions Up to 3840 x 2160 60 Hz Software compatibility Windows Linux Mac host computer OS s USB HID including touchscreens compliant with Microsoft Digitizer Console connections 2x DisplayPort HDMI 2x USB type A 1x Audio 3 5mm RJ12 for remote control Computer connections 8x DisplayPort HDMI 8x USB type B 8x Audio 3 5mm Front panel 8x channel selection but...

Страница 5: ...L FOUO RC R NEW YORK 2 AUDIO HOLD 1 SUPPLIED ITEMS Information wallet containing Four self adhesive rubber feet Quick start guide Safety document AVS 4128 USB type A to type A cable for use with external configuration tools future use Universal power adapter with locking connector ...

Страница 6: ...EX OPTIONAL EXTRAS Audio cable 2m 3 5mm stereo jacks Part number VSC22 USB cable 2m type A to B Part number VSC24 19 rack mount kit Part number RMK14 DisplayPort to DisplayPort video link cable 2m Part number VSCD10a HDMI to HDMI video cable 2m Part number VSCD15 ...

Страница 7: ... connections Remote control link Secondary video output as per port 8 Computer port 1 Speakers as per port 8 Computer port 2 as per port 8 Computer port 3 as per port 8 Computer port 4 as per port 8 Computer port 5 as per port 8 Computer port 6 as per port 8 Computer port 7 Computer port 8 Power in Suitable for installation in Information Technology Rooms in accordance with Article 645 of the Nati...

Страница 8: ...x B Alternative layouts on page 19 Note Video resolutions up to 3840 x 2160 60 Hz are supported To make connections to each computer port USB connection to computer 2 Insert a USB type A to type B cable between the USB socket and a vacant USB port on the computer 1 Attach a cable between the video connector DisplayPort or HDMI and the primary video output connector on the computer 3 Insert a 3 5mm...

Страница 9: ...ake console connections USB connections to console keyboard and mouse 1 Attach the primary video display DisplayPort or HDMI to video connector 1 2 Where a secondary video display DisplayPort or HDMI is also to be used repeat the previous step for the video connector 2 3 Connect the USB leads from the console mouse and keyboard to the two sockets on the rear panel Connection to console speakers 4 ...

Страница 10: ... the outer body to assist the locking mechanism until the plug is fully inserted 2 Attach the appropriate country specific plug to the power adapter body and insert it into a nearby mains outlet To disconnect the power adapter 1 Isolate the power adapter from the mains supply 2 Grasp the outer body of the power adapter plug where it connects with the node 3 Gently pull the body of the outer plug a...

Страница 11: ...nagement 1 firmware versions 3 configure sc system controller 4 account management 5 reset to factory defaults 6 logs and events 7 configure peripheral devices 8 exit terminal mode 9 power cycle the kvm 5 On the console keyboard enter the number of the required option See map right To exit terminal mode To exit from the menu but still remain logged in Press option 8 at the top level To log out com...

Страница 12: ...account management 3 Choose option 2 create admin account 4 Enter a username for your new admin account and press Enter Note Admin usernames must be 5 to 11 characters and must contain a mix of upper and lowercase characters 5 Repeat the new admin account username and press Enter 6 Enter a password for the new account Note Passwords must be 8 to 15 characters in length and must contain a mix of at...

Страница 13: ...ary video displays plus the audio channel source and hold status source In addition you can optionally choose to show a channel name and or standard security level tag To enter edit a channel name 1 Enter terminal mode see page 10 2 Choose option 3 configure sc 3 Choose option 7 fp configuration 4 Choose option 5 enter channel names and security information 5 Choose option 2 update channel name 6 ...

Страница 14: ...ideo displays Free Flow Adder Free Flow allows you to automatically switch between host computers simply by moving the mouse across the edge of the screen When enabled keyboard and mouse focus follows the mouse as it moves across monitor edges You ll notice that the focus button reflects the current cursor position Notes When used with dual head displays connected to computers running older versio...

Страница 15: ...lus security classification if configured It also indicates whether the switch is under remote control Channel indications You can optionally assign indicator colors to each computer channel so that each front panel button illuminates accordingly The channel indicator colors can be altered using Terminal mode see Appendix A Terminal mode configuration on page 16 The channel names and security clas...

Страница 16: ...wing Getting assistance see right Appendix A Configuration menu items Appendix B Alternative layouts Appendix C Hotkey commands GETTING ASSISTANCE If you are still experiencing problems after checking the information contained within this guide then please refer to the Support section of our website www adder com Further information ...

Страница 17: ...o de Select this option to send either the standard or custom descriptor as determined by the selection of either options 1 or 2 above to all of the connected computers firmware versions option 1 from the top level menu These options display the firmware versions of the various primary components of the secure switch 1 de version Displays the firmware version for the desktop environment interface ...

Страница 18: ...u These options relate to the admin accounts and their passwords 1 change password Allows you to change the access password for any admin account See page 11 2 create admin account Allows you to create a new admin account See page 11 3 delete all accounts Deletes all admin accounts except the default one See page 11 reset to factory defaults option 5 from the top level menu This option returns all...

Страница 19: ... must adhere to the Microsoft Digitizer standard 2 toggle consumer control support Enable support for consumer report keyboards 3 configure absolute mouse support Allows you to choose whether the connected console mouse operates in relative mode the default manner or absolute mode The latter is required if you wish to use the Free Flow mode to change between computers See page 14 Note Absolute mod...

Страница 20: ... return to the Standard eight host single head layout Note that each layout uses Absolute mouse mode If the uses changes to Relative mouse mode then the unit will be returned to the default eight host single head layout Other bespoke layouts can be created for you by Adder Professional Services on request Default eight host single head dual display layout The standard layout allows you to control ...

Страница 21: ...continually monitor a critical source while also switching between other host computers The first host computer provides its primary video output directly to the left most of the three displays Its secondary video output is connected to port 1 while up to seven other single head hosts are connected to the remaining ports The primary output of host 1 is permanently displayed Switching between all o...

Страница 22: ...TRL F11 System reset to factory defaults L CTRL L CTRL F11 r Enter Terminal mode L CTRL R CTRL t Exit Terminal mode L CTRL R CTRL x Upload mode L CTRL L CTRL L Alternative layout presets see Appendix B Default eight host single head dual display layout L CTRL L CTRL F11 F1 Eight host single head single display layout L CTRL L CTRL F11 m Eight host layout with top bottom displays L CTRL L CTRL F11 ...

Страница 23: ...22 INSTALLATION CONFIGURATION OPERATION FURTHER INFORMATION INDEX www ctxd com Documentation by 2023 Adder Technology Limited All trademarks are acknowledged Part No MAN 000006 Release 1 1 www adder com ...

Страница 24: ...rs 11 Channel name 12 14 17 Colors button indicators 11 Configuration menu 10 16 19 Connections 6 computer 7 console 8 overview 6 power 9 D Default admin 10 F Factory reset 12 Free Flow 2 13 G Guard mode 14 H Hotkeys 21 changing 12 L Layout presets 21 P Power in 9 R Reset 12 S Security information 17 Security level tag 17 Speakers 8 Specifications 3 Status display 14 T Technical specifications 3 ...

Отзывы: