background image

6

2.1

  Important Information for set up

After having unpacked your subwoofer, please allow the system to acclimate to 
the temperature of the room for approximately an hour.

The subwoofer should be positioned on a firm ground.

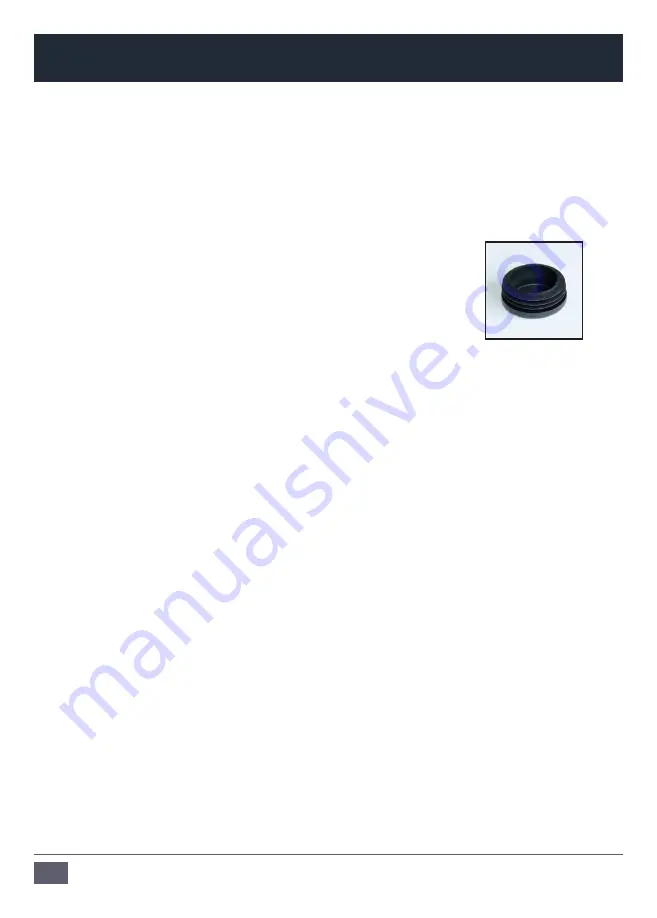
When setting up your subwoofer, please make sure to attach 
the black protective plugs to the subwoofer’s feet in order 
to prevent damage of your floor surfacing. For hard floors 
there are also felt pads provided that can be sticked to the 
underside of the protective plugs.

We recommend that you retain the original packaging, as it is the best  way to 
guarantee safe transportation should the need to do so arise.

Please note that the subwoofer will take some break-in time to achieve optimum 
sonic performance. 

2.2

  Quick Start

a)

  Before connecting the subwoofer to your audio components and the power 

source make sure that the subwoofer, the loudspeakers and your audio source 
are switched off and set the level controls fully counterclockwise.

b)

  Choose your preferred connection as described under 3.

c)

  Check if the specified voltage matches the voltage of the power supply you use. 

If this is not the case do not connect the loudspeakers to a power source! Please 
contact your local dealer or national distributor. 
If the voltages match, use the included power cables to connect the loudspeaker 
to the AC sockets.

d) 

  Switch on the main on/off switches on the rear panel of the subwoofer.

e) 

  Make sure that the line out level (volume) of your stereo is either at a low level or 

all the way off. Then, switch on your audio system.

f) 

  Turn on your source of music and adjust the volume carefully.

2. Quick Start

Содержание Classic SW260 MK3

Страница 1: ...Classic SW260 MK3 Operation Manual Bedienungsanleitung English Deutsch ...

Страница 2: ...ponents Do not place this unit on an unstable cart stand or tripod bracket or table The unit may fall causing serious injury and or serious damage When cart is used use caution when moving the cart apparatus combination Do not expose this product to rain or moisture never wet the inside with any liquid and never pour or spill liquids directly onto this unit Please do not put any objects filled wit...

Страница 3: ...ely disconnect from AC mains disconnect the power supply from the AC receptacle Never use flammable or combustible chemicals for cleaning audio components Avoid touching the speaker membranes and do not block the woofer s ventilation ports Never expose this product to extremely high or low temperatures Never operate this product in an explosive atmosphere High SPL s may damage your hearing Please ...

Страница 4: ...ellites 8 4 2 Walls Distance to walls 8 4 3 Finding the optimum position 8 5 Controls 9 10 5 1 LED on front panel 9 5 2 Controls on rear panel 9 5 2 Controls on rear panel continued 10 6 Trouble Shooting 11 6 1 No or distorted signal 11 6 2 Parasitic noises 11 7 Maintenance 12 8 Shipping Packaging 12 9 Environmental Information 12 10 EU Declaration of Conformity 13 11 Limited Warranty 14 11 1 Term...

Страница 5: ...sintendedtoprovideyouwithinformationaboutyournewADAMsubwoofer It contains important information regarding safety setting up handling and warranty We request that you read these sections carefully to ensure easy set up and prevent potential problems If you have any questions about this or any of our products please don t hesitate to contact us we will be happy to assist you For detailed information...

Страница 6: ...ptimum sonic performance 2 2 Quick Start a Before connecting the subwoofer to your audio components and the power source make sure that the subwoofer the loudspeakers and your audio source are switched off and set the level controls fully counterclockwise b Choose your preferred connection as described under 3 c Check if the specified voltage matches the voltage of the power supply you use If this...

Страница 7: ...nd RIGHT SATELLITE OUT jacks to the inputs of the left and right main powered speakers or the inputs of the amps powering the main speakers 3 4 Sub Out This balanced output mirrors the input signal enabling you to daisy chain as many SW260s in a row as you like The Sub Level affects the output so that all Subs in the chain can be levelled at a time Instead of having one huge subwoofer it often is ...

Страница 8: ...nce to walls Generally every wall in relative close distance to the subwoofer enhances its sound pressure by about 6 dB For instance placing the subwoofer in a corner of a room will make it about 18 dB louder It is likely that this will result in an impair ment of the precision of the musical reproduction Another problem related to the geometrics of the room concerns the so called standing waves T...

Страница 9: ... by As soon as the subwoofer receives a signal the LED starts to glow green operating mode 5 2 Controls on the rear panel a Mode This push button allows you to choose between Signal On woofer starts operation as soon as a musical signal arrives and stops after 15 minutes without a signal Continuous the unit is permanently working We recommend the Signal on position It minimises power consumption a...

Страница 10: ...e phase improves the sound quality d Sub Level This controls the Input Sensitivity from 60dB to 6dB relative to 775mV when used via the balanced XLR input or relative to 250mV when used via the unbalanced Cinch RCA input e Sub Filter The upper frequency limit of the unit is variable and can be set to any value between 50 and 150Hz The 85Hz marker indicates the recommendation of Dolby labs for surr...

Страница 11: ...les Connect the subwoofer as directly to the signal source as possible please mind the volume Is another part of the signal path e g mixer audio source defective 6 2 Problem You hear parasitic noises like humming buzzing soughing cracking Please disconnect the signal cables If the noises disappear check the signal path Make sure that all cables are properly connected especially the signal cable be...

Страница 12: ...you have to send your speakers to any other location it is of vital importance that you use the original packaging materials Experience has shown that it is very dif ficult to avoid damage if you have to send them without these ADAM Audio can not be held responsible for damages due to improper packaging If a transport is necessary and the original shipping carton is not available a new one can be ...

Страница 13: ... 2001 EN 61000 6 3 2001 EN 55020 2002 EN 55013 2001 and complies with the EU General Product Safety 2001 95 EC in pursuance of which the following standard has been applied EN 60065 2002 This declaration attests that the manufacturing process quality control and product documentation accord with the need to assure continued compliance The attention of the user is drawn to any special measures rega...

Страница 14: ...ng b for damages caused by any use other than correct use described in the user man ual c for damages caused by faulty or unsuitable ancillary equipment d if repairs or modifications have been executed by an unauthorized person e for damages caused by accidents lightning water fire heat public disturbances or any other cause beyond the reasonable control of ADAM Audio 11 2 How to claim repairs und...

Страница 15: ...n amplifiers 1 Subwoofer channel 1 2 200 W 300 W Input sensitivity 60 to 6 dB Frequency response 25 Hz 150 Hz Crossover frequencies 50 150 Hz Inputs XLR RCA Input impedance 10 kΩ Weight 21 kg 46 3 lb Height x Width x Depth 500 x 300 x 400 mm 19 5 x 12 x 15 5 Warranty 5 years Operating temperature 0 C to 40 C 32 F to 104 F Storage temperature 30 C to 70 C 22 F to 167 F Humidity Max 90 not condensin...

Страница 16: ...Notes Notizen ...

Страница 17: ...Classic SW260 MK3 Bedienungsanleitung Deutsch ...

Страница 18: ...die gekennzeichnete Nennspannung mit der Nennspannung in Ihrer Umgebung übereinstimmt Sollte dies nicht der Fall sein schließen Sie den Subwoofer in keinem Falle an eine Stromquelle an und kontaktieren Sie Ihren Fachhändler Schalten Sie stets alle Geräte aus bevor Sie eine Kabelverbindung entfernen oder neu hinzufügen Verwenden Sie nur Wagen Ständer Stative Einbauhilfen oder Tische die vom Herstel...

Страница 19: ...tz schalten Sie den Netzschalter aus Anschließend ziehen Sie den Netzstecker aus der Steckdose Der Netzschalter und stecker müssen leicht erreichbar sein Verwenden Sie stets geprüfte Kabel Defekte Kabel sind häufig die Ursache für Störgeräusche verschiedener Art Setzen Sie dieses Produkt nicht bei extremen Temperaturen ein ebenso wenig in feuer oder explosionsgefährdeten Umgebungen Bitte beachten ...

Страница 20: ...4 4 1 Entfernung zu den Satelliten 24 4 2 Wände Wandabstand 24 4 3 Das Finden der optimalen Position 24 5 Bedienelemente 25 26 5 1 LED auf der Vorderseite 25 5 2 Rückseitiges Kontrollpanel 25 5 2 Rückseitiges Kontrollpanel Fortsetzung 26 6 Fehlerbehebung 27 6 1 Kein oder gestörtes Signal 27 6 2 Nebengeräusche 27 7 Wartung und Pflege 28 8 Transport Verpackung 28 9 Umweltinformation 28 10 Konformitä...

Страница 21: ...wendungen bis hinunter zu 25 Hertz Bitte lesen Sie diese Bedienungsanleitung vor der Inbetriebnahme und beachten Sie die Sicherheitshinweise und Garantiebestimmungen Die nachfolgenden Tipps und Überlegungen sollen Ihnen dabei helfen die Fähigkeiten ihres Subwoofers möglichst gut zu nutzen Die Positionierung im Raum sowie die Eigenschaften des Hörraums selbst sind von größerer Bedeutung für das Ges...

Страница 22: ...oofer abhängig von Pegel und Nutzungsfrequenz einige Tage benötigt um seine optimale Klangqualität zu erreichen 2 2 Quick Start Inbetriebnahme a Vergewissern Sie sich vor Anschluss der Kabel dass sowohl der Subwoofer Netz schalter als auch die betreffenden Komponenten Ihrer Audio Anlage ausgeschaltet sind und stellen Sie die Lautstärke auf Minimum b Wählen Sie eine der Anschlussmöglichken siehe 3 ...

Страница 23: ...s rechte und linke Signal von ihrer Signalquelle Vorverstärker etc an die LEFT und RIGHT Eingangsbuchsen an Benutzen sie entweder XLR balanced oder RCA unbalanced Kabel 3 3 Satellite Out Ausgänge Verbinden Sie die LEFT und RIGHT SATELLITE OUT Buchsen mit den Eingängen ihrer aktiven Hauptlautsprecher oder mit den Eingängen des die Lautsprecher kontrollierenden Verstärkers 3 4 Sub Out Hier handelt e...

Страница 24: ...B erhöht Das bedeutet dass z B die Aufstellung in einer Ecke die Schallenergie um rund 18 dB erhöht was dazu führen kann dass die tiefen Frequenzen unverhältnismäßig verstärkt werden und die Präzision leidet Ein weiteres Problem das sich mit der Aufstellung in Wandnähe oder gar in Ecken vergrößern kann betrifft die so genannten Stehenden Wellen Wellen gleicher Länge stehen zwischen zwei einander g...

Страница 25: ...ges Kontrollpanel a Mode Zuschaltung des Subwoofers Mittels dieses Schalters können Sie wählen zwischen Signal Auto On Der Subwoofer wird automatisch einge schaltet sobald er ein Musiksignal erhält und geht in Stand by Modus wenn er 15 Minuten lang kein Signal erhalten hat Continuous Der Subwoofer ist stets eingeschaltet Wir empfehlen die Signal On Stellung Sie minimiert den Stromverbrauch und erl...

Страница 26: ...schaltung klanglich sinnvoll ist d Sub Level In der Stellung 0dB wird das einkommende Signal 1 1 an die interne Endstufe weitergeleitet es ist im Bereich von 60dB bis 6dB regelbar Damit kann die Lautstärke in einem sehr weiten Bereich geregelt und alle erforderlichen Pegel eingestellt werden e Sub Filter Die obere Grenzfrequenz des Subwoofers kann im Bereich von 50Hz bis 150Hz variabel eingestellt...

Страница 27: ...n sie das Gerät so direkt wie möglich an die Signalquelle an achten Sie dabei auf die Lautstärke Ist ein anderes Element der Signalkette Vorverstärker etc defekt 6 2 Es sind störende Nebengeräusche Brummen Pfeifen Knistern etc zu hören Bitte ziehen Sie das Signaleingangskabel ab Wenn die Störgeräusche nicht mehr zu hören sind überprüfen Sie die Signalkette Stellen Sie sicher dass alle Kabel korrek...

Страница 28: ...ons und Verpackungsteile aufzuheben um bei einem notwendig werdenden Transport die Lautsprecher sicher zu verpacken und nicht zu gefährden Die Erfahrung zeigt dass es sehr schwierig ist mit allgemeinen Verpackungsmitteln einen sicheren Transport zu ermöglichen Für Schäden die von unzureichenden Verpackungsmaß nahmen herrühren kann ADAM Audio nicht haftbar gemacht werden Sollte für einen Transport ...

Страница 29: ...men entspricht EN 61000 6 1 2001 EN 61000 6 3 2001 EN 55020 2002 EN 55013 2001 Ebenfalls stimmt es überein mit der EU General Product Safety 2001 95 EC und richtet sich nach folgendem Standard EN 60065 2002 Diese Erklärung bezeugt dass die Qualitätskontrolle und Produktdokumenta tion mit der Notwendigkeit fortlaufender Einhaltung der EU Direktiven über einstimmt Sven Schmöle Managing Director ADAM...

Страница 30: ...ehler zum Zeitpunkt des Kaufes zurückzuführen sind und deckt keine Schäden durch a unsachgemäße Montage sowie unsachgemäßen Anschluss b unsachgemäßen Gebrauch für einen anderen als den vorgesehenen Zweck c Nichtbeachtung der Bedienungsanleitung d Modifikation der Lautsprecher oder defekte oder ungeeignete Zusatzgeräte e Reparaturen oder Veränderungen durch unberechtigte Personen f Unfälle Blitzsch...

Страница 31: ...aterial beschichtetes Papier Eingebaute Verstärker 1 Tieftöner 1 2 200 W 300 W Lautstärke 60 bis 6 dB Frequenzgang 25 Hz 150 Hz Übergangsfrequenz 50 150 Hz Eingänge XLR RCA Eingangsimpedanz 10 kΩ Gewicht 21 kg 46 3 lb Höhe x Breite x Tiefe 500 x 300 x 400 mm 19 5 x 12 x 15 5 Garantie 5 Jahre Betriebstemperatur 0 C bis 40 C Lagertemperatur 30 C bis 70 C Luftfeuchtigkeit Max 90 nicht kondensierend ...

Страница 32: ...ne Vorankündigung vorbehalten ADAM Audio GmbH Ederstr 16 12059 Berlin GERMANY tel 49 30 863 00 97 0 fax 49 30 863 00 97 7 email info adam audio com ADAM Audio UK Ltd email uk info adam audio com ADAM Audio USA Inc email usa info adam audio com ADAM Audio China email china info adam audio com www adam audio com Join us on Facebook Follow us on Twitter ...

Отзывы: