background image

ACS-B1086 User’s Guide 


ACS-B1086 

Celeron M 1.5G ,OnBoard 512MB DDR2 

with DDR2 SO-DIMM, built in Six Giga-LAN, nine COM 

port 


Edition: 1.02 

Book Number: ACS-B1086-08.08.12

Содержание ACS-B1086

Страница 1: ...ACS B1086 User s Guide ACS B1086 Celeron M 1 5G OnBoard 512MB DDR2 with DDR2 SO DIMM built in Six Giga LAN nine COM port Edition 1 02 Book Number ACS B1086 08 08 12...

Страница 2: ...possibility of such damages This document contains proprietary information protected by copyright All rights are reserved No part of this manual may be reproduced by any mechanical electronic or other...

Страница 3: ...r Button Setting 9 2 3 CMOS Reset 9 2 4 Jumper description 9 Connection 10 3 1 Ultra ATA33 IDE Disk Drive Connector IDE1 10 3 2 Keyboard Mouse Connector MSKB1 11 3 3 USB Port Connector USB3 4 11 3 4 L...

Страница 4: ...U STEPING OPTION SW1 SW2 17 Award BIOS Setup 18 4 1 Introduction 18 4 2 Starting Setup 18 4 3 Using Setup 19 4 4 Main Menu 20 4 5 Advanced BIOS Features 22 4 6 Power 23 4 7 PnP PCI Configuration Setup...

Страница 5: ...sh Disk or IBM Micro Drive Series ports Ten high speed 16C550 compatible UARTs ports COM3 COM10 can also support RS 485 RS 422 and 2500 Vrms isolation Series ATA The ICH6M has an integrated SATA host...

Страница 6: ...r Intel 82574L two 82541PI Gigabit Ethernet Controller provides a standard IEEE 802 3 Ethernet interface for 1000BASE T 100BASE TX and 10BASE T applications 802 3 802 3u and 802 3ab respectively Power...

Страница 7: ...ACS B1086 User s Guide ACS B1086 7 1 2 What You Have In addition to this User s Manual the ACS B1086 package includes the following items ACS B1086 board User Manual Drive CD...

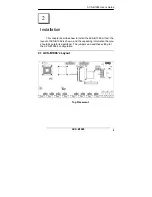
Страница 8: ...ter describes how to install the ACS B1086 At first the layout of ACS B1086 is shown and the unpacking information that you should be careful is described The jumpers and switches setting for the ACS...

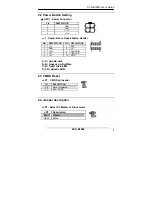
Страница 9: ...hard disk LED 9 10 power LED 2 3 CMOS Reset JP1 CMOS pin header 2 4 Jumper description JP3 Select CF Master or Slave mode Pin DESCRIPTION 1 GND 2 GND 3 12V 4 12v PIN DESCRIPTION PIN DESCRIPTION 1 5V...

Страница 10: ...IDE Connector 44 Pins PIN NO DESCRIPTION PIN NO DESCRIPTION 1 RESET 2 GROUND 3 DATA 7 4 DATA 8 5 DATA 6 6 DATA 9 7 DATA 5 8 DATA 10 9 DATA 4 10 DATA 11 11 DATA 3 12 DATA 12 13 DATA 2 14 DATA 13 15 DAT...

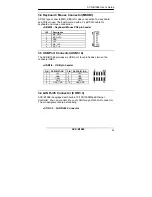
Страница 11: ...3 4 The ACS B1086 provides six USB port four pin header two on the connector IDE3 USB3 4 USB pin header 3 4 LAN RJ45 Connector CON1 3 ACS B1086 is equipped with built in 10 100 1000Mbps Ethernet Contr...

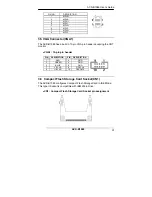
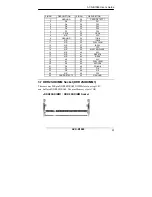
Страница 12: ...torage Card Socket CN1 The ACS B1086 configures Compact Flash Storage Card in IDE Mode This type II Socket is compatible with IBM Micro Drive CN1 Compact Flash Storage Card Socket pin assignment PIN N...

Страница 13: ...N C 36 PULL HIGH 12 N C 37 IRQ15 13 VCC 38 VCC 14 N C 39 MASTER SLAVE 15 N C 40 N C 16 N C 41 RESET 17 N C 42 IORDY 18 A2 43 N C 19 A1 44 PULL HIGH 20 A0 45 ACTIVE 21 D0 46 PDIAG 22 D1 47 D8 23 D2 48...

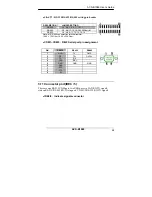
Страница 14: ...S B1086 offers eight high speeds NS16C550 compatible UARTs with Read Receive 16 byte FIFO serial ports PORT A H can also asigment to RS 232 RS 422 or RS 485 The PORTA H have isolation power and signal...

Страница 15: ...ctor port IDE4 5 There are one RS 232 COM port two USB port six LAN RX TX signals sixteen RS 232 RS 485 RX TX singnals COM1 2 RS 232 RX TX signals IDE4 5 indicate signals connector DESCRIPTION JUMPER...

Страница 16: ...B1 42 COM2_RX_LED 43 USB1 44 COM2_TX_LED IDE5 PIN DESCRIPTION IDE4 PIN DESCRIPTION 1 COM3_TX_LED 2 COM3_RX_LED 3 COM4_TX_LED 4 COM4_RX_LED 5 COM5_TX_LED 6 COM5_RX_LED 7 COM6_TX_LED 8 COM6_RX_LED 9 COM...

Страница 17: ...uide ACS B1086 17 3 12 CPU STEPING OPTION SW1 SW2 SW1 SW2 CPU steping switch SW1 BANIAS DOTHAN A DOTHAN B 1 OFF ON 2 OFF ON BANIAS DOTHAN A SW2 FBS 400 FSB 533 DOTHAN B 1 ON ON OFF 2 ON ON OFF 3 ON OF...

Страница 18: ...o ways 1 By pressing Del immediately after switching the system on or 2 By pressing the Del key when the following message appears briefly at the bottom of the screen during the POST Power On Self Tes...

Страница 19: ...r Esc Main Menu Quit without saving changes Submenus Exit Current page to the next higher level menu Move Enter Move to the item you desired PgUp key Increase the numeric value or make changes PgDn ke...

Страница 20: ...enu Selections Item Options Description Date MM DD YYYY Set the system date Time HH MM SS Set the system time IDE Channel 0 Master Options are in its sub menu described in Table 3 Press Enter to enter...

Страница 21: ...d disk drive Use a separate sub menu to configure each hard disk drive Figure 2 shows the IDE primary master sub menu IDE HDD Auto Detection Press Enter IDE Primary Master Auto Access Mode Auto Capaci...

Страница 22: ...te PRECOMP 65535 means NONE Capacity Auto Display your disk drive size Disk drive capacity Approximated Note that this size is usually slightly greater than the size of a formatted disk given by a dis...

Страница 23: ...e quick POST Disabled Normal POST Full Screen LOGO Show This item allows you to enable or disable show full screen LOGO The Choice Enabled Disabled USB Keyboard Support This item allows you to enable...

Страница 24: ...This item allows you to choose the Option of Power Status after Power Fail by ATX Power Supply The Choice Former STS On Off Note In order to work LAN function under Linux operating system the default...

Страница 25: ...by going into each of the sub menu that follows this field a sub menu is preceded by a The choice Auto ESCD Manual IRQ Resources When resources are controlled manually assign each system interrupt a t...

Страница 26: ...RQ4 2F8 IRQ3 Disabled Auto UART Mode Select Select the Function Mode for UART The choice IrDA ASKIR Normal USB Controller Select Enabled if your system contains a Universal Serial Bus USB controller a...

Страница 27: ...s Guide ACS B1086 27 support built in the support will be automatically turn on when high speed device were attached The Choice Enabled Disabled 4 9 PC Health Figure 7 H W Monitor menu 4 10 Boot Figu...

Страница 28: ...First Second Third Other Boot Device The BIOS attempts to load the operating system from the devices in the sequence selected in these items The Choice Floppy LS120 Hard Disk CDROM ZIP100 USB FDD USB...

Страница 29: ...n this item asks for confirmation Save to CMOS and EXIT Y N Y Pressing Y stores the selections made in the menus in CMOS a special section of memory that stays on after you turn your system off The ne...

Страница 30: ...When you press Enter on this item you get a confirmation dialog box with a message similar to Load Optimized Defaults Y N N Pressing Y loads the default values that are factory settings for optimal pe...

Страница 31: ...led after reset Once you enabled the watchdog timer your program should trigger the watchdog timer every time before it times out After you trigger the watchdogtimer the timer will be set to zero and...

Страница 32: ...program as follow GPO Example Description O 2E 87 Eetended Functions Enable Register O 2E 87 Eetended Functions Enable Register O 2E 2A Select CR2A O 2F FC Define the PINs as GPIO or Game Port 1 FC P...

Страница 33: ...n121 128 set as GPIO O 2E 07 EFIR EFER Extended Functions Index Register point to Logical Device Number Reg O 2F 07 EFDR EFIR 1 select logical device 7 GPIO in logical device7 O 2E 30 select CR30 Acti...

Отзывы: