background image

9

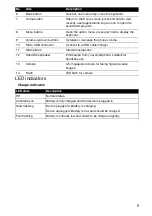
LED indicators

Charge indicator:

6

Back button

Go back one menu step; close the keyboard.

7

Home button

Return to the Home screen; press and hold to view 
recently-used applications, tap an icon to open the 
associated program.

8

Menu button

Open the option menu; press and hold to display the 
keyboard.

9

Volume up/down buttons

Increase or decrease the phone volume.

10

Micro USB connector

Connect to a USB cable/charger.

11

Microphone

Internal microphone.

12

Handsfree speaker

Emits audio from your smartphone; suitable for 
handsfree use.

13

Camera

A 5-megapixel camera for taking high-resolution 
images.

14

Flash

LED flash for camera.

LED state

Description

Off

Normal status.

Constantly on

Battery is fully charged and the device is plugged in.

Slow flashing

Device plugged in: Battery is charging.

Device unplugged: Battery is low and should be charged.

Fast flashing

Battery is critically low and needs to be charged urgently.

No.

Item

Description

Содержание Liquid Express E320

Страница 1: ...Acer Liquid Express E320 User Guide ...

Страница 2: ...de Model E320 First issue 8 2011 Acer Liquid Express E320 Smartphone Model number __________________________________ Serial number ___________________________________ Date of purchase ________________________________ Place of purchase ________________________________ ...

Страница 3: ... terms of this Agreement 7 Transfer your rights under this Agreement to any third parties 8 Export the Software in contravention of applicable export laws and regulations or i sell export re export transfer divert disclose technical data or dispose of any Software to any prohibited person entity or destination including without limitation Cuba Iran North Korea Sudan and Syria or ii use any Softwar...

Страница 4: ...TAL DAMAGES THE ABOVE LIMITATION MAY NOT APPLY TO YOU TERMINATION Without prejudice to any other rights Acer may immediately terminate this Agreement without notice if you fail to comply with any terms and conditions of this Agreement In such event you must 1 Cease all use of the Software 2 Destroy or return to Acer the original and all copies of the Software and 3 Delete the Software from all pho...

Страница 5: ...ne Turning on for the first time 12 Locking your smartphone 12 Using the touchscreen 13 The Idle screen 15 The Home screen 16 Managing contacts Managing your contacts 21 Making Calls Before making a call 23 Making a call 23 The voice call screen 24 Voice call options 25 Messaging Creating a new message 27 Replying to a message 28 MMS messages 28 Going online Browsing the Internet 30 Setting up you...

Страница 6: ...ettings 37 Connecting to a PC 41 Acer USB Fast Charge 42 FM radio 42 Multimedia playback 42 Restoring to factory settings 45 Accessories and Tips Using the headset 46 Using a Bluetooth headset 46 Inserting a microSD Card 46 Appendix FAQ and troubleshooting 47 Other sources of help 48 Warnings and precautions 48 Emergency calls 51 Disposal and recycling information 51 Taking care of your smartphone...

Страница 7: ...ediately register it This will give you access to some useful benefits such as Faster service from our trained representatives Membership in the Acer community receive promotions and participate in customer surveys The latest news from Acer Hurry and register as other advantages await you How to register To register your Acer product please visit mobile acer com Click PRODUCT REGISTRATION and foll...

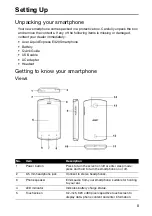
Страница 8: ...e AC adapter Headset Getting to know your smartphone Views No Item Description 1 Power button Press to turn the screen on off or enter sleep mode press and hold to turn the smartphone on or off 2 3 5 mm headphone jack Connect to stereo headphones 3 Phone speaker Emits audio from your smartphone suitable for holding to your ear 4 LED indicator Indicates battery charge status 5 Touchscreen 3 2 inch ...

Страница 9: ...cro USB connector Connect to a USB cable charger 11 Microphone Internal microphone 12 Handsfree speaker Emits audio from your smartphone suitable for handsfree use 13 Camera A 5 megapixel camera for taking high resolution images 14 Flash LED flash for camera LED state Description Off Normal status Constantly on Battery is fully charged and the device is plugged in Slow flashing Device plugged in B...

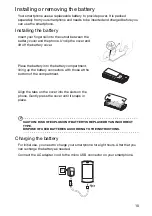
Страница 10: ... Place the battery into the battery compartment lining up the battery connectors with those at the bottom of the compartment Align the tabs on the cover into the slots on the phone Gently press the cover until it snaps in place CAUTION RISK OF EXPLOSION IF BATTERY IS REPLACED BY AN INCORRECT TYPE DISPOSE OF USED BATTERIES ACCORDING TO THE INSTRUCTIONS Charging the battery For initial use you need ...

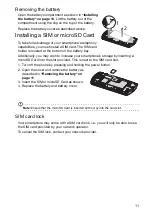
Страница 11: ...ou may wish to increase your smartphone s storage by inserting a microSD Card into the slot provided This is next to the SIM card slot 1 Turn off the phone by pressing and holding the power button 2 Open the cover and remove the battery as described in Removing the battery on page 11 3 Insert the SIM or microSD Card as shown 4 Replace the battery and battery cover Note Ensure that the microSD Card...

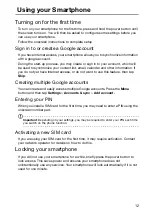
Страница 12: ...feature then tap Skip Creating multiple Google accounts You can create and easily access multiple Google accounts Press the Menu button and then tap Settings Accounts sync Add account Entering your PIN When you install a SIM card for the first time you may need to enter a PIN using the onscreen number pad Important Depending on your settings you may be required to enter your PIN each time you swit...

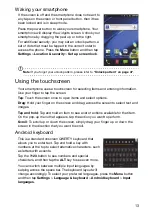
Страница 13: ...uch the screen once to open items and select options Drag Hold your finger on the screen and drag across the screen to select text and images Tap and hold Tap and hold an item to see a list of actions available for that item On the pop up menu that appears tap the action you want to perform Scroll To scroll up or down the screen simply drag your finger up or down the screen in the direction that y...

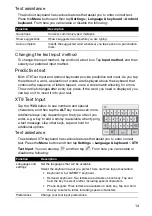
Страница 14: ... on the type of text you enter e g a key to add a smiley is available when typing a text message Like other keys tap and hold for additional options Text assistance The standard XT9 keyboard has various features that assist you to enter correct text Press the Menu button and then tap Settings Language keyboard XT9 Text Input You can also tap and then tap From here you can enable or disable the fol...

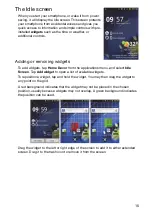
Страница 15: ...idgets tap Home Decor from the applications menu and select Idle Screen Tap Add widget to open a list of available widgets To reposition a widget tap and hold the widget You may then drag the widget to any point on the grid A red background indicates that the widget may not be placed in the chosen position usually because widgets may not overlap A green background indicates the position can be use...

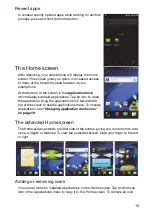
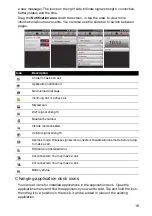
Страница 16: ...ions Tap an icon to open the application Drag the application dock towards the top of the screen to see the applications menu To change applications see Changing application dock icons on page 19 The extended Home screen The Home screen extends to either side of the screen giving you more room to add icons widgets or features To view the extended screen slide your finger to the left or right Addin...

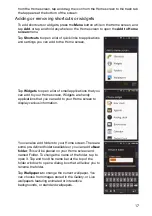
Страница 17: ...pplications that you can add to your Home screen Widgets are handy applications that you can add to your Home screen to display various information You can also add folders to your Home screen There are some pre defined folders available or you can add a New folder This will be placed on your Home screen and named Folder To change the name of the folder tap to open it Tap and hold the name bar at ...

Страница 18: ... Home button to return to the Home screen then start the new application To view your active applications press and hold the Home button Then tap an icon to go to the application Tip To prolong battery life it is better to close an application when you ve finished using it Do this by either pressing the Back key or the Menu button and selecting Exit if available The applications menu The applicati...

Страница 19: ...ations menu and find the application you want to add Tap and hold the icon then drag it to a position in the dock it will be added in place of the existing application Icon Description An alarm has been set Application notification New unread message Incoming call or active call Missed call Wi Fi signal strength Bluetooth enabled Vibrate mode enabled Cellular signal strength Airplane mode Wireless...

Страница 20: ...n from the dock open the applications menu then tap and hold an icon to select it Either drag the icon to a different page in the applications menu or to the trash icon that appears at the bottom left corner of the screen ...

Страница 21: ...h for a contact or press the Menu button to open the menu Adding a contact Tap New contact to add a new contact You may also scan a person s profile barcode to add the person to your contact list or group To create a contact you will be asked to enter the contact s Given and Family name Phone numbers Email addresses IM addresses Postal addresses You may also Enter information such as organizations...

Страница 22: ...om the contact to voicemail To assign an image to your contact tap the silhouette and select whether to take a photo or select an image from your smartphone s picture gallery Tip You may also create a contact from an already dialed or received number see Saving a dialed number to contacts on page 24 ...

Страница 23: ...ternational call rates can vary greatly depending on the country you are calling and your network provider We suggest you check all call rates with your network provider to avoid excessive phone bills If you are using your smartphone abroad roaming charges will apply Consult your network provider for roaming rates specific to the country you are visiting before you leave Smart search Smart search ...

Страница 24: ...b in the onscreen number pad or Contacts from the Home screen to view your contacts 2 Tap a contact A dialog will open asking if you want to View contact Call contact Text contact Edit contact Send contact or Delete contact Speed Dial You may add a contact to a Speed Dial number on the phone keypad Open the Phone tab then tap and hold any number from 2 through 9 1 is reserved for the voicemail ser...

Страница 25: ...rphone Accessing the keypad To access the keypad while in a call tap the dialpad icon Tap Back to return to the voice call screen Accessing your phonebook To access your phonebook while in a call tap Add call Muting a call To mute a call tap Mute on the voice call screen to switch off the microphone Tap Mute again to switch the microphone back on Putting a call on hold To put a call on hold tap Ho...

Страница 26: ... view missed calls from the Notification area 1 Open the notification list by tapping the Notification area to display the details of the missed calls 2 Select the call from the list to enter the Call log You can save phone numbers to your Contacts from the Call log Please refer to Adding a contact on page 21 for further details ...

Страница 27: ... You can also select from your contact Once you have entered the recipient enter your message in the text box labeled Type to compose Note SMS messages may be up to 160 characters long If your message is longer than 160 characters it will be sent as multiple linked messages Most phones will automatically join the linked messages to present the recipient with a single long message however some olde...

Страница 28: ...ofile before you can send MMS messages Normally your smartphone will set up the profile for you based on information retrieved from your provider Tip Ask your network provider for the necessary information if you need to manually set up the MMS profile Receiving MMS messages When a new MMS message arrives a message icon appears at the top of the screen and a notification message is displayed 1 Ope...

Страница 29: ...age to view the content 4 To reply to the message enter your text in the text box labeled Type to compose and tap Send Simple text replies will be sent as SMS messages If you wish to attach a file press the Menu button and tap Attach You will be presented with a menu of options 5 When you have finished composing the message press the Menu button and tap Send ...

Страница 30: ...ld the back button You may open multiple pages When a page is open press the Menu button and tap New window from the menu that opens Tap Windows to view all the windows that are open You can zoom in or out of pages using the zoom bar that appears when you tap the screen Tap and hold an item on a page to open a contextual menu Voice Search Note Voice search is available only in some regions With vo...

Страница 31: ...e sure your smartphone is connected to a data or Wi Fi connection 2 From the Applications menu tap Gmail 3 Press the Menu button and then tap Compose 4 Enter the recipient s email address the subject and message 5 When you are finished composing your message tap Send Setting up Email Your smartphone enables you to access your email Most popular ISPs can be set up in two steps Tap Email to start se...

Страница 32: ...roceed with the installation You may keep track of the download progress from the Notification Area Important Some applications may require payment before you can download them You will need to have a Google Checkout account in order to pay for these applications Uninstalling downloaded applications Once you ve downloaded and installed an application you may uninstall the application by tapping Se...

Страница 33: ...ition and navigate by using spoken turn by turn driving instructions with Navigation view where your friends are and places of interest and local businesses on Google Maps using Places and Latitude Important Maps does not have information about every location Using the map Tap the Maps icon in the applications menu Drag the map with your finger to move the map around To zoom in or out 1 Tap the pl...

Страница 34: ... the Applications tab and tap Camera Camera icons and indicators In the camera window the four icons on the left allow you to switch between camera and camcorder change the flash setting and view the gallery of pictures or videos Use the zoom slider at the bottom of the screen to adjust the zoom Tap the flash icon to cycle through the different modes Icon Description Takes you to the gallery Activ...

Страница 35: ...your subject and steady your smartphone 3 Zoom in or out as needed 4 Tap the camera button to take the photo Shooting a video Turn on camcorder mode by tapping the mode switch to camcorder mode 1 Ensure you have adjusted the parameters described above Flash enabled Automatic flash enabled Icon Description Set the photo quality Set white balance Set brightness contrast saturation and sharpness Set ...

Страница 36: ...os After you have taken your photo or video it is automatically saved Once you have taken a photo or video you can view it in Gallery by tapping the thumbnail icon in the upper right corner Alternatively open the Applications tab and tap Gallery From Gallery you can share the file directly using various services Note Share options vary depending on the file type Type Formats Image JPEG Video MPEG ...

Страница 37: ...ttings for your phone data Wi Fi and Bluetooth connections Activating or deactivating connections Open the Applications menu and tap Settings Wireless networks to manage your connection settings Each connection will have a green check when turned on Item Description Airplane mode Disable all wireless connections so you can safely use this device onboard an aircraft Wi Fi Turn the Wi Fi function on...

Страница 38: ...le NFC open the Applications menu and tap Settings Wireless networks NFC The box next to NFC will have a green check when turned on Note To send or recieve tags your phone must be turned on and not in sleep mode Sending tags via NFC 1 Open the Applications menu tap Settings Wireless networks and tap the box next to NFC to enable it 2 Open the Application menu and tap Tags 3 Tap My tag at the top o...

Страница 39: ...figure Wi Fi hotspot 3 Set the Network SSID and adjust security between Open and WPA2 PSK Tap Save to finish Note When your smartphone is serving as a Wi Fi hotspot you can t use your phone s applications to access the Internet via its Wi Fi connection Phone network settings Tap Mobile networks to adjust your network settings You can turn data connection on or off when roaming restrict the connect...

Страница 40: ...ice mail and text message center numbers You can also view and modify these settings manually through the Phone Settings screen Open the Applications menu and tap Settings Call settings Item Description Silent mode Silence all sounds except media and alarms Vibrate Sets vibration options Volume Sets volume for Ringtone Media Alarm and Notifications Phone ringtone Sets your phone s ringtone Notific...

Страница 41: ...email and contacts on your phone and never worry about losing them again Sync in real time or adjust it as you please Push the Menu button and then tap Settings Accounts sync to access the synchronization settings To have your smartphone auto sync make sure Background data and Auto sync are checked To manage synchronization of individual accounts tap an account to see their settings Google Sync In...

Страница 42: ...er right corner to turn the radio off Multimedia playback Your smartphone comes supplied with a variety of programs that you can use to enjoy multimedia content Acer Media Open Acer Media from the Applications menu to play media you have stored on your phone Acer Media enables you to listen to music view video clips and pictures upload photos and videos to social networking sites or send MMS messa...

Страница 43: ...r Music In the Applications menu tap clear fi Acer clear fi will automatically detect devices that are connected to the network and are also running Acer clear fi Tap any of the connected devices and then tap Photo Video or Music to browse media files on that connected device Note To use clear fi your devices need be on the same network wired or wireless with clear fi installed software Adjusting ...

Страница 44: ...e not sure of the source do not install a program Installing programs from unknown sources increases your risk of virus attacks and theft of personal and private data Closing an application To close an active application in the Applications menu tap Settings Applications Manage applications Tap the Running tab then tap the program you wish to close Select Stop to close the program Uninstalling an ...

Страница 45: ...responds Warning You should only perform a clean boot when all other options have failed to restore your smartphone to an operational state Warning This will erase all your personal information any contacts stored on your phone and any programs you installed If your phone is responding to screen input then open Settings from the Applications menu Tap Privacy Factory data reset click Reset phone an...

Страница 46: ...llows you to use the unit handsfree when making calls without the inconvenience of wires Creating a new access point When you need to add another GPRS 3G EDGE connection on your phone obtain the access point name and settings including username and password if required from your wireless service provider 1 Open the Applications menu and tap Settings Wireless networks Mobile networks Access Point N...

Страница 47: ...rmation System information and performance How do I check the OS version of my device Tap Menu Settings About phone to check the OS version Build number and other hardware and software information Power I can t turn on the device The battery power may be depleted Recharge the device Refer to Charging the battery on page 10 for more information RAM ROM How do I check the RAM and ROM memory status T...

Страница 48: ... or damage and even a risk of explosion from the battery pack CAUTION when listening to music To protect your hearing follow these instructions Increase the volume gradually until you can hear clearly and comfortably Do not increase the volume level after your ears have adjusted Do not listen to music at high volumes for extended periods Do not increase the volume to block out noisy surroundings D...

Страница 49: ...o not short circuit the battery Accidental short circuiting can occur when a metallic object such as a coin clip or pen causes direct connection of the positive and negative terminals of the battery These look like metal strips on the battery This might happen for example when you carry a spare battery in your pocket or purse Short circuiting the terminals may damage the battery or the connecting ...

Страница 50: ... Pacemaker manufacturers recommend that a minimum separation of 15 3 cm 6 be maintained between wireless devices and a pacemaker to avoid potential interference with the pacemaker These recommendations are consistent with the independent research by and recommendations of Wireless Technology Research Persons with pacemakers should do the following Always keep the device more than 15 3 cm 6 from th...

Страница 51: ...reless device for essential communications like medical emergencies If certain features are in use you may first need to turn those features off before you can make an emergency call Consult this guide or your service provider for more information When making an emergency call give all the necessary information as accurately as possible Your wireless device may be the only means of communication a...

Страница 52: ... car on a hot day or when temperatures are below freezing point Also keep it away from heaters and other sources of heat 5 DO NOT use or store your smartphone in any location that is dusty damp or wet 6 DO use a soft damp cloth to clean your smartphone If the surface of the screen becomes soiled clean it with a soft cloth moistened with diluted window cleaning solution 7 DO NOT press down on the s...

Страница 53: ...lity stereo output Mono speaker 0 5 W max Omni directional microphone Formats supported USB connector Micro USB connector USB client DC power in 5 V 1 A Connectivity Bluetooth 2 1 EDR and A2DP support IEEE Wi Fi 802 11 b g n WLAN GSM 850 900 1800 1900 UMTS 900 2100 EU models UMTS 850 1900 US models HSDPA HSUPA US models GPRS EDGE GPS AGPS NFC Type Formats Audio playback MP3 AMR WMA Ringtone MP3 MI...

Страница 54: ... battery replaceable Note Length of battery operation will depend on power consumption which is based on system resource use For example constantly using the backlight or using power demanding applications will shorten battery life between charges Dimensions Height 115 mm Width 60 8 mm Thickness 13 4 mm Weight 138 g with battery ...

Страница 55: ...e overcharging may shorten its lifetime If left unused a fully charged battery will lose its charge over time If the battery is completely discharged it may take a few minutes before the charging indicator appears on the display or before any calls can be made Use the battery only for its intended purpose Never use any charger or battery that is damaged Do not short circuit the battery Accidental ...

Страница 56: ...ctrical and electronic equipment RoHS and its amendments Prevention of hearing loss Caution Permanent hearing loss may occur if earphones or headphones are used at high volume for prolonged periods of time This device have been tested to comply with the Sound Pressure Level requirement laid down in the applicable EN 50332 1 and or EN 50332 2 standards Note For France mobile headphones or earphones...

Страница 57: ...e Please check with ART for the latest information www art telecom fr Note Your WLAN Card transmitts less than 100 mW but more than 10 mW List of National Codes This equipment may be operated in the following countries 01 Ain Orientales 02 Aisne 03 Allier 05 Hautes Alpes 08 Ardennes 09 Ariege 11 Aude 12 Aveyron 16 Charente 24 Dordogne 25 Doubs 26 Drome 32 Gers 36 Indre 37 Indre et Loire 41 Loir et...

Страница 58: ...ment into an outlet on a circuit different from that to which the receiver is connected Consult the dealer or an experienced radio TV technician for help Changes or modifications not expressly approved by the party responsible for compliance could void the user s authority to operate the equipment RF exposure warning The equipment complies with FCC RF exposure limits set forth for an uncontrolled ...

Страница 59: ...minimum of 1 cm from your body when the phone is switched on Certificate Information SAR This device meets the EU requirements 1999 519 EC on the limitation of exposure of the general public to electromagnetic fields by way of health protection The limits are part of extensive recommendations for the protection of the general public These recommendations have been developed and checked by independ...

Страница 60: ...eloped ratings for some of their mobile phones to assist hearing device users in finding phones that may be compatible with their hearing devices Not all phones have been rated Phones that have been rated have a label on the box Your device has been tested for hearing aid device compatibility and has a M3 rating These ratings are not guarantees Results will vary depending on the level of immunity ...

Страница 61: ...ollowing two conditions 1 This device may not cause interference and 2 this device must accept any interference including interference that may cause undesired operation of the device Le présent appareil est conforme aux CNR d Industrie Canada applicables aux appareils radio exempts de licence L exploitation est autorisée aux deux conditions suivantes 1 l appareil ne doit pas produire de brouillag...

Страница 62: ...s device and its antenna s must not be co located or operating in conjunction with any other antenna or transmitter Note The county code selection feature is disabled for products marketed in the US or Canada ...

Страница 63: ...tning må kun ske med batteri af samme fabrikat og type Levér det brugte batteri tilbage til leverandøren VARNING Explosionsfara vid felaktigt batteribyte Använd samma batterityp eller en ekvivalent typ som rekommenderas av apparattillverkaren Kassera använt batteri enligt fabrikantens instruktion VAROITUS Paristo voi räjähtää jos se on virheellisesti asennettu Vaihda paristo ainoastaan laitevalmis...

Страница 64: ...0 2007 EN 60950 1 EN 60950 1 2006 A1 2010 EN 50332 1 2000 EN 50332 2 2003 EN 50360 2001 AC 2006 EN 62209 1 2006 EN 62311 2008 EN 62209 2 2010 We hereby declare that the above named product is in conformance to all the essential requirements of the R TTE Directive 99 5 EC issued by the Commission of the European Community The conformity assessment procedure referred to in Article 10 and detailed in...

Отзывы: