background image

Aspire TC-780 Desktop Computer Service Guide

19

Security


Parameter

Description

Option

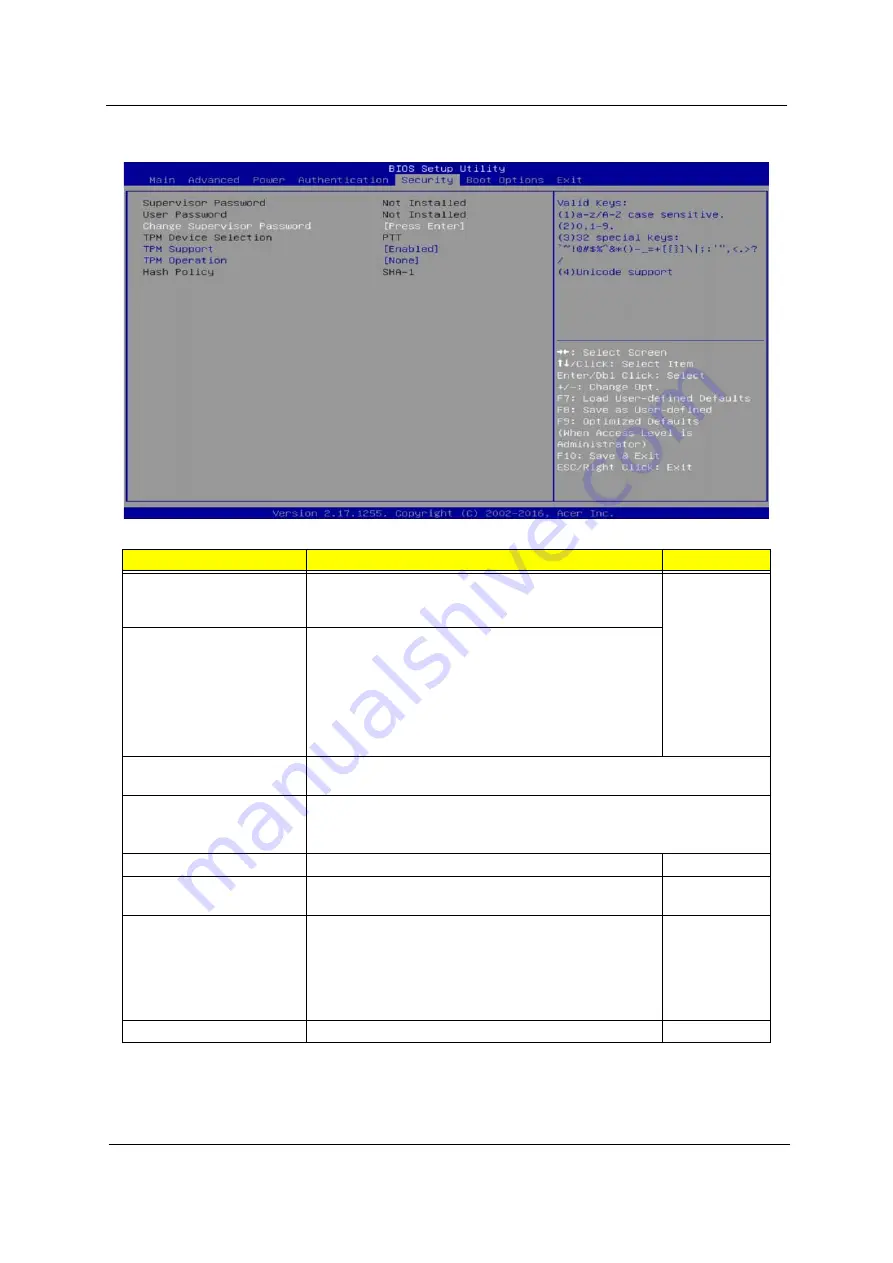
Supervisor Password

Displays  the  supervisor  password  status.  When  set  to 

Installed

, this password will allow the user to access and 

change all settings in the Setup Utility.

Installed
Not Installed

User Password

Displays  the  user  password  status.  Only  the  following 
menus will be accessible when this password is used to 
logged in:
• System Date and System Time
• Exit Without Saving
The 

F9

  key  (Load  Default  Settings)  will  also  be 

unavailable.

Change Supervisor 
Password

Press 

Enter

 to change the supervisor password.

Change User Password

Press 

Enter

 to change the user password. Note that this field: 

• is only accessible when a supervisor password is set;
• is cleared when the supervisor password is cleared.

TPM Device Selection

Displays supported TPM device.

PTT

TPM Support

Enables or disables the Trusted Platform Module (TPM) 
function.

Enabled

Disabled

TPM Operation

Displays  the  current  Trusted  Platform  Module  (TPM) 
operation.

None

Enable Take 
Ownership
Disable Take 
Ownership
Clear

Hash Policy

Displays supported hash policy

SHA-1

Содержание Aspire TC-780

Страница 1: ...spire TC 780 Desktop Computer Service Guide SG V1 03 PRINTED IN TAIWAN Service guide files and updates are available on the Acer CSD web site for more information go to http gcsd acer com tw GCSD_Portal ...

Страница 2: ...age 1 Removed Win7x64 driver in System Features 01 11 2017 V1 02 1 Page 1 Added Kaby Lake information in System Features Page 5 Added Kaby Lake information in Hardware Specifications 5 Page 103 Added Kaby Lake information in Block Diagram 6 Page 107 Added Kaby Lake information in Aspire TC 780 FRU List Appendix A Page 119 Added Kaby Lake information in Approved Vendor List AVL 01 20 2017 V1 03 1 P...

Страница 3: ...ect to the contents hereof and specifically disclaims any warranties of merchantability or fitness for any particular purpose Any Acer Incorporated software described in this guide is sold or licensed as is Should the programs prove defective following their purchase the buyer and not Acer Incorporated its distributor or its dealer assumes the entire cost of all necessary servicing repair and any ...

Страница 4: ... appear on screen NOTE Gives additional information related to the current topic WARNING Alerts you to any physical risk or system damage that might result from doing or not doing specific actions CAUTION Gives precautionary measures to avoid possible hardware or software problems IMPORTANT Reminds you to do specific actions relevant to the accomplishment of procedures ...

Страница 5: ...neric service guide In such cases please contact your regional offices or the responsible personnel channel to provide you with further technical details FRU Information Please note WHEN ORDERING FRU PARTS that you should check the most up to date information available on your regional web or channel If for whatever reason a part number change is made it will not be noted in the printed service gu...

Страница 6: ...vi Aspire TC 780 Desktop Computer Service Guide ...

Страница 7: ...ity 9 Accessing the Setup Utility 10 Navigating through the Setup Utility 11 Setup Utility Menus 12 Main 12 Advanced 13 Power 17 Authentication 18 Security 19 Boot Options 21 Exit 22 System Disassembly and Reassembly 23 Disassembly Tools 23 Pre disassembly Procedure 23 Disassembly Procedures 24 Removing the Side Panel 24 Removing the Front Bezel 25 Removing the ODD Module 28 Removing the HDD Modul...

Страница 8: ...l Module 68 Reinstalling the HDD Module 70 Reinstalling the ODD Module 72 Reinstalling the Front Bezel 76 Reinstalling the Side Panel 79 Troubleshooting 81 Hardware Diagnostic Procedure 81 System Check Procedures 81 Checkpoints 82 POST Error Indicators 86 BIOS Recovery 97 Creating the BIOS Crisis Recovery Disk 97 Performing a BIOS Recovery 97 BIOS Update 99 Updating the BIOS 99 Clearing CMOS 102 T...

Страница 9: ... Quad Core 65W Skylake S Intel Core i3 7100 3 9G 3M 2133 Quad Core 51W Kaby Lake Intel Core i3 6100 3 7G 3M 2133 Dual Core 47W Skylake S Intel Pentium G4400 3 3G 3M 2133 Dual Core 47W Skylake S Intel Celeron G3900 2 8G 2M 2133 Dual Core 51W Skylake S Chipset PCH Intel Skylake H110 Graphics controller One PCIe x16 graphics card Hardware monitor Super I O Memory Support DDR4 1 2V 2133 unbuffered DIM...

Страница 10: ...supply PFC 220W power supply unit Active PFC Non PFC 300W power supply unit Non PFC FR 300W power supply unit Active PFC FR 500W power supply unit Active PFC Security BIOS based user and supervisor passwords Kensington lock LED display and buttons Power LED Power button ODD eject button System BIOS AMI BIOS with 8 MB SPI Flash ROM Supports ACPI revision 5 0 standard Supports Plug and Play STR S3 S...

Страница 11: ...ctures and tables in this section illustrate the physical outlook of the computer Front View Item Component 1 ODD eject button 2 ODD 3 USB 3 0 ports 4 Microphone in jack 5 SD card reader 6 Headphone jack 7 Dummy ODD bezel 8 ODD emergency eject hole 9 Power button LED ...

Страница 12: ...ktop Computer Service Guide Rear View Item Component 1 Power connector 2 HDMI ports 3 USB 2 0 ports 4 USB 3 0 port 5 Microphone jack 6 Line in jack 7 Line out jack 8 Expansion card slots 9 Expansion card 10 LAN connector ...

Страница 13: ...100 3 7G 3M 2133 Dual Core 47W Skylake S Intel Pentium G4400 3 3G 3M 2133 Dual Core 47W Skylake S Intel Celeron G3900 2 8G 2M 2133 Dual Core 51W Skylake S Item Specification System chipset Intel Skylake H110 Hardware monitor Super I O IT8772 Item Specification Controller Integrated in the Intel Kaby Lake Skylake S processors Number of DIMM slot 2 Maximum memory 32GB using two 16GB modules Data rat...

Страница 14: ... Mars Western Digital WD20EZRX 22D8PB0 WD30EZRX 22D8PB0 GP1000A Item Specification Controller Integrated in the Intel Skylake H110 chipset Number of SSD bays 1 Form factor M 2 2280 Interface SATA 3 0 Supported capacities 96GB 128GB 256GB 512GB Vendor and models Kingston 96GB RBU SNS8151S3 Lite On 128GB CV1 8B128 256GB CV1 8B256 512GB CV1 8B512 Toshiba 128GB THNSNJ128G8NY 256GB CV1 8B256 Item Speci...

Страница 15: ...r Realtek RTL8111GA LAN protocol 10 100 1000 Mbps LAN connector type RJ 45 Item Specification WLAN module Intel Stone Peak 3165 7265 LiteOn QCA9377A Form factor M 2 2230 Protocol WLAN 802 11ac a b g n M 2 2T2R BT Item Specification Controller Realtek ALC662 VD 6 Channel High Definition Audio Codec Connectors Three audio jacks Item Specification SATA Controller Integrated in the Intel Skylake H110 ...

Страница 16: ...cification Type PFC 220W power supply unit Active PFC Non PFC 300W power supply unit Non PFC FR 300W power supply unit Active PFC FR 500W power supply unit Active PFC Input 100 240V Output max 220W 300W 500W Vendor and models Chicony Power D220A007L AC01 D14 220P1A 220W Active PFC FSP FSP220 50AANA 220W Active PFC 220v 240V FSP FSP300 60THA 1 300W None PFC A01003 100 127V 220 240V FSP FSP300 60EP ...

Страница 17: ...by the system and you are prompted Run Setup message to make changes to the BIOS settings The Setup Utility loads the configuration values in a battery backed nonvolatile memory called CMOS RAM This memory area is not part of the system RAM which allows configuration data to be retained when power is turned off The values take effect when the system is booted POST uses these values to configure th...

Страница 18: ...u will need to restart the computer Use the Left Right Up Down arrow keys to move between the menu screens then press Enter to view that menu tab Some options lead to pop up dialog boxes that prompt you to verify that you wish to execute that option Other options lead to dialog boxes that prompt you for information Some options marked with a lead to submenus that enable you to change the values fo...

Страница 19: ...d only if it is user configurable Press these keys repeatedly to display all possible entries A parameter that is enclosed in square brackets is user configurable Black font parameters are not user configurable for one of the following reasons The field value is auto configured or auto detected The field value is informational only The field is password protected F1 To bring up the General Help wi...

Страница 20: ...ve tables following each of the menu screen illustrations settings in boldface are the default and suggested settings Parameter Description System BIOS Version Current system BIOS version Build Date Date when the system BIOS was built Processor model Processor model installed Core Frequency Core frequency of the installed processor Memory Size Size of system memory detected during boot up Product ...

Страница 21: ...menu to enable or disable various Intel technology functions and configure video memory settings Integrated Peripherals Access this submenu to enable or disable operation modes for the onboard I O controllers PC Health Status Access this submenu to view current level of system processor PCH temperature voltages and fan speed ...

Страница 22: ...ether to enable or disable the Intel Advanced Encryption Standard New Instructions Enabled Disabled Video Output Select which display device the system will use when the system boots Discrete Onboard Onboard Graphics Controller Select whether to enable or disable the onboard video controller when the system boots Enabled Disabled ...

Страница 23: ...Emulation Enables or disables the PS 2 keyboard mouse emulation function Enabled Disabled Onboard Audio Controller Enables or disables the onboard audio controller Enabled Disabled Onboard LAN Controller Enables or disables the onboard LAN controller Enabled Disabled Onboard LAN Option ROM Enables or disables the load of embedded option ROM for onboard network controller Enabled Disabled Onboard W...

Страница 24: ...12V 5V 3 3V These items lets you monitor the parameters for critical voltages temperatures and fan speeds System Shutdown Temperature Enables or disables the System Shutdown Temperature function Enabled Disabled VRD Shutdown Temperature Enables or disables the VRD Shutdown Temperature function Enabled Disabled Smart Fan Enables or disables the smart system fan control function Enabled Disabled ...

Страница 25: ...he system from a power saving mode through an event on a PCI Express device Enabled Disabled Power On by Onboard LAN Enables or disables the system to wake up from a power saving mode when an onboard LAN card received an incoming call Enabled Disabled Wake Up by USB KB Mouse Enables or disables to wake up the system from a power saving mode using a USB keyboard or mouse Enabled Disabled Restore On...

Страница 26: ...r Secure keys installed Setup User Secure Boot Mode State Displays the current system boot mode status Enabled Disabled Secure Boot Enables or disables the secure boot function Enabled Disabled Secure Boot Mode Select the secure boot mode when secure boot is enabled Standard Custom Default Key Provisioning Enables or disables the default key provisioning function Enabled Disabled ...

Страница 27: ...hout Saving The F9 key Load Default Settings will also be unavailable Change Supervisor Password Press Enter to change the supervisor password Change User Password Press Enter to change the user password Note that this field is only accessible when a supervisor password is set is cleared when the supervisor password is cleared TPM Device Selection Displays supported TPM device PTT TPM Support Enab...

Страница 28: ...ord or Change User Password then press Enter The password box appears 2 Type the original password then press Enter 3 Type a new password then press Enter 4 Retype the new password to verify the first entry then press Enter You will be prompted to save the new password 5 Press Enter 6 Press F10 to save the password and close the Setup Utility To remove a system password 1 Select Change Supervisor ...

Страница 29: ...ority Press Enter to set the boot priority for the hard drive Optical Disc Drive Priority Press Enter to set the boot priority for the optical drive Removable Device Priority Press Enter to set the boot priority for a removable USB drive Network Device Priority Press Enter to set the boot priority for a network boot Boot Menu Enable or disable the boot menu function Enabled Disabled Bootup Num Loc...

Страница 30: ...menu and press Enter Save Changes Select this option and press Enter to save all the changes and return to the BIOS Setup Utility Discard Changes Select this option and press Enter to discard all the changes and return to the BIOS Setup Utility Load Default Settings To set this feature select Load Default Settings from the Exit menu and press Enter Then select OK to allow the BIOS to automatically...

Страница 31: ...y Procedure Before proceeding with the disassembly procedure perform the steps listed below 1 Make sure that the optical disc drive and the card reader slot are empty 2 Turn off the power to the computer and all peripherals 3 Unplug the power cord from the computer 4 Unplug the network cable and all connected peripheral devices from the computer 5 Place the computer on a flat steady surface with t...

Страница 32: ...the two screws securing the side panel to the chassis 3 Slide the side panel toward the back of the chassis until the tabs on the side panel disengage with the slots on the chassis 4 Detach the side panel from the unit and put it aside for re installation later Quantity Color Torque Part Number Screw Type 2 Black 6 0 0 5 kgf cm 86 SR2D1 001 ...

Страница 33: ...uter Service Guide 25 Removing the Front Bezel 1 Force eject the ODD tray by inserting a thin metal object into the ODD emergency eject hole 2 Disengage the latch securing the ODD bezel to the ODD tray then detach the ODD bezel ...

Страница 34: ...26 Aspire TC 780 Desktop Computer Service Guide 3 Push back the ODD tray until it latches into place 4 Release the front bezel retention tabs from the chassis interior ...

Страница 35: ...Aspire TC 780 Desktop Computer Service Guide 27 5 Pull the front bezel away from the chassis ...

Страница 36: ...ire TC 780 Desktop Computer Service Guide Removing the ODD Module 1 Release all the cables from the twist wire tie securing them to the chassis 2 Disconnect the power and data combo cable from the ODD module ...

Страница 37: ...Aspire TC 780 Desktop Computer Service Guide 29 3 Disconnect the power and data combo cable from the power supply cable 4 Disconnect the ODD data cable from the mainboard ...

Страница 38: ... Desktop Computer Service Guide 5 Remove the two screws securing the ODD module to the chassis 6 Slide the ODD module out of the chassis Quantity Color Torque Part Number Screw Type 2 Silver 6 0 0 5 kgf cm 86 B1HD1 001 ...

Страница 39: ... Desktop Computer Service Guide 31 7 Remove the two screws securing the ODD to the ODD bracket 8 Pull the ODD out of the ODD carrier Quantity Color Torque Part Number Screw Type 2 Silver 1 5 0 3 kgf cm 86 SXLD1 001 ...

Страница 40: ...32 Aspire TC 780 Desktop Computer Service Guide Removing the HDD Module 1 Disconnect the data and power cables from the HDD module 2 Disconnect the HDD data cable from the mainboard ...

Страница 41: ...ktop Computer Service Guide 33 3 Remove the four screws securing the HDD module to the chassis 4 Slide the HDD module out of the chassis Quantity Color Torque Part Number Screw Type 4 Silver 6 0 0 5 kgf cm 86 SXHD1 001 ...

Страница 42: ...ry hot when the system is on NEVER touch the heatsink with any metal or with your hands 1 Disconnect the heatsink fan cable from the mainboard 2 Loosen the four captive screws securing the thermal module to the mainboard Quantity Color Torque Part Number Screw Type 4 Silver 6 0 0 5 kgf cm Thermal Screws N A ...

Страница 43: ...Aspire TC 780 Desktop Computer Service Guide 35 3 Remove the thermal module from the mainboard ...

Страница 44: ...ke sure to create a backup file of all important data WARNING The processor becomes very hot when the system is on Allow it to cool off first before handling 1 Press the load lever and move it to the right to release the load lever from the retention tab 2 Pull the load lever to release the CPU cover plate from the retaining post ...

Страница 45: ...the CPU cover plate 4 Lift the processor from the socket Note WEEE Annex VII component A circuit board that is 10 cm2 has been highlighted with a yellow rectangle as shown in the above image Follow local regulations for disposing this type of circuit board ...

Страница 46: ...M slot to release the DIMM 1 then gently pull the DIMM upward to remove it from the mainboard 2 2 Repeat Step 1 to remove the remaining memory module Note WEEE Annex VII component A circuit board 10 cm2 has been highlighted with the yellow rectangle as shown above Please follow local regulations for disposal of detached circuit boards ...

Страница 47: ...ving the Expansion Board 1 Remove the screw securing the expansion board bracket to the chassis 2 Unlatch the metal clip securing the expansion board bracket to the chassis Quantity Color Torque Part Number Screw Type 1 Silver 6 0 0 5 kgf cm 86 SPZD1 003 ...

Страница 48: ...Guide 3 Remove the PCIe x16 expansion board from its slot Note WEEE Annex VII component A circuit board 10 cm2 has been highlighted with the yellow rectangle as shown above Please follow local regulations for disposal of detached circuit boards ...

Страница 49: ... antenna cables from the WLAN module NOTE For reference during machine reassembly note which cable color corresponds to the main and auxiliary connectors 2 Remove the screw securing the WLAN module to the mainboard Quantity Color Torque Part Number Screw Type 1 Silver 1 5 0 3 kgf cm 86 NBY01 003 ...

Страница 50: ...ice Guide 3 Remove the WLAN module from the mainboard Note WEEE Annex VII component A circuit board 10 cm2 has been highlighted with the yellow rectangle as shown above Please follow local regulations for disposal of detached circuit boards ...

Страница 51: ... mainboard 2 Remove the SSD module from the mainboard Quantity Color Torque Part Number Screw Type 1 Silver 1 5 0 3 kgf cm 86 NBY01 003 Note WEEE Annex VII component A circuit board 10 cm2 has been highlighted with the yellow rectangle as shown above Please follow local regulations for disposal of detached circuit boards ...

Страница 52: ...ing the Power Supply Module 1 Disconnect the power supply cables from the mainboard 2 Remove the four screws securing the rear end of the power supply module to the chassis Quantity Color Torque Part Number Screw Type 4 Silver 6 0 0 5 kgf cm 86 SPZD1 003 ...

Страница 53: ...Aspire TC 780 Desktop Computer Service Guide 45 3 Pull the power supply module out of the chassis ...

Страница 54: ...O and Card Reader Assembly 1 Disconnect the front I O board and card reader board cables from the mainboard 2 Remove the screw securing the front I O and card reader bracket to the chassis Quantity Color Torque Part Number Screw Type 1 Silver 6 0 0 5 kgf cm 86 SPZD1 003 ...

Страница 55: ...Aspire TC 780 Desktop Computer Service Guide 47 3 Pull the bracket with the cables out of the chassis ...

Страница 56: ... 780 Desktop Computer Service Guide Removing the Power Button Module 1 Disconnect the power button and LED cable from the mainboard 2 Release the power button cable from the plastic clip securing it to the chassis ...

Страница 57: ...Aspire TC 780 Desktop Computer Service Guide 49 3 Slide the top cover to disengage the latches securing it to the chassis then remove the top cover 4 Pull the power button cable out of the chassis ...

Страница 58: ...he chassis 2 Gently lift the mainboard off the chassis Quantity Color Torque Part Number Screw Type 6 Silver 6 0 0 5 kgf cm 86 SPZD1 003 Note WEEE Annex VII component A circuit board 10 cm2 has been highlighted with the yellow rectangle as shown above Please follow local regulations for disposal of detached circuit boards ...

Страница 59: ...he mainboard 2 Note WEEE Annex VII component The RTC battery has been highlighted with the yellow circle as shown above Please follow local regulations for disposal of used batteries Caution Risk of explosion if battery is replaced by an incorrect type Dispose of used batteries according to the instructions ...

Страница 60: ...einstalling the Mainboard 1 Slide the RTC battery into its socket in the mainboard 1 then push it down 2 until it latches into place 2 Slide the mainboard into the chassis with the I O ports of the mainboard extruding from their port holes then lower the mainboard in place ...

Страница 61: ...Aspire TC 780 Desktop Computer Service Guide 53 3 Secure the mainboard to the chassis using six screws Quantity Color Torque Part Number Screw Type 6 Silver 6 0 0 5 kgf cm 86 SPZD1 003 ...

Страница 62: ...C 780 Desktop Computer Service Guide Reinstalling the Power Button Module 1 Insert the power button cable into the chassis 2 Place the top cover into its socket in the chassis and push until it latches into place ...

Страница 63: ...Aspire TC 780 Desktop Computer Service Guide 55 3 Use the plastic clip to secure the power button cable to the chassis 4 Connect the power button and LED cable to the mainboard ...

Страница 64: ... I O and Card Reader Assembly 1 Insert the cables and place the front I O and card reader assembly in its socket 2 Secure the front I O and card reader bracket to the chassis using one screw Quantity Color Torque Part Number Screw Type 1 Silver 6 0 0 5 kgf cm 86 SPZD1 003 ...

Страница 65: ...Aspire TC 780 Desktop Computer Service Guide 57 3 Connect the front I O and card reader board cables to the mainboard ...

Страница 66: ...lling the Power Supply Module 1 Slide the power supply module into its socket in the chassis 2 Secure the rear end of the power supply module to the chassis using four screws Quantity Color Torque Part Number Screw Type 4 Silver 6 0 0 5 kgf cm 86 SPZD1 003 ...

Страница 67: ...Aspire TC 780 Desktop Computer Service Guide 59 3 Connect the power supply cables to the mainboard ...

Страница 68: ...puter Service Guide Reinstalling the SSD Module 1 Insert the SSD module into the mainboard 2 Secure the SSD module to the mainboard using one screw Quantity Color Torque Part Number Screw Type 1 Silver 1 5 0 3 kgf cm 86 NBY01 003 ...

Страница 69: ...r Service Guide 61 Reinstalling the WLAN Module 1 Insert the WLAN module into the mainboard 2 Secure the WLAN module to the mainboard using one screw Quantity Color Torque Part Number Screw Type 1 Silver 1 5 0 3 kgf cm 86 NBY01 003 ...

Страница 70: ...C 780 Desktop Computer Service Guide 3 Connect the WLAN antenna cables to the WLAN module NOTE Refer to your machine disassembly note to determine which cable color corresponds to the main and auxiliary connectors ...

Страница 71: ...uide 63 Reinstalling the Expansion Board 1 Insert the PCIe x16 expansion board into its slot then press it down until it latches into place 2 Press the metal clip securing the expansion board bracket to the chassis until it latches into place ...

Страница 72: ...64 Aspire TC 780 Desktop Computer Service Guide 3 Secure the expansion board bracket to the chassis using one screw Quantity Color Torque Part Number Screw Type 1 Silver 6 0 0 5 kgf cm 86 SPZD1 003 ...

Страница 73: ...ess it down until it latches into place 2 2 Repeat Step 1 to install the remaining memory module IMPORTANT When installing DIMM modules populate the DIMM slots according to the table below Size DIMM1 DIMM2 2G N A 2G 4G 2G 2G 4G N A 4G 6G 2G 4G 8G 4G 4G 8G N A 8G 10G 2G 8G 12G 4G 8G 16G 8G 8G 18G 2G 16G 20G 4G 16G 24G 8G 16G 32G 16G 16G ...

Страница 74: ...he Processor 1 Place the processor into its socket NOTE Make sure the gold arrow on the corner of the processor is aligned with the beveled corner of the socket The processor will easily fit into the socket if it is properly oriented 2 Replace the CPU cover plate ...

Страница 75: ...ire TC 780 Desktop Computer Service Guide 67 3 Pull down the load lever making sure the cover plate latch into the retaining post 4 Slide the load lever to the left until it latches into the retention tab ...

Страница 76: ...e Reinstalling the Thermal Module 1 Place the thermal module into the mainboard 2 Tighten the four captive screws to secure the thermal module to the mainboard Quantity Color Torque Part Number Screw Type 4 Silver 6 0 0 5 kgf cm Thermal Screws N A ...

Страница 77: ...Aspire TC 780 Desktop Computer Service Guide 69 3 Connect the thermal module fan cable to the mainboard ...

Страница 78: ...omputer Service Guide Reinstalling the HDD Module 1 Slide the HDD module into the chassis 2 Secure the HDD module to the chassis using four screws Quantity Color Torque Part Number Screw Type 4 Silver 6 0 0 5 kgf cm 86 SXHD1 001 ...

Страница 79: ...Aspire TC 780 Desktop Computer Service Guide 71 3 Connect the HDD data cable to the mainboard 4 Connect the data and power cables to the HDD module ...

Страница 80: ...p Computer Service Guide Reinstalling the ODD Module 1 Place the ODD into the ODD bracket 2 Secure the ODD to the ODD bracket using two screws Quantity Color Torque Part Number Screw Type 2 Silver 1 5 0 3 kgf cm 86 SXLD1 001 ...

Страница 81: ...0 Desktop Computer Service Guide 73 3 Slide the ODD module into the chassis 4 Secure the ODD module to the chassis using two screws Quantity Color Torque Part Number Screw Type 2 Silver 6 0 0 5 kgf cm 86 B1HD1 001 ...

Страница 82: ...74 Aspire TC 780 Desktop Computer Service Guide 5 Connect the ODD data cable to the mainboard 6 Connect the power and data combo cable to the power supply cable ...

Страница 83: ...Aspire TC 780 Desktop Computer Service Guide 75 7 Connect the power and data combo cable to the ODD module 8 Use the twist wire tie to secure all the cables to the chassis ...

Страница 84: ...ront Bezel 1 Insert the tabs on the front bezel into the notches on the right side of the chassis then rotate the front bezel in the direction indicated 2 Push the front bezel until the retention tabs latch into place and are securely fastened to the chassis interior ...

Страница 85: ...0 Desktop Computer Service Guide 77 3 Force eject the ODD tray by inserting a thin metal object into the ODD emergency eject hole 4 Place the bezel into the ODD tray 1 then press until the latches lock into place 2 ...

Страница 86: ...78 Aspire TC 780 Desktop Computer Service Guide 5 Push back the ODD module into its slot until it latches into place ...

Страница 87: ...e Panel 1 Slide the side panel toward the front of the chassis until the tabs on the side panel engage with the slots on the chassis 2 Secure the side panel to the chassis using two screws Quantity Color Torque Part Number Screw Type 2 Black 6 0 0 5 kgf cm 86 SR2D1 001 ...

Страница 88: ...80 Aspire TC 780 Desktop Computer Service Guide ...

Страница 89: ...ng Check if the power cable is properly connected to the AC power jack and a functional AC power source Check if the voltage selector switch is set to the correct voltage setting System External Inspection 1 Inspect the power and LED indicators on the front panel Go to Front View section on page 3 for the location and description of the LED behaviour 2 Make sure that the ventilation slots on the r...

Страница 90: ...PCI add in cards that show the value of I O port 80h on a LED display Checkpoints may appear on the bottom right corner of the screen during POST This display method is limited since it only displays checkpoints that occur after the video card has been activated NOTE Please note that checkpoints may differ between different platforms based on system configuration Checkpoints may change due to vend...

Страница 91: ... the POST Code Checkpoints section for more information Checkpoint Description E0 Initialize the floppy controller in the super I O Some interrupt vectors are initialized DMA controller is initialized 8259 interrupt controller is initialized L1 cache is enabled E9 Set up floppy controller and data Attempt to read from floppy EA Enable ATAPI hardware Attempt to read from ARMD and ATAPI CDROM EB Dis...

Страница 92: ...ouse 0C Detects the presence of Keyboard in KBC port 0E Testing and initialization of different Input Devices Also update the Kernel Variables Traps the INT09h vector so that the POST INT09h handler gets control for IRQ1 Uncompress all available language BIOS logo and Silent logo modules 13 Early POST initialization of chipset registers 24 Uncompress and initialize any platform specific BIOS modul...

Страница 93: ...tialization of chipset registers 8E Program the peripheral parameters Enable Disable NMI as selected 90 Late POST initialization of system management interrupt A0 Check boot password if installed A1 Clean up work needed before booting to OS A2 Takes care of runtime image preparation for different BIOS modules Fill the free area in F000h segment with 0FFh Initializes the Microsoft IRQ Routing Table...

Страница 94: ...s after you make changes in the Setup menus reboot the computer enter Setup again and load Setup defaults to correct the error Checkpoint Description 2A Initialize different buses and perform the following functions Reset Detect and Disable function 0 Static Device Initialization function 1 Boot Output Device Initialization function 2 Function 0 disables all device nodes PCI devices and PnP ISA ca...

Страница 95: ...edia is present A Drive Error The BIOS attempted to configure the A drive during POST but was unable to properly configure the device This may be due to a bad cable or faulty diskette drive B Drive Error The BIOS attempted to configure the B drive during POST but was unable to properly configure the device This may be due to a bad cable or faulty diskette drive Insert BOOT diskette in A The BIOS a...

Страница 96: ...I devices in POST 6th Slave Hard Disk Error The IDE ATAPI device configured as Slave in the 6th IDE controller could not be properly initialized by the BIOS This message is typically displayed when the BIOS is trying to detect and configure IDE ATAPI devices in POST Primary Master Drive ATAPI Incompatible The IDE ATAPI device configured as Primary Master failed an ATAPI compatibility test This mes...

Страница 97: ...TAPI device using the S M A R T error reporting standard S M A R T failure messages may indicate the need to replace the hard disk S M A R T Command Failed The BIOS tried to send a S M A R T message to a hard disk but the command transaction failed This message can be reported by an ATAPI device using the S M A R T error reporting standard S M A R T failure messages may indicate the need to replac...

Страница 98: ...o a data error Static Resource Conflict Two or more Static Devices are trying to use the same resource space usually Memory or I O PCI I O conflict A PCI adapter generated an I O resource conflict when configured by BIOS POST PCI ROM conflict A PCI adapter generated an I O resource conflict when configured by BIOS POST PCI IRQ conflict A PCI adapter generated an I O resource conflict when configur...

Страница 99: ... not detected Keyboard Interface Error Keyboard controller failure This may indicate a problem with system hardware Unlock Keyboard PS 2 keyboard is locked User needs to unlock the keyboard to continue the BIOS POST System Halted The system has been halted A reset or power cycle is required to reboot the machine This message appears after a fatal error has been detected INS Pressed Indicates that ...

Страница 100: ... system problems Symptom Error Action FRU Processor fan does not run but power supply fan runs Ensure the system is not in power saving mode With the system powered on measure the voltage of the processor fan connector Its reading should be 12Vdc If the reading shows normal but the fan still does not work then replace the heat sink fan Mainboard Processor test failed Processor Mainboard Symptom Er...

Страница 101: ... system power on measure the voltage of the HDD LED connector HDD LED cable Symptom Error Action FRU CD DVD ROM drive LED doesn t come on but works normally Enter CMOS Setup and load the default settings DIMM Mainboard CD DVD ROM drive LED flashes for more than 30 seconds before LED shutting off Software asks to reinstall disc Software displays a reading CD DVD error CD DVD ROM may have dirt or fo...

Страница 102: ...gured correctly for your modem and set to receive messages and or fax Data fax modem software program invoked but cannot receive send data fax Ensure the modem card is installed properly Fax voice modem software program invoked but has no sound output Data files are received normally voice from modem cannot be produced but system sound feature works normally Ensure the modem voice in cable from mo...

Страница 103: ...ctrical outlet can turn off the system Ensure the Soft off by PWR BTTN in CMOS Setup under Power Management is not set to Instant off Power switch cable assembly Pressing the power button does not turn on the system Ensure the power override switch located at the back of the computer just above the connector for the power cable is not set to OFF Power switch cable assembly Executing software shutd...

Страница 104: ...oard and then LCD assembly one at a time Do not replace a non defective FRU Beep Status Possible Causes One short beep System ready System is OK Continuous one long beep Memory not installed or memory error Something is wrong with the memory installed There is problem accessing the memory i e mainboard problem One long beep then two short beeps and repeat VGA not installed or VGA error The mainboa...

Страница 105: ...unning the Windows OS A USB flash drive can be used Creating the BIOS Crisis Recovery Disk 1 Set up a computer running the Windows operating system and connect the BIOS recovery media 2 Copy the target BIOS ROM file to the BIOS recovery media and rename it as RCVBOOT CAP 3 Eject the BIOS recovery media from the computer Performing a BIOS Recovery 1 Shut down the system with failed BIOS 2 Put the B...

Страница 106: ...98 Aspire TC 780 Desktop Computer Service Guide 7 Wait for the program to finish with the recovery 8 Flash update completed 9 Press any key to reboot system 10 The BIOS recovery is now completed ...

Страница 107: ... storage then plug the USB storage to the system 2 Press the power button to turn on the system 3 Press Delete when the company logo is displayed on the screen to enter BIOS Setup Menu 4 Go to the Authentication page select Secure Boot and press Enter Select Disabled to disable Secure Boot 5 Go to the Exit page select Save and Exit Setup and press Enter ...

Страница 108: ...tem using USB thumbdrive 9 Enter BIOS folder 10 Enter DOS folder 11 Execute BIOS_DOS bat file 12 Process to flash BIOS don t reset 13 Press the power button to shut down the system 14 Press the power button to turn on the system The system will now execute the BIOS update process 15 Press Delete when the company logo is displayed on the screen to enter BIOS Setup Menu ...

Страница 109: ...780 Desktop Computer Service Guide 101 16 Go to the Exit page select Load Default Setting and press Enter Select Yes to load default setting 17 Select Save and Exit Setup and press Enter 18 Select Yes to Restart ...

Страница 110: ...nnected peripheral devices from the computer 4 Place the computer on a flat steady surface 5 Remove the side panel 6 If necessary remove any expansion cards assemblies or cables that prevent access to the CMOS clear jumper 7 Locate the CLR_CMOS jumper on the mainboard 8 Remove the jumper block and set it over the 2 3 pins for 20 to 30 seconds 9 Return the jumper block to its default 1 2 position 1...

Страница 111: ... Guide 103 This chapter shows the block diagram and board layout of the Aspire TC 780 Desktop Computer Block Diagram The core subsystems of the Aspire TC 780 computer are depicted in the following block diagram System Architecture Chapter 5 ...

Страница 112: ... PCIe x16 Slot 5 WPWR1 Wireless charger connector 18 NGFFE1 M 2 WLAN connector 6 ATX1 Standard 24 Pin ATX power connector 19 PCI1 PCIe x1 Slot 7 CRF1 Front panel USB 3 0 connector 3 20 BT1 Battery slot 8 LEDH1 Power button LED connector 21 AUDF1 Front panel audio connector 9 NGFFM1 M 2 SSD connector 22 AUDR1 Rear panel audio ports 10 SATA1 SATA 6Gb s connector 23 U3RJ1 RJ45 USB 3 0 ports 11 USB3F1...

Страница 113: ...e part numbers listed in this Service Guide may differ from those given to regional AUTHORIZED SERVICE PROVIDERS You MUST use the local FRU list provided by your regional office to order FRU parts for repair and service of customer machines Make sure that you are using the most up to date information available on your regional web site or channel when ordering FRU parts NOTE Follow the local gover...

Страница 114: ... 4 Mainboard DB B5711 001 1 5 HDD KH 01K08 031 2 6 Hex Machine Screw 6 32 L12 086 00U97 B60 8 7 Power Supply Unit DC 2201B 006 1 8 Rear I O Cover 360 05Z08 0001 1 9 Main Chassis DC 13111 05E 1 10 ODD KO 0080D 019 1 11 ODD Top Bezel 360 05Y07 0001 1 12 ODD Bottom Bezel 360 05Y06 0001 1 13 Front I O Board DA 13711 007 1 14 Card Reader DC 10411 01A 1 15 Front I O Bracket 360 02E07 0001 1 16 Front Bez...

Страница 115: ...DMI 288 BN214 X60A8 DA 70511 005 VGA CARD NVIDIA GT720 DDRIII 2GB ATX UEFI DVI I HDMI 288 5N326 X01A8 DA 72011 001 VGA CARD NVIDIA GT730 DDRIII 2GB ATX PCI EX16 UEFI DVI HDMI 288 6N326 X01A8 DA 73011 001 VGA CARD NVIDIA GTX745 DDRIII 4GB ATX UEFI DVI I HDMI BL 288 1N249 X04A8 DA 74511 001 VGA CARD NV GTX745 DDRIII 4GB ATX UEFI DVI HDMI MEM 288 1N249 X04A8 DA 74511 003 CR01_SD_M 331317201014 530MM ...

Страница 116: ...7 01518 I51 POWER CORD 250V 3PIN 1800MM UK 27 03118 031 POWER CORD 7A 250V KOREA 27 SLSD1 001 POWER CORD ARGENTINE 10A 250V 1 8M BK 27 SLSD1 002 POWER CORD 16A 250V 1800MM ISRAEL BLACK 27 VEHD1 001 POWER CORD 250V 10A 1800MM ITALY 27 VG6D1 001 POWER SWITCH CABLE 50 B1HD1 001 HDD SATA CABLE FOR BLACK 50 SLAD1 002 ODD CABLE ODD TO MB ODD TO POWER 50 SXND1 001 CASE COVER BRACKET ASSEMBLY VGA HOLDER 4...

Страница 117: ...133 1151 65W SKYLAKE KC 39001 CDG CPU PGA INTEL PENTIUM G4400 LGA 3 3G 3M 2133 1151 65W SKYLAKE KC 44001 DEG CPU PGA INTEL CORE I3 6100 LGA 3 7G 3M 2133 1151 65W SKYLAKE KC 61001 CI3 CPU PGA INTEL CORE I5 6400 LGA 2 7G 6M 2133 1151 65W SKYLAKE KC 64A01 CI5 CPU PGA INTEL CORE I5 6400 LGA 2 7G 6M 2133 1151 65W R0 SKYLAKE KC 64B01 CI5 CPU PGA INTEL CORE I7 6700 LGA 3 4G 8M 2133 1151 65W SKYLAKE KC 67...

Страница 118: ...GB ST2000DM001 GRENADA BP2 REFRESH SATA III 64MB LF F W CC26 KH 02K01 026 HDD TOSHIBA 3 5 7200RPM 2000GB DT01ACA200 MARS SATA III 64MB LF F W 750 KH 02K04 002 HDD WD 3 5 5400RPM 2000GB WD20EZRX 22D8PB0 GP1000A 4K SATA III 64MB LF F W 80 00A80 KH 02K08 012 HDD SEAGATE 3 5 7200RPM 3000GB ST3000DM001 GRENADA BP2 REFRESH SATA III 64MB LF F W CC26 KH 03K01 010 HDD TOSHIBA 3 5 7200RPM 3000GB DT01ACA300 ...

Страница 119: ...9 DC 11211 00W 6K SUYD1 005 KEYBOARD KIT LITE ON SK 9662 RF2 4 BLACK SPANISH W DK RF41B 04A DC 11211 00W 6K SUYD1 006 KEYBOARD KIT LITE ON SK 9662 RF2 4 BLACK PORTUGUESE W DK RF41B 04B DC 11211 00W 6K SUYD1 007 KEYBOARD KIT LITE ON SK 9662 RF2 4 BLACK BRAZILIAN PORTUGUESE W DK RF41B 04C DC 11211 00W 6K SUYD1 008 KEYBOARD KIT LITE ON SK 9662 RF2 4 BLACK JAPANESE W DK RF41B 04D DC 11211 00W 6K SUYD1...

Страница 120: ...T LITE ON SK 9662 RF2 4 BLACK DANISH W DK RF41B 04X DC 11211 00W 6K SUYD1 026 KEYBOARD KIT LITE ON SK 9662 RF2 4 BLACK CZECH NEW LAYOUT FOR EMEA W DK RF41B 04Y DC 11211 00W 6K SUYD1 027 KEYBOARD KIT LITE ON SK 9662 RF2 4 BLACK ROMANIAN W DK RF41B 04Z DC 11211 00W 6K SUYD1 028 KEYBOARD KIT LITE ON SK 9662 RF2 4 BLACK TURKISH W DK RF41B 050 DC 11211 00W 6K SUYD1 029 KEYBOARD KIT LITE ON SK 9662 RF2 ...

Страница 121: ... 9626 USB BLACK BRAZILIAN PORTUGUESE DK USB1B 070 KEYBOARD LITE ON SK 9626 USB BLACK JAPANESE DK USB1B 071 KEYBOARD LITE ON SK 9626 USB BLACK GERMAN DK USB1B 072 KEYBOARD LITE ON SK 9626 USB BLACK ITALIAN DK USB1B 073 KEYBOARD LITE ON SK 9626 USB BLACK FRENCH DK USB1B 074 KEYBOARD LITE ON SK 9626 USB BLACK SWEDISH DK USB1B 075 KEYBOARD LITE ON SK 9626 USB BLACK UK DK USB1B 076 KEYBOARD LITE ON SK ...

Страница 122: ...7S KEYBOARD LITE ON SK 9626 USB BLACK NORDIC DK USB1B 07T KEYBOARD LITE ON SK 9626 USB BLACK ENGLISH CANADIAN FRENCH DK USB1B 07U KEYBOARD LITE ON SK 9626 USB BLACK CZECH SLOVAK DK USB1B 07V KEYBOARD LITE ON SK 9626 USB BLACK SWISS FR DK USB1B 07W KEYBOARD LITE ON SK 9626 USB BLACK KOR DK USB1B 07X KEYBOARD LITE ON SK 9626 USB BLACK SPANISH LATIN DK USB1B 07Y KEYBOARD LITE ON SK 9626 USB BLACK US ...

Страница 123: ...OARD PRIMAX KBAY211 USB BLACK POLISH DK USB1P 0CU KEYBOARD PRIMAX KBAY211 USB BLACK SLOVENIAN DK USB1P 0CV KEYBOARD PRIMAX KBAY211 USB BLACK SLOVAK DK USB1P 0CW KEYBOARD PRIMAX KBAY211 USB BLACK HUNGARIAN DK USB1P 0CX KEYBOARD PRIMAX KBAY211 USB BLACK DANISH DK USB1P 0CY KEYBOARD PRIMAX KBAY211 USB BLACK ROMANIAN DK USB1P 0CZ KEYBOARD PRIMAX KBAY211 USB BLACK TURKISH DK USB1P 0D0 KEYBOARD PRIMAX K...

Страница 124: ...AMSUNG UNB DIMM DDRIV 2133 4GB M378A5143DB0 CPB LF HF 512 8 25NM KN 4GB0B 038 MEMORY HYNIX UNB DIMM DDRIV 2133 4GB HMA451U6AFR8N TF LF HF 512 8 25NM POLARIS KN 4GB0G 037 MEMORY SAMSUNG UNB DIMM DDRIV 2133 8GB M378A1G43DB0 CPB LF HF 512 8 D25 KN 8GB0B 033 MEMORY HYNIX UNB DIMM DDRIV 2133 8GB HMA41GU6AFR8N TF LF HF 512 8 25NM POLARIS KN 8GB0G 038 MISCELLANEOUS HDD RUBBER 47 B57D1 001 POINTING DEVICE...

Страница 125: ...PATA DC 3001B 002 PSU LITE ON PS 6301 18A4 300W NONE PFC 100 127V 220 240V P7 P9 120 15 0MM DC 3001B 003 SCREWS SCREW WAFER STEP 6 32 L12 NI 3NOD 86 B1DD1 001 SCREW M3 L5 NI 3NOD 86 B1HD1 001 SCREW M2 CAP L4 NI 86 NBY01 003 SCREW MA HEX M3 L5 NI 3NOD 86 SPZD1 002 SCREW MA HEX 6 32 L5 NI 3NOD 86 SPZD1 003 SCREW MA HEX 6 32 L5 BLACK 3NOD 86 SR2D1 001 SCREW M2 L2 5 NI JF 86 SXLD1 001 SCREW MACH PAN M...

Страница 126: ...118 Aspire TC 780 Desktop Computer Service Guide ...

Страница 127: ..._SD_M L43CR006 DT R 530mm USB 2 0 RTS5143 DC 10411 01H Card Reader 30L Mingji CR01_SD_M 9143 0700007RII 530mm USB 2 0 RTS5143 DC 10411 01G Chassis 3NOD 3NOD TC3 Chassis MicroATX w i HDD x2 w i slim type ODD for BAM16A bezel DC 13111 05B Cooler Auras 15Q2 Intel 65W cooler Auras first cooler Rev 1 0 DC 10811 016 Cooler CM COOLER BUY ACER 12V 4700rpm DEL 00095 R3 GP2 CPU 92 92 45 4mm L250mm 4P DC 108...

Страница 128: ...41 KH 02K01 021 HDD SEAGATE HDD SEAGATE 3 5 7200rpm 3000GB Grenada2 Refresh SATA III 64MB LF F W CC26 KH 03K01 010 HDD Toshiba HDD Toshiba 3 5 7200rpm 1000GB Mars SATA III 64MB LF F W 750 KH 01K04 010 HDD Toshiba HDD Toshiba 3 5 7200rpm 2000GB Mars SATA III 64MB LF F W 750 KH 02K04 002 HDD Toshiba HDD Toshiba 3 5 7200rpm 3000GB Mars SATA III 64MB LF F W 750 KH 03K04 001 HDD WD HDD WD 3 5 5400rpm 2...

Страница 129: ...arian DK USB1B 07H Keyboard Lite On Keyboard LITE ON SK 9626 USB Black Icelandic DK USB1B 07A Keyboard Lite On Keyboard LITE ON SK 9626 USB Black Italian DK USB1B 073 Keyboard Lite On Keyboard LITE ON SK 9626 USB Black Japanese DK USB1B 071 Keyboard Lite On Keyboard LITE ON SK 9626 USB Black Kazakh DK USB1B 07R Keyboard Lite On Keyboard LITE ON SK 9626 USB Black Korean DK USB1B 07X Keyboard Lite O...

Страница 130: ... USB Black US International new layout for EMEA DK USB1B 080 Keyboard Lite On Keyboard LITE ON SK 9626 USB Black US with Rupee Symbol for India DK USB1B 07Z Keyboard Lite On Keyboard LITE ON SK 9662 RF2 4 Black Arabic English new layout for EMEA DK RF41B 048 Keyboard Lite On Keyboard LITE ON SK 9662 RF2 4 Black Arabic French DK RF41B 052 Keyboard Lite On Keyboard LITE ON SK 9662 RF2 4 Black Belgiu...

Страница 131: ...SK 9662 RF2 4 Black Romanian DK RF41B 04Z Keyboard Lite On Keyboard LITE ON SK 9662 RF2 4 Black Russian new layout for EMEA DK RF41B 04U Keyboard Lite On Keyboard LITE ON SK 9662 RF2 4 Black Slovak DK RF41B 04T Keyboard Lite On Keyboard LITE ON SK 9662 RF2 4 Black Slovenian DK RF41B 04S Keyboard Lite On Keyboard LITE ON SK 9662 RF2 4 Black Spanish DK RF41B 04A Keyboard Lite On Keyboard LITE ON SK ...

Страница 132: ...B HMA451U6AFR8N TF LF HF 512 8 25nm Polaris KN 4GB0G 037 MEM Hynix Memory HYNIX UNB DIMM DDRIV 2133 8GB HMA41GU6AFR8N TF LF HF 512 8 25nm Polaris KN 8GB0G 038 MEM Samsung Memory SAMSUNG UNB DIMM DDRIV 2133 16GB M378A2K43BB1 CPB LF HF 1024 8 25nm Mono KN 16G0B 016 MEM Samsung Memory SAMSUNG UNB DIMM DDRIV 2133 4GB M378A5143DB0 CPB LF HF 512 8 25nm KN 4GB0B 038 MEM Samsung Memory SAMSUNG UNB DIMM DD...

Страница 133: ...5 0mm 2015 rev DC 5001B 003 SSD Kingston Flash Disk KINGSTON SSD NAND 96GB RBU SNS8151S3 96GG LF HF KN 09607 001 SSD Lite On Flash Disk LITE ON SSD NAND 128GB CV1 8B128 LF HF KN 1280L 013 SSD Lite On Flash Disk LITE ON SSD NAND 256GB CV1 8B256 LF HF KN 2560L 012 SSD Lite On Flash Disk LITE ON SSD NAND 512GB CV1 8B512 LF HF KN 5120L 005 SSD Toshiba 15nm Toshiba NAND KN 1280A 008 SSD Toshiba 15nm To...

Страница 134: ...001 WLAN BT Intel Wireless LAN Intel WLAN INT3165 NGWG C0 Stone Peak 1x1 AC BT M 2 KI STN01 101 WLAN BT Intel WLAN Intel WLAN 7265 NGWG W D0 Stonepeak M 2 2X2 AC BT 2230 KI STN01 008 WLAN BT Lite On Wireless LAN Liteon 802 11ac Bluetooth FM 3rd WiFi 1x1 AC BT M 2 QCA9377A QCA NFA435A Rev 1 1 KE 11A0L 001 Components Vendor Model Name or Key Spec Acer Part No ...

Страница 135: ... all Acer notebook desktop All In One AIO and server models including Service guides for all models User s manuals Training materials BIOS updates Software utilities Spare parts lists TABs Technical Announcement Bulletin For these purposes we have included a PDF file to facilitate the problem free downloading of our technical material Also available on this website are Detailed information on Acer...

Страница 136: ...128 Aspire TC 780 Desktop Computer Service Guide ...

Страница 137: ...vity Ethernet 7 WLAN 7 connector LAN 4 PS 2 keyboard 4 D DIM checkpoints 86 disassembly procedures expansion board 39 63 guidelines 105 memory 38 65 preparatory steps 23 side panel 24 52 79 tools 23 display display by model 1 E environmental requirements 2 Ethernet specifications 7 expansion slots expansion board remove 39 63 specifications 1 exploded view 106 external modules disassembly font bez...

Страница 138: ...see Return Merchandise Authorization 105 RTC battery BIOS error 9 S security features 2 side panel remove 24 52 79 software specifications operating system 1 specifications audio 7 8 Ethernet controller 7 hard disk drive 6 memory 5 optical disc drive 6 power supply unit 8 system chipsets 5 WLAN controller 7 supervisor password 19 system architecture 103 system chipsets 5 system date 12 system pass...

Отзывы: