background image

Aspire 5810T/5810TZ/5410T/5810TG Series

Service Guide

    
                                                                                                                                     PRINTED IN TAIWAN

Service guide files and updates are available

on the ACER/CSD web; for more information, 

please refer to 

http://csd.acer.com.tw

Содержание Aspire 5810T Series

Страница 1: ...Aspire 5810T 5810TZ 5410T 5810TG Series Service Guide PRINTED IN TAIWAN Service guide files and updates are available on the ACER CSD web for more information please refer to http csd acer com tw...

Страница 2: ...II Revision History Please refer to the table below for the updates made on Aspire 5810T 5810TZ 5410T 5810TG Series service guide Date Chapter Updates...

Страница 3: ...expressed or implied with respect to the contents hereof and specifically disclaims any warranties of merchantability or fitness for any particular purpose Any Acer Incorporated software described in...

Страница 4: ...bits and pieces of additional information related to the current topic WARNING Alerts you to any damage that might result from doing or not doing specific actions CAUTION Gives precautionary measures...

Страница 5: ...NOT be covered in this generic service guide In such cases please contact your regional offices or the responsible personnel channel to provide you with further technical details 2 Please note WHEN OR...

Страница 6: ...VI...

Страница 7: ...Boot 33 Exit 34 BIOS Flash Utility 35 Remove HDD and BIOS Passwords 36 Machine Disassembly and Replacement 39 Disassembly Requirements 39 General Information 40 Pre disassembly Instructions 40 Disasse...

Страница 8: ...ck 79 Touchpad Check 80 Power On Self Test POST Error Messages 81 Post Code Table 82 Index of Symptom to FRU Errors 85 Intermittent Problems 89 Undetermined Problems 90 Connector Locations 91 Top and...

Страница 9: ...Acer InviLink Nplify 802 11b g Draft N System Memory Dual Channel SDRAM support Up to 2 GB of DDR3 1066 MHz memory upgradeable to 4 GB using two soDIMM modules Up to 4 GB of DDR3 1066 MHz memory upgra...

Страница 10: ...0 Enhanced Data Rate EDR LAN Gigabit Ethernet Wake on LAN ready I O Ports 5 in 1 card reader SD MMC MS MS PRO xD USB 2 0 port HDMI port with HDCP support External display VGA port Headphones speaker...

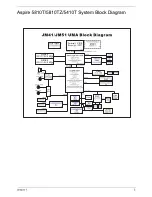
Страница 11: ...Chapter 1 3 Aspire 5810T 5810TZ 5410T System Block Diagram...

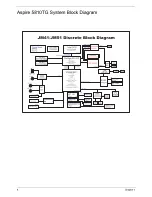
Страница 12: ...4 Chapter 1 Aspire 5810TG System Block Diagram...

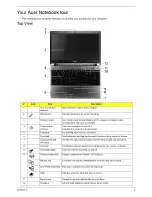
Страница 13: ...ur computer 6 Touchpad Touch sensitive pointing device which functions like a computer mouse 7 Click buttons left and right The left and right buttons function like the left and right mouse buttons 8...

Страница 14: ...g The light shows amber when the battery is charging 2 Fully charged The light shows blue when in AC mode 2 5 in 1 card reader Accepts Secure Digital SD MultiMediaCard MMC Memory Stick MS Memory Stick...

Страница 15: ...2 USB 2 0 port Connect to USB 2 0 devices e g USB mouse USB camera 3 Ventilation slots Enable the computer to stay cool even after prolonged use 4 External display VGA port Connects to a display devi...

Страница 16: ...ve 3 Emergency eject hole Ejects the optical drive tray when the computer is turned off Note Insert a paper clip to the emergency eject hole to eject the optical drive tray when the computer is off 4...

Страница 17: ...Chapter 1 9 Rear View Icon Item Description 1 Battery bay Houses the computer s battery pack...

Страница 18: ...sition 3 Memory compartment Houses the computer s main memory 4 Hard disk bay Houses the computer s hard disk secured with screws 5 Ventilation slots and cooling fan Enable the computer to stay cool e...

Страница 19: ...buttons are similar to the left and right buttons on a mouse Tapping on the touchpad is the same as clicking the left button Icon Function Description WLAN 3G Manufacturing option Indicates the status...

Страница 20: ...TE By default vertical and horizontal scrolling is enabled on your touchpad It can be disabled under Mouse settings in Windows Control Panel Function Left button 2 Right button 3 Main touchpad 1 Execu...

Страница 21: ...as a calculator complete with the arithmetic operators and Use this mode when you need to do a lot of numeric data entry A better solution would be to connect an external keypad Scroll Lock Fn F12 Wh...

Страница 22: ...k domain M Minimizes all windows R Open the Run dialog box T Cycle through programs on the taskbar U Open Ease of Access Center X Open Windows Mobility Center BREAK Display the System Properties dialo...

Страница 23: ...nformation The US dollar sign 1 Open a text editor or word processor 2 Either press at the bottom right of the keyboard or hold Shift and then press the 4 key at the upper center of the keyboard NOTE...

Страница 24: ...hronization status and presentation settings Windows Mobility Center also includes Acer specific settings like sharing folders overview sharing service on or off Bluetooth Add Device if applicable and...

Страница 25: ...e windows on the same screen To access this function please go to Start All Programs and click on Acer GridVista You may choose any one of the four display settings indicated below Double vertical Tri...

Страница 26: ...18 Chapter 1 NOTE Please ensure that the resolution setting of the second monitor is set to the manufacturer s recommended value...

Страница 27: ...True Value Table DTS degree C Fan Speed rpm Acoustic Level dBA 45 50 0 3000 29 55 66 0 3300 33 68 74 3300 3800 38 78 83 3800 4100 40 86 91 4100 4800 40 BIOS Item Specification BIOS vendor Insyde H2O...

Страница 28: ...pset Atheros AR8131L Supports LAN protocol 10 100 1000 Mbps LAN connector type RJ45 LAN connector location Right side Features Integrated 10 100 BASE T transceiver Wake on LAN support compliant with A...

Страница 29: ...RPM 5400 RPM 5400 RPM 5400 RPM Performance Specifications Buffer size 8MB 8MB 8MB 8MB Interface SATA SATA SATA SATA Max media transfer rate disk buffer Mbytes s 540 875 Max 3 0 Gbit s Buffer host dat...

Страница 30: ...ybrid type US US RW DVD DVD ROM Book 1 02 DVD Dual DVD Video Book 1 1 DVD R Book 1 0 3 9G DVD R Book 2 0 4 7G General Authoring DVD R Version 1 0 DVD RW DVD RW Non CPRM CPRM DVD R Dual Loading mechani...

Страница 31: ...CS AM82801IUX VGA AMD M92LP Aspire 5810TG UMA Aspire 5810T 5810TZ 5410T USB 2 0 Intel ICH9M Super I O controller N A MODEM N A Bluetooth BCM2046 Wireless 802 11 b g WLAN 802 11ABGN SHIRLEYPEAK1 2 PCMC...

Страница 32: ...emperature Range C Operating Storage shipping 0 to 50 40 to 60 AC Adaptor Item Specification Input 100 240V 1 5A 50 60Hz Output 19V 65W System Power Management ACPI mode Power Management Mech Off G3 A...

Страница 33: ...ase also refer to Chapter 4 Troubleshooting when problem arises To activate the BIOS Utility press F2 during POST when Press F2 to enter Setup message is prompted on the bottom of screen Press F2 to e...

Страница 34: ...Esc while you are in any of the menu options to go to the Exit menu In any menu you can load default settings by pressing F9 You can also press F10 to save any changes made and exit the BIOS Setup Ut...

Страница 35: ...installed on Primary IDE master then it will display a blank line ATAPI Model Name This field shows the model name of the Optical device installed in the system System BIOS Version Displays system BI...

Страница 36: ...1MB Video Memory Shows the video memory size Quiet Boot Determines if Customer Logo will be displayed or not shows Summary Screen is disabled or enabled Enabled Customer Logo is displayed and Summary...

Страница 37: ...ttings in these cases D2D Recovery Enables disables D2D Recovery function The function allows the user to create a hidden partition on hard disc drive to store operation system and restore the system...

Страница 38: ...of parameters Set User Password Press Enter to set the user password When user password is set this password protects the BIOS Setup Utility from unauthorized access The user can enter Setup menu onl...

Страница 39: ...IMPORTANT Be very careful when typing your password because the characters do not appear on the screen 3 Press Enter After setting the password the computer sets the User Password parameter to Set 4 I...

Страница 40: ...tting the password the computer sets the User Password parameter to Set 5 If desired you can enable the Password on boot parameter 6 When you are done press u to save the changes and exit the BIOS Set...

Страница 41: ...Boot This menu allows the user to decide the order of boot devices to load the operating system Bootable devices includes the diskette drive in module bay the onboard hard disk drive and the CD ROM i...

Страница 42: ...without saving setup data to CMOS Load Setup Default Load default values for all SETUP item Discard Changes Load previous values from CMOS for all SETUP items Save Changes Save Setup Data to CMOS Ite...

Страница 43: ...power supply when you run the Flash utility If the battery pack does not contain enough power to finish BIOS flash you may not boot the system because the BIOS is not completely loaded Follow the step...

Страница 44: ...y in the wrong HDD password thrice HDD password error code will appear on the screen See the image below If you need to solve HDD password locked problem you can run HDD_PW EXE 1 Key in hdd_pw 15494 0...

Страница 45: ...hree time System Disabled would display on the screen See the image below If you need to solve BIOS password locked problem you can run BIOS_PW EXE 1 Key in bios_pw 14452 0 2 Choose one upper case str...

Страница 46: ...38 Chapter 2...

Страница 47: ...ools Wrist grounding strap and conductive mat for preventing electrostatic discharge Flat screwdriver Philips screwdriver Hex screwdriver Plastic flat screwdriver Plastic tweezers NOTE The screws for...

Страница 48: ...disassembly Main unit disassembly LCD module disassembly The flowcharts provided in the succeeding disassembly sections illustrate the entire disassembly sequence Observe the order of the sequence to...

Страница 49: ...st remove the keyboard then disassemble the inside assembly frame in that order Screw List Item Screw Color Part No A M2 5 x L6 Black 86 00E69 736 C M3 x L4 Silver 86 9A524 4R0 D M2 x L3 Silver 86 9A5...

Страница 50: ...latch to the unlock position 3 Slide and hold the battery release latch to the release position 4 Then slide out the battery from the battery bay Note Battery has been highlighted with the yellow cir...

Страница 51: ...n page 42 2 Remove the four captive screws and four screws H securing the lower cover 3 Use a plastic screw driver to carefully pry open the lower cover 4 Remove the lower cover from the lower case St...

Страница 52: ...y Pack on page 42 2 See Removing the Lower Cover on page 43 3 Remove the one screw A securing the optical drive 4 Use a screw driver and carefully push out and slide out the optical drive module out o...

Страница 53: ...the optical disk drive module Removing the DIMM 1 See Removing the Battery Pack on page 42 2 See Removing the Lower Cover on page 43 3 Push out the latches on both sides of the DIMM socket to release...

Страница 54: ...See Removing the Battery Pack on page 42 2 See Removing the Lower Cover on page 43 3 Using the plastic tab slide the hard disk drive module away from the connector 4 Lift up the hard disk module to re...

Страница 55: ...Chapter 3 47 5 Remove the two screws C securing the hard disk to the bracket and remove the hard disk from the bracket Step Size Quantity Color Torque 1 2 M3 x L4 2 Silver 3 0 kgf cm...

Страница 56: ...system Removing the RTC Battery 1 See Removing the Battery Pack on page 42 2 See Removing the Lower Cover on page 43 3 Disconnect the RTC battery cable from the system board and lift to remove it NOT...

Страница 57: ...5 x L6 Black 86 00E69 736 B M2 x L4 Silver 86 00E13 524 MAIN UNIT KEYBOARD BLUETOOTH MODULE MAIN UNIT DISASSEMBLY LCD MODULE Ax2 UPPER CASE A x 16 WLAN BOARD MODULE FINGERPRINT MODULE TOUCHPAD MODULE...

Страница 58: ...the Keyboard 1 See Removing the Battery Pack on page 42 2 Release the keyboard from the latches securing it 3 Carefully pry loose the keyboard 4 Place the keyboard below the LCD screen to gain access...

Страница 59: ...d Module 1 See Removing the Battery Pack on page 42 2 See Removing the Keyboard on page 50 3 Disconnect the antenna cables from the WLAN board NOTE There are 2 antenna cables connected to the WLAN boa...

Страница 60: ...the Battery Pack on page 42 2 See Removing the Lower Cover on page 43 3 See Removing the Lower Cover on page 43 4 See Removing the Optical Drive Module on page 44 5 See Removing the DIMM on page 45 6...

Страница 61: ...urn over the unit and remove the two screws A on the top panel 13 Disconnect the touchpad cable from the TPAD1 connector on the main board Step Size Quantity Color Torque 1 14 M2 5 x L6 14 Black 3 0 k...

Страница 62: ...Remove the tape securing the WAN antenna cables 15 Disconnect the function key board cable from the MMB1 connector on the system board 16 Disconnect the power button cable from the BTB2 connector on t...

Страница 63: ...ower Cover on page 43 3 See Removing the Lower Cover on page 43 4 See Removing the Optical Drive Module on page 44 5 See Removing the DIMM on page 45 6 See Removing the Hard Disk Drive Module on page...

Страница 64: ...on page 43 4 See Removing the Optical Drive Module on page 44 5 See Removing the DIMM on page 45 6 See Removing the Hard Disk Drive Module on page 46 7 See Removing the SSD Module on page 48 8 See Rem...

Страница 65: ...osal Removing the Speaker Module 1 See Removing the Battery Pack on page 42 2 See Removing the Lower Cover on page 43 3 See Removing the Lower Cover on page 43 4 See Removing the Optical Drive Module...

Страница 66: ...the Optical Drive Module on page 44 5 See Removing the DIMM on page 45 6 See Removing the Hard Disk Drive Module on page 46 7 See Removing the SSD Module on page 48 8 See Removing the RTC Battery on p...

Страница 67: ...10T disconnect the top CRT cable from the system board and the bottom CRT cable from the CRT board 14 For Aspire 5810TG disconnect the CRT cable from CN2 on the system board and disconnect the CRT cab...

Страница 68: ...the LCD cable from the LCD1 connector on the system board 16 Remove the two screws B securing the system board and the mini board 17 Carefully remove the main board Step Size Quantity Color Torque 1...

Страница 69: ...le on page 46 7 See Removing the SSD Module on page 48 8 See Removing the RTC Battery on page 48 9 See Removing the Keyboard on page 50 10 See Removing the WLAN Board Module on page 51 11 See Separati...

Страница 70: ...the picture below 1 See Removing the Battery Pack on page 42 2 See Removing the Lower Cover on page 43 3 See Removing the Lower Cover on page 43 4 See Removing the Optical Drive Module on page 44 5 Se...

Страница 71: ...able from the system board 14 Turn over the system board and loosen the four captive screws securing the thermal module For the discrete model Aspire 5810TG please loosen the five captive screws secur...

Страница 72: ...ing the DIMM on page 45 6 See Removing the Hard Disk Drive Module on page 46 7 See Removing the SSD Module on page 48 8 See Removing the RTC Battery on page 48 9 See Removing the Keyboard on page 50 1...

Страница 73: ...ower Cover on page 43 3 See Removing the Lower Cover on page 43 4 See Removing the Optical Drive Module on page 44 5 See Removing the DIMM on page 45 6 See Removing the Hard Disk Drive Module on page...

Страница 74: ...ee Removing the Optical Drive Module on page 44 5 See Removing the DIMM on page 45 6 See Removing the Hard Disk Drive Module on page 46 7 See Removing the SSD Module on page 48 8 See Removing the RTC...

Страница 75: ...e Lower Cover on page 43 4 See Removing the Optical Drive Module on page 44 5 See Removing the DIMM on page 45 6 See Removing the Hard Disk Drive Module on page 46 7 See Removing the SSD Module on pag...

Страница 76: ...Chapter 3 13 Remove the two screws B securing the card reader board to the lower case 14 Remove the card reader board from the lower case Step Size Quantity Color Torque 1 2 M2 x L4 2 Black 1 6 kgf c...

Страница 77: ...Flowchart Screw List Item Screw Color Part No E M2 x L2 5 Silver 86 9A526 2R5 F M2 5 x L2 5 Black 86 00F87 735 G M2 5 X L3 5 Silver 86 9A563 3R5 LCD MODULE LCD BEZEL Gx4 LCD ASSEMBLY LCD FPC CABLE LC...

Страница 78: ...7 See Removing the SSD Module on page 48 8 See Removing the RTC Battery on page 48 9 See Removing the Keyboard on page 50 10 See Removing the WLAN Board Module on page 51 11 See Separating the Upper...

Страница 79: ...l Drive Module on page 44 5 See Removing the DIMM on page 45 6 See Removing the Hard Disk Drive Module on page 46 7 See Removing the SSD Module on page 48 8 See Removing the RTC Battery on page 48 9 S...

Страница 80: ...Remove the hinge caps on both side of the hinges 16 Remove the four screws F securing the left and right hinges 17 Remove the left and right hinges Step Size Quantity Color Torque 1 4 M2 5 x L2 5 4 B...

Страница 81: ...emoving the Hard Disk Drive Module on page 46 7 See Removing the SSD Module on page 48 8 See Removing the RTC Battery on page 48 9 See Removing the Keyboard on page 50 10 See Removing the WLAN Board M...

Страница 82: ...s E securing the LCD panel to the back cover 17 Carefully lift up the LCD panel and turn it over to gain access to the LCD cable 18 Detach the acetic tape on the LCD cable Step Size Quantity Color Tor...

Страница 83: ...Drive Module on page 44 5 See Removing the DIMM on page 45 6 See Removing the Hard Disk Drive Module on page 46 7 See Removing the SSD Module on page 48 8 See Removing the RTC Battery on page 48 9 See...

Страница 84: ...76 Chapter 3 15 Disconnect the cable from the webcam 16 Carefully pry loose the webcam CAUTION Only remove the webcam if it is defective as it is glued to the back cover...

Страница 85: ...symptom to determine which page to go to Symptoms Verified Go To Power failure The power indicator does not go on or stay on See Power System Check on page 79 POST does not complete No beep or error...

Страница 86: ...ve any label attached to it The label can cause damage to the drive or can cause the drive to fail Do the following to select the test device 1 Boot from the diagnostics disc and start the diagnostics...

Страница 87: ...and install the charged battery pack then check that power is supplied by the battery pack If you suspect a power problem see the appropriate power supply check in the following list q Check the Power...

Страница 88: ...that has less than 50 of the total power remaining when installed in the computer If the battery status indicator does not light up remove the battery pack and let it return to room temperature Re ins...

Страница 89: ...xt possible FRU to be replaced when servicing a computer If the symptom is not listed see Undetermined Problems on page 90 The following lists the error messages that the BIOS displays on the screen a...

Страница 90: ...er chip initialization 36 PCX decoder 37 CPU Initialization 38 Prepare stall delay related services bios debug purpose 39 BIOS ROM reclaims relative 3A Install EFI Runtime Protocol bios debug purpose...

Страница 91: ...vice 5E Console Out Device 5F DataHub Service bios debug purpose 61 Memory Test 63 Legacy 8259 Interrupt router relative initialization 64 Shadow RAM Control Service 65 Legacy Interrupt router relativ...

Страница 92: ...e Services bios debug purpose B6 Prepare services for Firmware File Extract bios debug purpose B7 OEM service Initialization bios debug purpose C0 RAM accessed in System Management Mode service C1 Sys...

Страница 93: ...D LCD cable LCD inverter LCD System board LCD has extra horizontal or vertical lines displayed LCD inverter ID LCD inverter LCD cable LCD System board Indicator Related Symptoms Symptom Error Action i...

Страница 94: ...ystem DIMM System board Speaker Related Symptoms Symptom Error Action in Sequence In Windows multimedia programs no sound comes from the computer Audio driver Speaker System board Internal speakers ma...

Страница 95: ...devices Enter BIOS Setup Utility to execute Load Default Settings then reboot system Reconnect hard disk CD ROM diskette drives External display does not work correctly Press Fn F5 LCD CRT Both displ...

Страница 96: ...ed Problems on page 90 Touchpad does not work Reconnect touchpad cable Touchpad board System board Modem Related Symptoms Symptom Error Action in Sequence Internal modem does not work correctly Modem...

Страница 97: ...discharge or software errors FRU replacement should be considered only when a recurring problem exists When analyzing an intermittent problem do the following 1 Run the advanced diagnostic test for th...

Страница 98: ...perating correctly See Power System Check on page 79 1 Power off the computer 2 Visually check them for damage If any problems are found replace the FRU 3 Remove or disconnect all of the following dev...

Страница 99: ...SPK1 Speaker cable connector 2 KB1 Keyboard cable connector 3 TP1 Touchpad cable connector 4 CN1 Card reader cable connector 5 CN3 Top CRT cable connector 6 FAN1 Thermal module fan cable connector 7 L...

Страница 100: ...92 Chapter 5 Aspire 5810T 5810TZ 5410T Bottom View No Code Connector 1 DM1 DIMM slot 1 2 DM2 DIMM slot 2 3 CN2 Bottom CRT cable connector 4 SSD1 SSD connector 5 BTB1 Miniboard connector...

Страница 101: ...cable connector 2 KB1 Keyboard cable connector 3 TP1 Touchpad cable connector 4 CN1 Card reader cable connector 5 CN3 CRT cable connector 6 CN2 CRT cable connector 7 FAN1 Thermal module fan cable conn...

Страница 102: ...94 Chapter 5 Aspire 5810TG Bottom View No Code Connector 1 DM1 DIMM slot 1 2 DM2 DIMM slot 2 3 SSD1 SSD connector 4 BTB1 Miniboard connector...

Страница 103: ...Aspire 5810T 5810TZ 5410T 5810TG Series There is one Hardware Open Gap on the main board for clearing the password check and one Hotkey for enabling BIOS Recovery Clearing Password Check Hardware Open...

Страница 104: ...of the BIOS It is used to boot up the system with minimum BIOS initialization Users can enable this feature to restore the BIOS firmware to a successful one once the previous BIOS flashing process fa...

Страница 105: ...age device will be cleared during the creation of the Crisis Disk 2 Set up another computer loaded with Windows XP or Vista operating system 3 Decompress the Crisis Package Source Select WINCRIS EXE a...

Страница 106: ...Crisis Disk will be created after a few seconds 7 Press No if you do not want to create another Crisis Disk 8 Reconnect the USB removable storage device and check if it contains the 3 files shown in t...

Страница 107: ...mber change is made it will not be noted on the printed Service Guide For ACER AUTHORIZED SERVICE PROVIDERS your Acer office may have a DIFFERENT part number code from those given in the FRU list of t...

Страница 108: ...108 Chapter 6 Aspire 5810T 5810TZ 5410T Series Exploded Diagram...

Страница 109: ...Chapter 6 109 Aspire 5810TG Series Exploded Diagram...

Страница 110: ...YO AS 2009D LI ION 3S2P SANYO 6 CELL 4400MAH MAIN COMMON ID AS09D31 BT 00604 039 1 BATTERY PANASONIC AS 2009D LI ION 3S2P PANASONIC 6 CELL 4400MAH MAIN COMMON ID AS09D51 BT 00603 082 1 BATTERY SIMPLO...

Страница 111: ...CABLE 50 4CR04 011 2 CARD READER CABLE 50 4CR08 011 2 CARD READER CABLE 50 4CR08 001 2 CRT BOARD CABLE 32PIN 50 4CR09 011 2 CRT BOARD CABLE 32PIN 50 4CR09 001 2 CRT BOARD CABLE 40PIN 50 4CR10 011 2 C...

Страница 112: ...A 250V SOUTH AFRICA BK INDIA 27 01518 721 1 POWER CORD 10A 250V SOUTH AFRICA BK INDIA 27 01518 631 1 POWER CORD 7A 125V 2PIN JAPAN BK 27 01518 661 1 POWER CORD 250V 10A 3PIN ISRAEL 27 01518 761 1 POWE...

Страница 113: ...MODULE 8X 9 5MM SATA FOR GBAS 6M PBB01 001 1 DVD RW SUPER MULTI MODULE 8X 9 5MM SATA NONE GBAS 6M PBB01 002 2 ODD TOSHIBA SUPER MULTI DRIVE 8X 9 5MM TRAY DL TS U633A LF SATA GBAS2 0 W O BEZEL KU 0080...

Страница 114: ...0GB TOSHIBA MK5055GSX LIBRA SATA LF F W FG001J KH 50001 011 2 HDD 500GB 5400RPM HGST SATA HTS545050B9A300 PANTHER B LF KH 50004 001 2 HDD 500GB 5400RPM WD SATA WD5000BEVT 22ZAT0 F W 01 01A01 KH 50007...

Страница 115: ...NAL 17 STANDARD BLACK UV GLOSSY CZ SK KB I170A 062 1 KEYBOARD 104KEYS AC7G JM51 JM70 INTERNAL 17 STANDARD BLACK UV GLOSSY BELGIUM KB I170A 060 1 KEYBOARD 104KEYS AC7G JM51 JM70 INTERNAL 17 STANDARD BL...

Страница 116: ...LPIDA EBJ21UE8BBS0 AE F KN 2GB04 004 1 SODIMM 2GB DDRIII 1066MHZ SAMSUNG M471B5673EH1 CF8 KN 2GB09 004 MICROPHONE 3 MICROPHONE RESERVE MISCELLANEOUS 1 NAME PLATE 5810T 40 4CR28 011 1 NAME PLATE 5810T...

Страница 117: ...AS09D31 BT 00604 039 1 BATTERY PANASONIC AS 2009D LI ION 3S2P PANASONIC 6 CELL 4400MAH MAIN COMMON ID AS09D51 BT 00603 082 1 BATTERY SIMPLO AS 2009D LI ION 3S2P PANASONIC 6 CELL 4400MAH MAIN COMMON 2...

Страница 118: ...1 2 LED LCD CAMERA MICROPHONE CABLE 50 4CR03 001 2 LED LCD CAMERA MICROPHONE CABLE 50 4CR03 011 1 MULTI MEDIA BUTTON BOARD CABLE 50 4CR11 011 1 MULTI MEDIA BUTTON BOARD CABLE 50 4CR11 001 2 POWER BUTT...

Страница 119: ...PIN ISRAEL 27 01518 761 1 POWER CORD 2 5A 125V USA 27 01518 A11 1 POWER CORD 2 5A 125V 1 8M BLACK TAIWANESE 27 01518 781 1 POWER CORD 10A 250V 1 8M BRAZIL BLK 27 01518 A41 1 POWER CORD ACA ACNZ 27 032...

Страница 120: ...1 002 DVD RW DRIVE 1 DVD RW SUPER MULTI MODULE 8X 9 5MM SATA FOR GBAS 6M PBB01 001 2 ODD TOSHIBA SUPER MULTI DRIVE 8X 9 5MM TRAY DL TS U633A LF SATA GBAS2 0 W O BEZEL KU 0080D 046 2 ODD HLDS SUPER MUL...

Страница 121: ...320GB 5400RPM SATA WD WD3200BEVT 22ZCT0 ML125 F W 01 01A01 KH 32007 007 2 HDD 500GB 5400RPM SEAGATE ST9500325AS SATA LF F W 0001SDM1 KH 50008 013 2 HDD 2 5 5400RPM 500GB TOSHIBA MK5055GSX LIBRA SATA...

Страница 122: ...17 STANDARD BLACK UV GLOSSY SWEDEN KB I170A 078 1 KEYBOARD 104KEYS AC7G JM51 JM70 INTERNAL 17 STANDARD BLACK UV GLOSSY CZ SK KB I170A 062 1 KEYBOARD 104KEYS AC7G JM51 JM70 INTERNAL 17 STANDARD BLACK U...

Страница 123: ...A EBJ21UE8BBS0 AE F KN 2GB04 004 1 SODIMM 2GB DDRIII 1066MHZ SAMSUNG M471B5673EH1 CF8 KN 2GB09 004 MICROPHONE 3 MICROPHONE RESERVE MISCELLANEOUS 1 LCD SCREW RUBBER NONE FLUSH 47 PBB01 001 1 NAME PLATE...

Страница 124: ...AH MAIN COMMON 2 2CG ID AS09D71 BT 00607 079 1 BATTERY SIMPLO AS 2009D LI ION 3S2P LGC 6 CELL 4400MAH MAIN COMMON 2 2S3 ID AS09D73 BT 00607 080 1 BATTERY SIMPLO AS 2009D LI ION 3S2P SAMSUNG 6 CELL 440...

Страница 125: ...ENMARK 27 01518 671 1 POWER CORD 10A 250V 3PIN DENMARK BK 27 01518 561 1 POWER CORD 10A 250V SWISS 27 01518 691 1 POWER CORD 10A 250V 3PIN SWISS BK 27 01518 581 CABLE 1 POWER CORD 10A 250V 3PIN ITALY...

Страница 126: ...2 2 LCD BEZEL 15 6 NONE FLUSH W LOGO CAMERA HOLE FOR JAPAN 60 PDU01 003 2 LCD BEZEL 15 6 NONE FLUSH W LOGO CAMERA HOLE 60 PBB01 004 2 2 LED LCD BEZEL CAP LEFT 42 PBB01 004 LED LCD BEZEL CAP RIGHT 42 P...

Страница 127: ...SX F W FG000J 5 4K KH 25004 003 1 HDD 250GB 5400RPM SATA HGST HTS545025B9A300 PANTHER B LF KH 25007 015 1 HDD 250GB 5400RPM SATA WD WD2500BEVT 22ZCT0 F W 11 01A11 KH 25008 021 1 HDD 320GB 5400RPM SATA...

Страница 128: ...TANDARD BLACK UV GLOSSY NORWEGIAN KB I170A 073 1 KEYBOARD 104KEYS AC7G JM51 JM70 INTERNAL 17 STANDARD BLACK UV GLOSSY PORTUGUESE KB I170A 074 1 KEYBOARD 103KEYS AC7G JM51 JM70 INTERNAL 17 STANDARD BLA...

Страница 129: ...R 0 LF W CARD READER BOARD CABLE CRT BOARD CABLE 20PIN W O MEMORY MB PDU01 001 MEMORY 1 SODIMM 1G DDRIII 1066MHZ NANYA NT1GC64BH8A1PS BE LF 64 16 0 07UM KN 1GB03 031 1 SODIMM 1GB DDRIII 1066MHZ ELPIDA...

Страница 130: ...B ZN 86 00K04 734 1 SCREW M2 5 X L2 5 NYLOK 86 00K60 630 1 SCREW M2 5 X L4 HALF NYLOK 86 00K61 534 1 SCREW M2 5 X L6 HALF NYLOK 86 00K62 536 1 SCREW M2 5 XL11 NYLOK 86 1A353 110 1 SCREW M3 X L4 86 9A5...

Страница 131: ...Appendix A 117 Model Definition and Configuration Appendix A...

Страница 132: ...ld in SP1x2HMW SP1x2HMW BT 2 0 6CELL2 8 65W 1 0M DV AS5810TG 354G32Mn EMEA Holland LX PDU0X 068 AS5810TG 354G32Mn VHP32ATNL1 MC M92LP512Css 2 2G 320 BT 6L2 8 5R CB_n2_1 0D_AL_NL12 C2SSU3500B NLED15 6W...

Страница 133: ...2_1 0D_AL_RU61 C2DSU9400B NLED15 6W XGAGS M92LP 512M DDR3 64 16 4 SO2GBIII10 SO2GBIII10 N320GB5 4KS NSM8XS9 5 5 in 1 Build in SP1x2HMW SP1x2HMW BT 2 0 6CELL2 8 65W 1 0M DV AS5810TG 944G32Mn EMEA Belgi...

Страница 134: ...ss 2 2G 320 BT 6L2 8 5R CB_abg_1 0D_AL_RU11 C2DSU9400B NLED15 6W XGAGS M92LP 512M DDR3 64 16 4 SO2GBIII10 SO2GBIII10 N320GB5 4KS NSM8XS9 5 5 in 1 Build in SP1x2HMW SP1x2MAB G BT 2 0 6CELL2 8 65W 1 0M...

Страница 135: ...i 1x2 BGN N 6CELL2 8 65W 1 0M DV AS5810TZ 273G25Mn EMEA Ukraine LX PDM0X 052 AS5810TZ 273G25Mn VHP32ATUK1 MC UMACss 2G 1G 250 6L2 8 5R CB_bgn_1 0D_AL_RU11 PMSSU2700B NLED15 6W XGAGS UMA N SO2GBIII10 S...

Страница 136: ...II10 SO1GBIII10 N250GB5 4KS NSM8XS9 5 5 in 1 Build in 3rd WiFi 1x2 BGN 3rd WiFi 1x2 BGN BT 2 0 6CELL2 8 65W 1 0M DV AS5810TZ 273G25Mn EMEA Norway LX PDM0X 028 AS5810TZ 273G25Mn VHP32ATNO1 MC UMACss 2G...

Страница 137: ...ME3 MC UMACss 2G 1G 250 BT 6L2 8 5R CB_bgn_1 0D_AL_FR23 PMSSU2700B NLED15 6W XGAGS UMA N SO2GBIII10 SO1GBIII10 N250GB5 4KS NSM8XS9 5 5 in 1 Build in 3rd WiFi 1x2 BGN 3rd WiFi 1x2 BGN BT 2 0 6CELL2 8 6...

Страница 138: ...Canada LX PBB0X 092 AS5810T 354G32Mn VHP64ATCA2 MC UMACss 2 2G 320 6L2 8 5R CB_n2_1 0D_AL_FR31 C2SSU3500B NLED15 6W XGAGS UMA N SO2GBIII10 SO2GBIII10 N320GB5 4KS NSM8XS9 5 5 in 1 Build in SP1x2HMW SP...

Страница 139: ...DV AS5810T 944G32Mn AAP Australia New Zealand LX PBB0X 008 AS5810T 944G32Mn VHP32ATAU1 MC UMACss 2 2G 320 BT 6L2 8 5R CB_n2_1 0D_AL_EN12 C2DSU9400B NLED15 6W XGAGS UMA N SO2GBIII10 SO2GBIII10 N320GB5...

Страница 140: ...1 Build in SP1x2HMW SP1x2HMW BT 2 0 6CELL2 8 65W 1 0M DV AS5810T 354G32Mn EMEA Czech LX PBB0X 049 AS5810T 354G32Mn VHP32ATCZ2 MC UMACss 2 2G 320 BT 6L2 8 5R CB_n2_1 0D_AL_SK12 C2SSU3500B NLED15 6W XG...

Страница 141: ...3G_AL_EN11 C2SSU3500B NLED15 6W XGAGS UMA N SO1GBIII10 SO2GBIII10 N250GB5 4KS NSM8XS9 5 5 in 1 Build in SP1x2MMW SP1x2MM W BT 2 0 6CELL2 2 65W 1 0M DV AS5810T 354G32Mn WW WW S2 PBW0Y 002 AS5810T 354G3...

Страница 142: ...Appendix A 128...

Страница 143: ...Windows XP Pro environment Refer to the following lists for components adapter cards and peripherals which have passed these tests Regarding configuration combination and test procedures please refer...

Страница 144: ...ker EAB MPC57USB USB Storage Drive Iomega USB Zip 250MB Transcend 80G HDD Plextor DVD R RW LG DVD R RW Sony DVD R RW USB Camera Intel Easy PC Camera A20953 001 Orange Micro USB 2 0 Web Cam USB HUB and...

Страница 145: ...S card Sony Ericsson GC89 GPRS card ExpressCard Test Express Card Abcom 5 in 1 Adapter ExpressCard Reader Abcom GigaLan ExpressCard Sunix ECF2400 2 Ports 1394A ExpressCard Memory Card Test SD MS MMC S...

Страница 146: ...132 Appendix B...

Страница 147: ...ktop and Server models including q Service guides for all models q User s manuals q Training materials q Bios updates q Software utilities q Spare parts lists q TABs Technical Announcement Bulletin Fo...

Страница 148: ...134 Appendix C...

Страница 149: ...covery Disk 35 D DIMM module removing 45 Disassembly Requirements 39 E Emergency eject hole 8 Environment Test 130 error messages Power On Self Test POST 81 Euro 15 Euro symbol 15 External CD ROM Driv...

Страница 150: ...ort Information 133 P password changing 32 removing 31 port Ethernet RJ 45 8 external display VGA 7 HDMI 7 USB 2 0 7 8 power button board removing 55 Power System Check 79 Battery Pack 79 Power Adapte...

Страница 151: ...leshooting 77 U Undetermined Problems 90 utility BIOS 25 35 V View top 5 view bottom 10 closed front 6 left 7 rear 9 right 8 W webcam removing 75 Windows 2000 Environment Test 130 WLAN board module re...

Страница 152: ...138...
Отзывы: