


166
Chapter 5
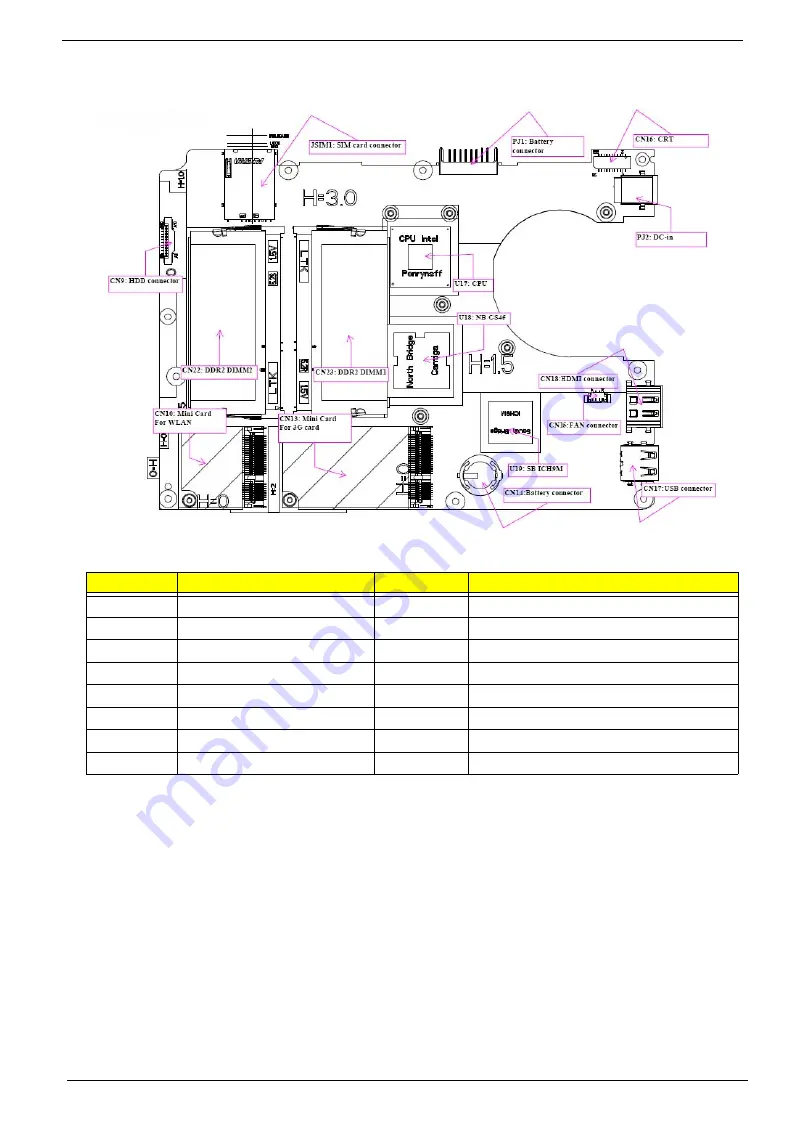
Mainboard Bottom View
Item
Description
Item
Description
CN9
HDD connector
CN17
USB connector
JSIM1
SIM card connector
CN14
RTC battery connector
PJ1
Battery connector
CN13
Mini card for 3G
CN16
CRT
CN10
Mini card for WLAN
PJ2
DC-in
CN22
DRR2 DIMM2
U17
CPU
CN23
DDR2 DIMM1
U18
North Bridge GS45
U19
SB ICH9M
CN18
HDMI connector
CN15
Fan connector
Содержание Aspire 1420P Series
Страница 6: ...vi...
Страница 10: ...x Table of Contents...
Страница 13: ...Chapter 1 3 System Block Diagram...
Страница 32: ...22 Chapter 1...
Страница 48: ...38 Chapter 2...
Страница 60: ...50 Chapter 3 4 Remove the one 1 screw 5 Remove the 3G module Step Screw Quantity Screw Type 3G Module M2 3 1...
Страница 64: ...54 Chapter 3 4 Unlock the FPC 5 Remove the FPC and keyboard...
Страница 66: ...56 Chapter 3 4 Remove the hinge cap 5 Remove the hinge bezel...
Страница 70: ...60 Chapter 3 10 Pull the upper cover away...
Страница 80: ...70 Chapter 3 6 Remove the two 2 screws 7 Remove the LED board Step Screw Quantity Screw Type LED Board M2 4 2...
Страница 85: ...Chapter 3 75 11 Lift up the main board from the inside edge and pull away 12 Remove the CRT cable...
Страница 94: ...84 Chapter 3 7 Pry up the bezel top edge and remove...
Страница 100: ...90 Chapter 3 6 Pull up the LCD cable from the adhesive 7 Pull the touchscreen cable from the adhesive...
Страница 105: ...Chapter 3 95 6 Remove the antenna cable from the retention guide hooks 7 Peel the antenna foil off the cover...
Страница 119: ...Chapter 3 109 7 Insert the stylus...
Страница 127: ...Chapter 3 117 7 Connect the touchscreen cable Replacing the CRT Board 1 Connect the CRT cable 2 Turn the CRT board over...
Страница 134: ...124 Chapter 3 6 Lock the main board connector 7 Replace the I O cable in the IO board 8 Lock the I O board connector...
Страница 142: ...132 Chapter 3 2 Replace the hinge cap 3 Replace the three 3 screws Step Screw Quantity Screw Type Hinge Covers M2 3 3...
Страница 144: ...134 Chapter 3 4 Press down the keyboard top edge Replacing the 3G Module 1 Replace the 3G module...
Страница 148: ...138 Chapter 3 2 Replace the HDD in the bay 3 Adhere the black tape 4 Replace the HDD FPC...
Страница 149: ...Chapter 3 139 5 Lock the HDD FPC Replacing the Module Cover 1 Insert the side of the module cover into the slots...
Страница 150: ...140 Chapter 3 2 Replace the module pressing firmly around the edges 3 Tighten the six 6 captive screws...
Страница 152: ...142 Chapter 3 3 Lock the battery Replacing the Dummy Card 1 Insert the dummy card into the slot...
Страница 202: ...192 Appendix A...
Страница 212: ...202...
Страница 215: ...205...
Страница 216: ...206...


