background image

Altos S205F / S200F  User’s Manual

10

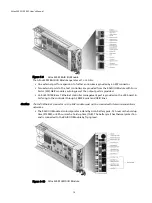
The Altos S205F RAID I/O Module operates at 1 or 2 Gb/s.

• One external port for expansion to further enclosures is provided by an SFP connector

• Two external ports to the host controllers are provided from the RAID I/O Module with Form 

Factor (SFP) GBIC modules, auto-bypass at the output ports is provided. 

• An RJ45 10/100 Base T Ethernet controller management port is provided on the LRC board, in-

terfacing to the controller through 2 RS232 serial and GPIO lines.

Caution

The RJ45 Ethernet connector on the LRC module must not be connected to telecommunications 

networks.

• The RAID I/O Module also incorporates a standby Li-ion battery pack, 72 hours cache hold up 

time (512MB), or 60 hours cache hold up time (1GB). The battery cell has thermal protection 
and is connected to the RAID I/O Module by flying lead.

Figure 1–9

Altos S205F RAID I/O Module

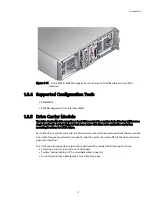
Figure 1–10

Altos S200F JBOD I/O Module

not used

Содержание Altos S205F

Страница 1: ...stered trademarks of Acer Incorporated Other company s product names or trademarks are used herein for identification purposes only and belong to their respective companies All other names brands products or services are trademarks or registered trademarks of their respective companies ...

Страница 2: ...pany makes no representations or warranties either expressed or implied with respect to the contents hereof and specifically disclaims the implied warranties of merchantability or fitness for a particular purpose No part of this publication may be reproduced stored in a retrieval system or transmitted in any form or by any means electronic mechanical photocopy recording or otherwise without the pr...

Страница 3: ...ule 4 1 3 2 Operators Panel 6 1 3 3 Controller Input Output Module 8 1 3 4 Supported Configuration Tools 11 1 3 5 Drive Carrier Module 11 1 3 6 Dummy Carrier Modules 13 1 3 7 Blank Modules 13 1 4 Visible and Audible Alarms 13 1 5 Altos S205F S200F Storage System Technical Specification 14 1 5 1 Dimensions 14 1 5 2 Weight 15 1 5 3 AC Power 450W PSU 15 1 5 4 PSU Safety and EMC Compliance 15 1 5 5 Po...

Страница 4: ... 2 7 1 Parts Check List 29 2 7 2 Procedure 30 2 8 Altos S205F Drive Enclosure Device Addressing 31 2 9 Altos S200F Drive Enclosure Device Addressing 32 2 10 Drive Carrier Configuration 34 2 10 1 Planning and Configuring Your Installation 34 2 11 Drive Carrier Installation 34 2 11 1 Parts Check List 34 2 11 2 Procedure 35 2 11 3 Dummy Carrier Modules 37 2 11 4 Engaging the Anti tamper Locks 37 2 12...

Страница 5: ...9 provides step by step instructions for installation and initial set up Chapter 3 Operation on page 39 tells you how to power on off the Alto S205F S200F monitor the LEDs and start the drives International Standards The Alto S205F S200F storage system complies with the requirements of the following agencies and standards CE UL 60950 TUV GS BSMI Potential for Radio Frequency Interference USA Feder...

Страница 6: ...y interference received including interference that may cause undesired operation European Regulations This equipment complies with European Regulations EN 55022 Class A Limits and Methods of Measurement of Radio Disturbance Characteristics of Information Technology Equipments and EN50082 1 Generic Immunity Safety All plug in modules are part of the fire enclosure and must only be removed when a r...

Страница 7: ... 100 120 VAC or 200 240 VAC The plug on the power supply cord is used as the main disconnect device Ensure that the socket outlets are located near the equipment and are easily accessible The equipment is intended to operate with two working PSUs Controller Module Caution Label Do not operate with modules missing PSU Cooling Module Caution Label Do not operate with modules missing A faulty Power S...

Страница 8: ...r North American NRTL RECOGNISED COMPONENT and the laser in the module must comply with Laser Class 1 US 21 CFR J and EN 60825 1 If passive copper cables are connected the cable must not have a connection to the supply pins pins 15 16 Battery Safety The battery is user replaceable please refer to the Battery Replacement Procedure Warning There is a danger of explosion if the battery is incorrectly...

Страница 9: ...IEC 60950 ESD Precautions Caution It is recommended that you fit and check a suitable anti static wrist or ankle strap and observe all conventional ESD precautions when handling Altos S205F S200F Storage System plug in modules and components Avoid contact with backplane components and module connectors etc Data Security Power down your host computer and all attached peripheral devices before begin...

Страница 10: ...embly of some configurations you may need the following not supplied Security keys one of these should be included with your Altos S205F S200F Storage System enclosure for use with the drive locks Related Documentation Altos S200F Storage System Quick Installation Guide Altos S205F Storage System Quick Installation Guide Altos RAIDWatch User s Guide Altos S205F Text Mode Management Reference Guide...

Страница 11: ...Preface xi Revision History Version Date Description of Change 1 0 1 May 2004 Initial Release ...

Страница 12: ...Acer S205F S200F User s Manual xii ...

Страница 13: ...Introduction 1 Chapter 1 Introduction 1 1 The Altos S205F S200F Storage System Figure 1 1 Altos S205F S200F Storage System ...

Страница 14: ...d at the rear The chassis assembly contains 16 drive bays at the front each of which accommodates a plug in drive carrier module The 16 drive bays are arranged in 4 rows of 4 drives At the rear the chassis assembly contains the integral ops panel module and four plug in module bays to house two Power Supply Cooling modules and two Controller I O modules The Backplane PCB provides logic level signa...

Страница 15: ...ent in Bay 1 1 or 4 4 to enable SES communications to operates Figure 1 3 Altos S205F Enclosure Chassis Rear Figure 1 4 Altos S200F Enclosure Chassis Front SES Drives there must be a drive present in Bay 1 1 or 4 4 to enable SES communications to operates Figure 1 5 Altos S200F Enclosure Chassis Rear ...

Страница 16: ...y Cooling modules 1 x Operator Panel 1 or 2 x I O modules RAID I O module for Altos S205F JBOD I O module for Altos S200F Up to 16 SATA drive carrier modules and or dummy drive carrier modules as required Note No drive bays should be left completely empty 1 3 1 Power Supply Cooling Module One Power Supply Cooling module is available for the Altos S205F S200F Storage System Auto ranging AC 450W Pow...

Страница 17: ...e Figure 1 7 indi cate the status of the PSU and the fans 1 3 1 2 Multiple Power Supply Cooling Modules The Altos S205F S200F Storage System must always be operated with two Power Supply Cooling modules fitted The two Power Supply Cooling modules operate together so that if one fails the other maintains the power supply and cooling while you replace the faulty unit Module replacement should only t...

Страница 18: ...ich is used to monitor and control all elements of the Enclosure 1 3 2 1 Ops Panel Indicators and Switches The Ops Panel includes Light Emitting diodes LEDs which show the status for all modules an Audible Alarm which indicates when a fault state is present a push button Alarm Mute switch and a thumb wheel SEL_ID Address Range selector switch The Ops Panel switch functions are shown in Table 1 1 a...

Страница 19: ...Not Used OFF Not Used 3 Hub Mode OFF OFF Hub Disabled ON Hub Enabled Direct Only 4 Not Used OFF Not Used 5 6 RAID host hub speed ON ON OFF OFF 1GB ON OFF 2GB OFF ON or ON ON Auto Select 7 Not Used OFF Not Used 8 Not Used OFF Not Used 9 10 Drive Addressing Mode Selection ON ON ON ON Mode 0 11 SOFT SELECT ON ON Selects functions using the hardware switches 12 Not Used OFF Not Used ...

Страница 20: ...0 1 0 1 3 5 10 30 and 50 The plug in I O modules have been designed for integration into a Altos S205F S200F Storage Sys tem storage subsystem providing external FCAL cable interfacing with up to 16 SATA disk drives Processors housed on the I O modules provide enclosure management and interface to devices on the Backplane PSU Controller and Ops Panel to monitor internal functions The module incorp...

Страница 21: ...e Amber When ON this LED denotes the following status When system is with power ON denotes cache memory con tains data or ECC errors are detected When system is without power ON denotes cache memory contains data and is held up by BBU Host Port 1 Signal Good Green When ON this LED denotes that incoming FC signal is GOOD Host port 0 Signal Good Green When ON this LED denotes that incoming FC signal...

Страница 22: ...Ethernet controller management port is provided on the LRC board in terfacing to the controller through 2 RS232 serial and GPIO lines Caution The RJ45 Ethernet connector on the LRC module must not be connected to telecommunications networks The RAID I O Module also incorporates a standby Li ion battery pack 72 hours cache hold up time 512MB or 60 hours cache hold up time 1GB The battery cell has t...

Страница 23: ... Each disk drive is enclosed in a die cast aluminum carrier which provides excellent thermal conduc tion radio frequency and electro magnetic induction protection and affords the drive maximum physical protection The front cap also supports an ergonomic handle which provides the following functions Camming of carrier into and out of drive bays Positive spring loading of the drive backplane connect...

Страница 24: ...ths to each drive thus improving system availability 1 3 5 2 Drive Status Indicators Each drive carrier incorporates two indicators an upper Green and lower Amber In normal operation the green indicator will be ON and will flicker as the drive operates 1 3 5 3 Anti tamper Locks Anti tamper locks are fitted in the drive carrier handles Figure 1 13 and are accessed through the small cutout in the la...

Страница 25: ...are filled before operating the unit Dummy Carriers and or Blank modules are available for this purpose 1 4 Visible and Audible Alarms The functional modules have associated status LEDs The Ops Panel shows a consolidated status for all modules LEDs show constant green for good or positive indication Constant Amber LEDs indicate there is a fault present within that module The Ops Panel also incorpo...

Страница 26: ... body of enclosure 17 6 447 Depth from flange to rear of enclosure body 21 531 Depth from flange to maximum extremity of enclosure rear hold down 21 7 550 Depth from flange to furthest extremity at front of unit 0 5 13 Depth overall 22 2 563 Tower Enclosure inches millimeters Height 22 27 501 Width including mounting feet 10 22 230 Depth 23 24 523 Table 1 5 Altos S205F S200F Storage System Chassis...

Страница 27: ...ule 4kg 8 8lb Controller I O Module 0 9kg 1 98lb Tower Conversion Kit 3kg 6 6lb Voltage Range 100 120 200 240 VAC Rated Voltage Range Selection Automatic Frequency 50 60 Hz Inrush Current 50A 260VAC Power Factor 0 98 Harmonics Meets EN61000 3 2 Safety Compliance UL 60950 IEC 60950 EN 60950 EMC Compliance CFR47 Part 15B Class A EN55022 EN55024 Cord Type SV 0r SVT 18 AWG minimum 3 conductor Plug 250...

Страница 28: ...f 35 C Altitude Non Operational 305 to 12 192m 1000 to 40 000ft Shock Operational Vertical axis 5g peak 1 2 sine 10ms Shock Non Operational 30g 10ms 1 2 sine Vibration Operational 0 21grms 5 500 Hz Random Vibration Non Operational 1 04grms 2 200 Hz Random Vibration Relocation 0 3g 2 200 Hz sine Acoustics Sound Pressure Operating Less than 58 dB LpA average mea sured at the bystander positions The ...

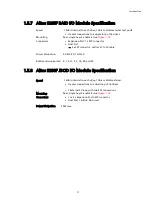
Страница 29: ... 3 Connectors Expansion Port 1 x SFP connector Host Port 2 x SFP connector optical LC to LC cable Power Dissipation 5A 3 3V 1A 5V RAID Levels supported 0 1 0 1 3 5 10 30 and 50 Speed 1 5Gb s internal to each drive 1Gb s or 2Gb s external Creates connections to a dual loop of 16 drives 1 External FC loop with two SFP connections Mounting Rear single bays 3 and or 4 see Figure 1 5 Connectors 1 or 2 ...

Страница 30: ...ES Support The enclosure has a sophisticated self monitoring and reporting function which conforms to ANSI SES specifications This reports on such topics as Enclosure temperature Fan speed Drive condition Operator panel status Module Dimensions Height 29 1mm Width 106 55mm Depth 251 mm Weight 0 98kg 1 0 36Gb drive Transition card Provides dual path emulation to Serial ATA drives Operating Temperat...

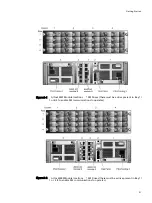
Страница 31: ...g in modules are shown in Figure 2 1 and Figure 2 2 Please refer to sections 2 5 2 7 for details of I O module configurations and installation Table 2 1 Altos S205F Storage System Configuration Module Location Drive Bays ALL drive bays must be fitted with either a drive carrier module or a dummy carrier no bays should be left completely empty All drive carrier modules provide SES Management Servic...

Страница 32: ...pletely empty All drive carrier modules provide SES Management Services Power Supply Cooling Modules Two Power Supply Cooling modules must be fitted Full power and cooling redundancy is provided while a faulty module is replaced Install the Power Supply Cooling modules in rear Bays 1 5 Note Rear bays are numbered from 1 to 5 commencing from the right hand side JBOD I O Module Two JBOD I O modules ...

Страница 33: ... locations SES Drives there must be a drive present in Bay 1 1 or 4 4 to enable SES communications to operates Figure 2 2 Altos S200F Module locations SES Drives there must be a drive present in Bay 1 1 or 4 4 to enable SES communications to operates ...

Страница 34: ...od handling practices which we encourage you to follow so as to ensure that a successful installation is achieved in the easiest manner Warning Ensure that you have fitted and checked a suitable anti static wrist or ankle strap and observe all conventional ESD precautions when handling Altos S205F S200F Storage System modules and components Avoid contact with Backplane components and module connec...

Страница 35: ... 3 2 Procedure 1 Check for damage 2 Slide the chassis assembly onto the rack rails until the front flanges engage on the rack Ensure the chassis is centrally located 3 If in doubt about correct orientation the drive bays at front should have their black drive connectors toward the bottom of each bay 4 Screw the 4 front rack mount screws through the flanges and tighten 5 Fit and tighten the rear ho...

Страница 36: ...em from their mountings inverting and then replacing them as shown in Figure 2 4 1 Check for damage especially to the rear connector on the supply Caution Handle the module carefully and avoid damaging the connector pins Do not install the module if any pins appear to be bent 2 With the PSU handle in the open position Figure 2 5 slide the module into the enclosure Figure 2 6 Important install the ...

Страница 37: ...Getting Started 25 Figure 2 5 AC Power Supply Cooling Module Handle in Open Position Figure 2 6 Installing an AC Power Supply Cooling Module 1 ...

Страница 38: ...FC AL SFP interface connections The I O module provides bi directional conversion between the Fibre Channel host side interface and the SATA drives The drives will not be presented to the Host until they are configured and mapped by the controller When Logical Arrays are configured and mapped each drive array appears as a single Fibre Channel drive in a single loop Note There are no external termi...

Страница 39: ...d the laser in the module must comply with Laser Class 1 US 21 CFR J and EN 60825 1 If passive copper cables are connected the cable must not have a connection to the 3 3V supply pins 15 and 16 Expansion enclosures are Altos S200F Storage System Note A maximum of 6 Altos S200Fs can be attached to an Altos S205F Storage System enclosure and a typical expansion configuration is shown in Figure 2 8 F...

Страница 40: ...Acer S205F S200F User s Manual 28 Figure 2 9 Dual loops connection Each connection can see all the drives in the enclosure J7 jumper of Altos S200F is open ...

Страница 41: ...purpose 2 7 1 Parts Check List Important The enclosure may be configured with either one or two I O modules If only one I O module is fitted it must be installed in rear bay 4 and a Blank I O module fitted in the unused bay Two RAID I O Modules or one RAID I O Module with one Blank I O module for Altos S205F Two JBOD I O Modules or one JBOD I O Module with one Blank I O module for Altos S200F Figu...

Страница 42: ...s 3 and 4 of the Enclosure Figure 2 1 Figure 2 2 2 With the latch in the open position see Figure 2 11 slide the Controller module into the enclosure until the latch engages automatically 3 Cam the module home by manually closing the latches see Figure 2 12 4 A click should be heard as the latch engages Figure 2 11 Controller Module Latch Operation Figure 2 12 Installing an I O Module ...

Страница 43: ..._ID 0 4 5 6 7 8 9 10 11 12 13 14 15 16 17 18 19 1 4 5 6 7 8 9 10 11 12 13 14 15 16 17 18 19 2 20 21 22 23 24 25 26 27 28 29 30 31 32 33 34 35 3 36 37 38 39 40 41 42 43 44 45 46 47 48 49 50 51 4 52 53 54 55 56 57 58 59 60 61 62 63 64 65 66 67 5 68 69 70 71 72 73 74 75 76 77 78 79 80 81 82 83 6 84 85 86 87 88 89 90 91 92 93 94 95 96 97 98 99 7 100 101 102 103 104 105 106 107 108 109 110 111 112 113 ...

Страница 44: ...he address range setting which is set by means of the Enclosure ID switch on the Ops Panel shown in Figure 1 8 on page 6 at the rear of the enclosure The switch settings are shown in Table 2 5 Table 2 4 Drive Slot Arrangement Enclosure Front View Column row 1 2 3 4 1 Drive 0 Drive 1 Drive 2 Drive 3 2 Drive 4 Drive 5 Drive 6 Drive 7 3 Drive 8 Drive 9 Drive 10 Drive 11 4 Drive 12 Drive 13 Drive 14 D...

Страница 45: ...78 79 80 81 82 83 6 84 85 86 87 88 89 90 91 92 93 94 95 96 97 98 99 7 100 101 102 103 104 105 106 107 108 109 110 111 112 113 114 115 8 100 101 102 103 104 105 106 107 108 109 110 111 112 113 114 115 9 100 101 102 103 104 105 106 107 108 109 110 111 112 113 114 115 10 100 101 102 103 104 105 106 107 108 109 110 111 112 113 114 115 11 100 101 102 103 104 105 106 107 108 109 110 111 112 113 114 115 ...

Страница 46: ...emember that All Altos S205F S200F Storage System enclosure drive bays must be filled with either a drive carrier or front dummy carrier module no bays should be left completely empty Warning Operation of the Enclosure with ANY modules missing will disrupt the airflow and the drives will not receive sufficient cooling It is ESSENTIAL that all apertures are filled before operating the unit Dummy Ca...

Страница 47: ...t and the handle opens from the top 2 Slide the carrier gently all the way into the enclosure until it is stopped by the camming lever on the right of the carrier Figure 2 14 3 Cam the carrier home the camming foot on the base of the carrier will engage into a slot in the enclosure Continue to push firmly until the handle fully engages A click should be heard as the latch engages and holds the han...

Страница 48: ...Acer S205F S200F User s Manual 36 Figure 2 14 Installing a SATA Drive Carrier Module 2 Figure 2 15 Installing an SATA Drive Carrier Module 3 ...

Страница 49: ...ock key provided into the cutout in the handle 2 Locate the key into its socket 3 Rotate the key in a clockwise direction until the indicator is visible in the aperture beside the key 4 Remove the key De activation is the reverse of this procedure that is Rotate the key in a anti clockwise direction until the indicator is no longer visible in the aperture beside the key Note A drive carrier cannot...

Страница 50: ... from the enclosure 2 13 Grounding Checks Perform these checks to ensure that a safe grounding system is provided If a rack distribution system is being used Ensure power is removed from the rack Connect the Altos S205F S200F Storage System power cord to the rack distribution and the enclosure If a direct connection is made with the Altos S205F S200F Storage System power cord ensure that it is con...

Страница 51: ... Panel the Audible Alarm beeps once all LEDs flash for 7 seconds then the Alarm double beeps 3 All LEDs on the Ops Panel should be lit Green when the enclosure power is activated and the disk drive motors should start Note All LEDs on the Ops Panel should be lit Green at power up to indicate that the system is functioning correctly If any show Amber then a problem exists and please contact certifi...

Страница 52: ...ure 3 1 Table 3 1 PSU LEDs AC PSU PSU Good Green AC input Fail Amber Fan Fault Amber DC Output Fail Amber Figure 3 1 Ops Panel LEDs and Switches Table 3 2 Ops Panel LED States LED Definition Color Normal Status Fault Status Power On Enclosure Powered On Green On Off System Fault System ESI Fault Amber Off On Hub Mode LED for Altos S205F only ...

Страница 53: ...ive carrier incorporates two indicators an upper GREEN and lower AMBER In normal operation the Green LED will be ON and will flicker as the drive operates The Amber LED will be OFF In normal operation It will only be ON if there is a drive fault 3 5 Power Down To power the Enclosure down either Switch off the Power Supply Cooling modules installed in the Enclosure or Remove AC at the power source ...

Страница 54: ...Acer S205F S200F User s Manual 42 ...

Страница 55: ...on the term usually refers to 8 bit units or characters 1 kilobyte K is equal to 1 024 bytes or characters 64K indicates 65 536 bytes or characters Cable Throughout this Altos S205F S200F User s Manual this term is used in accordance with the preferred US context of an insulated flexible electric wire used for the transmission of data signals between computer equipment Note Cable is UK preferred t...

Страница 56: ...power supply disk drive or electronics unit held in a carrier that plugs into a bay inside the enclosure An Altos S205F S200F Storage System enclosure can contain sixteen drive modules two power supply cooling modules and two I O modules Operating system The software running the host computer For example on PCs it is often Windows 2000 or Windows NT Power Cord Throughout this Altos S205F S200F Sto...

Страница 57: ...g system checks 38 i IEC 320 connector 38 l LED 5 6 13 LED indicators 8 Li ion battery pack 10 Logical Arrays 26 o Operators Panel 2 6 Ops Panel 6 13 20 23 38 39 Ops Panel LEDs 40 Ops Panel Switch Functions 7 32 p plug in module 2 19 Power Down 41 Power On 39 power supply cord 24 38 Power Supply Cooling 2 4 5 19 20 24 38 39 PSU LEDs 39 PSU voltage operating ranges 5 r Rack mounting 2 rack mounting...

Страница 58: ...Acer S205F S200F User s Manual 46 v Visible and Audible Alarms 13 ...

Отзывы: