background image

USER’S MANUAL

Содержание A715-75G

Страница 1: ...USER S MANUAL ...

Страница 2: ...gn in or sign up for an Acer ID 4 Enter S N or SNID of your device to register it Important This manual contains proprietary information that is protected by copyright laws The information contained in this manual is subject to change without notice Some features described in this manual may not be supported depending on the Operating System version Images provided herein are for reference only an...

Страница 3: ... computer security lock 44 Using passwords 44 Entering passwords 45 Fingerprint Reader 46 How to use the fingerprint reader 46 BIOS utility 51 Boot sequence 51 Setting passwords 51 Power management 52 Saving power 52 Battery pack 54 Battery characteristics 54 Charging the battery 54 Optimizing battery life 55 Checking the battery level 56 Battery low warning 56 Traveling with your computer 57 Disc...

Страница 4: ...e of contents Internet and online security 78 First steps on the net 78 Protecting your computer 78 Choose an Internet Service Provider 78 Network connections 80 Surf the Net 81 Internet security software 82 ...

Страница 5: ...g for your computer and your health Where to find the power button ports and connectors Tips and tricks for using the touchpad and keyboard How to create recovery backups Guidelines for connecting to a network and using Bluetooth Information on using Acer s bundled software ...

Страница 6: ...bleshooting Once you have connected to the internet you can download updates for your computer from http go acer com id 17883 1 The link will open the Acer Support webpage 2 Scroll down to Drivers and Manuals and search for your model by pasting in or manually entering the serial number SNID or product model 3 From this page you can also download and install the Acer identification utility that wi...

Страница 7: ... device Do not expose the computer to direct sunlight Do not place it near sources of heat such as a radiator Do not expose the computer to temperatures below 0º C 32º F or above 50º C 122º F Do not subject the computer to magnetic fields Do not expose the computer to rain or moisture Do not spill water or any liquid on the computer Do not subject the computer to heavy shock or vibration Do not ex...

Страница 8: ...he total ampere ratings of the equipment plugged in should not exceed the ampere rating of the cord if you are using an extension cord Also the total current rating of all equipment plugged into a single wall outlet should not exceed the fuse rating Cleaning and servicing When cleaning the computer follow these steps 1 Turn off the computer 2 Disconnect the AC adapter 3 Use a soft moist cloth Do n...

Страница 9: ...arging port must be clean and free from debris and should only be used with Acer charging equipment Use of a non Acer battery or charging equipment can cause damage to the product and will void the warranty If you plan to store the device for a long period of time turn off the device remove AC power and store the product at room temperature 0 C 35 C in a dry humidity 45 80 well ventilated area Avo...

Страница 10: ...er 50 C 122 F Failure to follow these guidelines may cause the battery to leak acid become hot explode or ignite and cause injury and or damage Do not pierce open or disassemble the battery If the battery leaks and you come into contact with the leaked fluids rinse thoroughly with water and seek medical attention immediately For safety reasons and to prolong the lifetime of the battery charging wi...

Страница 11: ...r winter Always try to keep the battery between 15 C and 25 C 59 F and 77 F A device with a hot or cold battery may not work temporarily even when the battery is fully charged Battery performance is especially limited in temperatures well below freezing Do not dispose of batteries in a fire as they may explode Batteries may also explode if damaged Dispose of batteries according to local regulation...

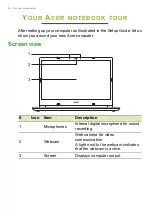
Страница 12: ...he Setup Guide let us show you around your new Acer computer Screen view 2 3 1 Icon Item Description 1 Microphones Internal digital microphone for sound recording 2 Webcam Web camera for video communication A light next to the webcam indicates that the webcam is active 3 Screen Displays computer output ...

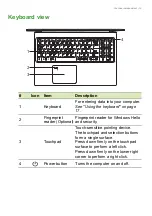
Страница 13: ...Fingerprint reader Optional Fingerprint reader for Windows Hello and security 3 Touchpad Touch sensitive pointing device The touchpad and selection buttons form a single surface Press down firmly on the touchpad surface to perform a left click Press down firmly on the lower right corner to perform a right click 4 Power button Turns the computer on and off ...

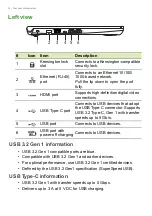
Страница 14: ...B devices that adopt the USB Type C connector Supports USB 3 2 Type C Gen 1 with transfer speeds up to 5 Gb s 5 USB port Connects to USB devices 6 USB port with power off charging Connects to USB devices USB 3 2 Gen 1 information USB 3 2 Gen 1 compatible ports are blue Compatible with USB 3 2 Gen 1 and earlier devices For optimal performance use USB 3 2 Gen 1 certified devices Defined by the USB 3...

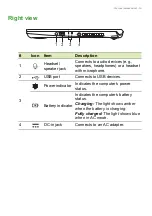
Страница 15: ...dphones or a headset with microphone 2 USB port Connects to USB devices 3 Power indicator Indicates the computer s power status Battery indicator Indicates the computer s battery status Charging The light shows amber when the battery is charging Fully charged The light shows blue when in AC mode 4 DC in jack Connects to an AC adapter ...

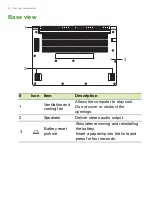
Страница 16: ...Ventilation and cooling fan Allows the computer to stay cool Do not cover or obstruct the openings 2 Speakers Deliver stereo audio output 3 Battery reset pinhole Simulates removing and reinstalling the battery Insert a paperclip into the hole and press for four seconds ...

Страница 17: ...ic characters typed are in uppercase Num Lock Numeric Lock When Num Lock is on the keypad is in numeric mode The keys function as a calculator complete with the arithmetic operators and Use this mode when you need to do a lot of numeric data entry Scr Lk Scroll Lock When Scroll Lock is on the screen moves one line up or down when you press the up or down arrow keys respectively Scroll Lock does no...

Страница 18: ...ight toggle Turns the keyboard backlight on and off Function varies depending on configuration Speaker toggle Turns the speakers on and off Volume down Decreases the sound volume Volume up Increases the sound volume Scr LK Scroll Lock Turns Scroll Lock on or off Icon Function Description Hotkey Icon Function Description Fn F1 F12 Function keys Activate the F1 to F12 keys Fn Delete Insert Insert Tu...

Страница 19: ...tion key setting in the BIOS to open the BIOS press F2 when starting your computer then select the Main menu and change Function key behavior to Function keys Specifications vary depending on model Key Description Windows key Pressed alone it returns to the Start screen or to return to the last open app Application key This key has the same effect as clicking the right mouse button ...

Страница 20: ...Slide a finger across the touchpad to move the cursor Single finger press or tap Press the touchpad down or lightly tap the touchpad with your finger to perform a click which will select or start an item Quickly repeat the tap to perform a double tap or double click Two finger press Lightly tap the touchpad with two fingers to perform a right click In the Start screen this will toggle the app comm...

Страница 21: ...ipe down to minimize all open windows and show Desktop swipe upwards to restore the minimized windows Swipe left or right to switch between open windows Four finger press Lightly tap the touchpad with four fingers to open the Action Center Four finger swipe Swipe across the touchpad with four fingers Swipe up to open Task View Move the cursor over a window and tap the touchpad to select that windo...

Страница 22: ...in the lower right hand corner of the screen select the Notifications icon to open the Notifications pane 2 Select All settings 3 Select Devices Touchpad 4 Now you can adjust the settings to suit your personal needs You can switch off the touchpad if you prefer to use a mouse Or you can adjust the touchpad sensitivity to suit your needs Scroll down to see more settings ...

Страница 23: ... data or create a factory default backup If you cannot access Acer Care Center click Settings in the Start menu select Update Security and then click Recovery Creating a file history backup Recovery Management allows you to quickly and easily back up your files and restore them if the originals are lost damaged or deleted 1 From Start select Care Center then Recovery Management 2 Select the Backup...

Страница 24: ...ive Select the USB drive from the drop down list 4 Click More options to select back up options which best fit your needs such as schedule the backup interval how long you want to keep those backups default is Forever which folders to be backed up or be excluded Click Back up now to continue ...

Страница 25: ...nd LAN drivers if you install another operating system 1 From Start select Care Center then Recovery Management 2 Select the Backup tab and click Get started for Backup wireless and LAN drivers Choose a folder to save your drivers and select OK 3 You will be shown the backup progress on the screen Important Write a unique descriptive label on the backup such as File History Recovery Backup Make su...

Страница 26: ...ws you to quickly and easily back up your operating system installed apps and data 1 From Start select Care Center then Recovery Management 2 Select the Backup tab and click Get started for Create backup to open the Backup window 3 Click Go to Backup and Restore Windows 7 ...

Страница 27: ...Recovery 27 4 Click Security and Maintenance in the bottom left of the page and click Recovery ...

Страница 28: ...28 Recovery 5 Select Create a recovery drive to open the Recovery Drive window 6 Make sure Back up system files to the recovery drive is selected and click Next ...

Страница 29: ...he PC to detect the USB drive then click Next 8 Everything on the drive will be deleted Click Create to continue 9 You will be shown the backup progress on the screen 10 Follow the process until it completes 11 Unplug the USB drive and label it clearly ...

Страница 30: ...es 1 From Start select Care Center then Recovery Management 2 Select the Restore tab and click Get started to open the Recovery window Important Write a unique descriptive label on the backup such as Windows Recovery Backup Make sure you keep the backup in a safe place that you will remember Note Since the recovery backup requires at least 8 GB of storage after formatting it is recommended to use ...

Страница 31: ...your personal files Click Next to continue Important If you have apps installed on your PC they will be removed If you d like not to restore apps and setting that came with your PC go to Change settings and turn off the option to not restore preinstalled apps that came with this PC before proceeding the restore progress Click Confirm to continue ...

Страница 32: ...reset progress on the screen The screen will turn off during the reset process 6 The screen will turn back on when it is installing Windows Your PC will restart several times during the reset process 7 Follow the process until it completes 8 When your PC has completed the reset process Windows will have been reset back to its factory default settings without removing your personal files Reset this...

Страница 33: ...Recovery 33 2 Select the Restore tab and click Get Started to open the Recovery window ...

Страница 34: ...ted to Choose an option Select Remove everything to reset your PC back to its factory default 4 Click Change settings to choose restore settings Data erasure and Data drives which best fit your needs Then click Confirm to continue ...

Страница 35: ...s 8 The screen will turn back on when it is installing Windows Your PC will restart several times during the reset process 9 Follow the process until it completes 10 When your PC has completed the reset process Windows will use factory default settings Warning Turn on Data erasure will remove all of your personal files and accounts along with pre existing drivers that may affect your Windows insta...

Страница 36: ...ter is available Enable Bluetooth and add a device Every new device must first be paired with your computer s Bluetooth adapter This means it must first be authenticated for security purposes You only need to pair once After that simply turning on the Bluetooth adapter of both devices will connect them Bluetooth on your computer is disabled by default To enable your computer s Bluetooth adapter do...

Страница 37: ... icon in the lower right hand corner of the screen to open the Notifications pane From here you can enable or disable Bluetooth or right click on Bluetooth Go to Settings to enter the Bluetooth settings Note Some devices using older versions of the Bluetooth technology require both devices to enter a PIN In the case of one of the devices not having any inputs as in a headset the passcode is hardco...

Страница 38: ...rea network which can link two or more computers without using wires Once connected to WLAN you can access the internet You can also share files other devices and even your internet connection itself Your computer s wireless connection is turned on by default and Windows will detect and display a list of available networks during setup Select your network and enter the password if required Acer no...

Страница 39: ... name and password if necessary If you are trying to connect to a public network such as at a coffeeshop make sure you have the wireless network s name 2 Click Network icon in the notification area 3 You will see a list of available wireless networks Select the one you wish to use Note Please refer to your ISP or router documentation for details on connecting to the internet Note If Wi Fi is turne...

Страница 40: ...40 Connecting to the Internet 4 Once you select a wireless network select Connect 5 If required enter the network s password ...

Страница 41: ...a port on your router refer to the image below Then you ll be ready to get online Connecting to a cellular network If your computer has a SIM slot you can connect to the internet using a cellular phone network To do this you must have a compatible SIM card and a data contract with your cellular provider Contact your cellular provider for more information on connecting to the internet using a cellu...

Страница 42: ... to fit your needs No Item Description 1 Low Reduction Reduces blue light emission from the LED backlit screen by 10 to 25 for basic protection 2 Medium Reduction Reduces blue light emission from the LED backlit screen by 26 to 45 to protect your eyes 3 High Reduction Reduces blue light emission from the LED backlit screen by 46 to 65 for maximum protection 4 Long Hour Mode Professionally tuned to...

Страница 43: ...Keeping your computer and data safe In this section you will find How to secure your computer Setting passwords What you need to prepare when you re traveling How to get the most out of your battery ...

Страница 44: ...authorized access Setting these passwords creates several different levels of protection for your computer and data Supervisor Password prevents unauthorized entry into the BIOS utility Once set you must enter this password to gain access to the BIOS utility See Setting passwords on page 51 User Password secures your computer against unauthorized use Combine the use of this password with password ...

Страница 45: ...ge appears Try again and press Enter When the User Password is set and the password on boot parameter is enabled a prompt appears at boot up Type the User Password and press Enter to use the computer If you enter the password incorrectly a warning message appears Try again and press Enter Important You have three chances to enter a password If you fail to enter the password correctly after three t...

Страница 46: ...he fingerprint reader to sign in and unlock your Acer notebook In order to use the fingerprint reader you must first configure the fingerprint reader to recognize your fingerprint to confirm your identity How to use the fingerprint reader Select the Start button then select Settings Accounts Sign in options to set up Windows Hello 1 Set a password ...

Страница 47: ...Fingerprint Reader 47 2 Set a PIN code 3 In Windows Hello Fingerprint select Set up to configure the fingerprint reader ...

Страница 48: ...48 Fingerprint Reader 4 In the Windows Hello set up window select Get started to begin the fingerprint configuration 5 Enter your PIN to confirm your identity ...

Страница 49: ...ader 49 6 When the Windows Hello setup window appears follow the onscreen directions Press and hold your finger on the fingerprint sensor and then lift Repeat this step until the fingerprint configuration is complete ...

Страница 50: ...to sign in or unlock your computer by placing your fingerprint on the fingerprint reader You may select Add another finger to add another fingerprint to unlock the computer Note If the notebook has multiple accounts you can set up access separately and automatically switch between accounts ...

Страница 51: ...layed Boot sequence To set the boot sequence in the BIOS utility activate the BIOS utility then select Boot from the categories listed on the top of the screen Setting passwords To set a password on boot activate the BIOS utility then select Security from the categories listed on the top of the screen Find Set Supervisor Password and enter a password to enable this feature Once you have entered a ...

Страница 52: ...artup Your computer uses Fast startup to start quickly but also uses a small amount of power to check for signals to start These checks will slowly drain your computer s battery If you prefer to reduce your computer s power requirements and environmental impact turn off Fast startup 1 Press the Windows key or select the Windows Start button then select Settings System Power sleep 2 Select Addition...

Страница 53: ...Power management 53 4 Select Change settings that are currently unavailable 5 Scroll down and disable Turn on fast startup 6 Select Save changes ...

Страница 54: ...nnect to a mains power outlet Conditioning a new battery pack Before you use a battery pack for the first time there is a conditioning process that you should follow 1 Connect the AC adapter and fully charge the battery 2 Turn on the computer and complete setting up the operating system 3 Disconnect the AC adapter 4 Operate the computer using battery power 5 Fully deplete the battery until the bat...

Страница 55: ...fective life An embedded battery has a life span of more than 1 000 charge discharge cycles Optimizing battery life Optimizing battery life helps you get the most out of battery operation prolonging the charge recharge cycle and improving recharging efficiency You are advised to follow the suggestions set out below Use AC power whenever possible reserving battery for mobile use Remove accessories ...

Страница 56: ...portant Connect the AC adapter as soon as possible after the battery low warning appears Data may be lost if the battery is allowed to become fully depleted and the computer shuts down Situation Recommended Action The AC adapter and a power outlet are available 1 Plug the AC adapter into the computer and then connect to the main power supply 2 Save all necessary files 3 Resume work Turn off the co...

Страница 57: ...sington Noble lock if you are using one to secure the computer Moving around When you are just moving within short distances for example from your office desk to a meeting room Preparing the computer Before moving the computer close and latch the display cover to place it in Sleep mode You can now safely take the computer anywhere you go within the building To wake the computer from Sleep mode ope...

Страница 58: ...tkey or close the display cover whenever you are not actively using the computer Taking the computer home When you are moving from your office to your home or vice versa Preparing the computer After disconnecting the computer from your desktop follow these steps to prepare the computer for the trip home Pack the computer in a protective case that can prevent the computer from sliding around and cu...

Страница 59: ...greater than 10 C 18 F allow the computer to come to room temperature slowly If possible leave the computer for 30 minutes in an environment with a temperature between outside and room temperature Setting up a home office If you frequently work on your computer at home you may want to purchase a second AC adapter for use at home With a second AC adapter you can avoid carrying the extra weight to a...

Страница 60: ...he computer home follow these guidelines to protect your computer while traveling Always take the computer as carry on luggage If possible have the computer inspected by hand Airport security X ray machines are safe but do not put the computer through a metal detector Traveling internationally When you are moving from country to country Preparing the computer Prepare the computer as you would norm...

Страница 61: ...h the computer In addition these tips are useful when traveling internationally When traveling in another country check that the local AC voltage and the AC adapter power cord specifications are compatible If not purchase a power cord that is compatible with the local AC voltage Do not use converter kits sold for appliances to power the computer If you are using the modem check if the modem and co...

Страница 62: ...In this section you will find Information on the ports and connectors fitted to your computer Ports and connectors ...

Страница 63: ... to a single USB port Note Two USB standards are currently available on Acer computers USB 2 0 High speed USB and USB 3 2 Gen 1 SuperSpeed USB USB 2 0 ports on Acer computers have a black tongue in the port while USB 3 2 Gen 1 ports have a blue tongue For best performance USB 3 2 Gen 1 devices should always be plugged into USB 3 2 Gen 1 ports Consult your device s documentation to see which standa...

Страница 64: ... USB Type C ports support up to USB 3 2 SuperSpeed USB 5 Gbps Other USB devices with a USB Type C connector are supported but transfer speed may be reduced and certain functions will be disabled such as Thunderbolt video support Important When removing a USB storage device you should right click on the USB icon in the Windows task bar and select Eject device to tell the operating system to stop us...

Страница 65: ...solution and refresh rate should be detected automatically If necessary change the display settings used by the computer Headphones and microphone One or more 3 5 mm jacks on your computer allow you to connect audio devices Use the headphone port to plug in stereo headphones or powered speakers connecting an audio device to the headphone port disables the built in speakers Use the microphone port ...

Страница 66: ...y compatible digital audio video source such as your computer a set top box DVD player and audio video receiver to any compatible digital audio and or video monitor such as a digital television DTV with a single cable The single cable keeps everything neat and tidy while ensuring easy connection and the best audio and visual quality ...

Страница 67: ...uestion In this section you will find Frequently asked questions Tips for using Windows 10 Troubleshooting information How to protect yourself while online Where to find Acer service center contact information ...

Страница 68: ...is being supplied to the computer check the following Do you have a USB storage device USB drive CD drive or smartphone plugged into your computer Unplug it and press Ctrl Alt Del to restart the system Nothing appears on the screen The computer s power management system automatically blanks the screen to save power Press any key to turn the display back on If pressing a key does not turn the displ...

Страница 69: ...t the printer is connected to a power outlet and that it is turned on Make sure that the printer cable is connected securely to a USB port and the corresponding port on the printer I want to restore my computer to its original settings This recovery process helps you restore the C drive with the original software content that is installed when you purchased your computer Before performing a restor...

Страница 70: ...o the ITW passport If the country you are traveling in does not have an Acer authorized ITW service site you can still get in contact with our offices worldwide Please visit www acer com Before you call Please have the following information available when you call Acer for online service and please be at your computer when you call With your support we can reduce the amount of time a call takes an...

Страница 71: ...e Windows key or select the Windows Start button and select the power icon Shut down You can also turn off the computer by right clicking the Windows Start button Shut down or sign out Shut down Can I turn off notifications You can turn off notifications so that you can leave your computer running but not be disturbed by notifications Press the Windows key or select the Windows Start button and se...

Страница 72: ...h to use your Pictures folder will open by default Select Choose this folder to add the folder to the lock screen slideshow 4 Select a folder and select Remove to remove the folder from the lock screen slideshow 5 Change the other settings to suit your needs How do I move tiles Select a tile and drag it to the place on Start that you want it to appear Other tiles will be moved to accommodate the t...

Страница 73: ...omputer can act as an alarm clock Type Alarms to search for the Alarms Clock app 1 Select an alarm from the list or select the in the lower right corner to create a new alarm 2 Enter the Alarm name 3 Set the time by choosing the hour and minute 4 Choose which days the alarm should go off 5 Select the sound notification 6 Select the snooze time 7 Select the Save icon in the bottom right hand corner...

Страница 74: ...elect More Pin to taskbar How do I install apps You will need to have a Microsoft ID to purchase and download apps from Microsoft Store I can t find apps like Notepad and Paint Where are they Move your cursor to the lower left hand corner of the screen and click search box Type the name of the app you would like to open Alternatively open all apps list and scroll to Windows Accessories to see the ...

Страница 75: ...icrosoft account and want to get one press the Windows key or select the Windows Start button Settings Accounts Sign in with a Microsoft account instead and follow the onscreen instructions How do I check for Windows updates Press the Windows key or select the Windows Start button Settings Update Security Windows Update Select Advanced options to configure the settings Where can I get more informa...

Страница 76: ... be resolved contact your dealer Error messages If you receive an error message note the message and take the corrective action The following table lists the error messages in alphabetical order together with the recommended course of action Error messages Corrective action CMOS battery bad Contact your dealer or an authorized service center CMOS checksum error Contact your dealer or an authorized...

Страница 77: ... O parity error Contact your dealer or an authorized service center Keyboard error or no keyboard connected Contact your dealer or an authorized service center Keyboard interface error Contact your dealer or an authorized service center Memory size mismatch Press F2 during POST to enter the BIOS utility then press Exit in the BIOS utility to reboot Error messages Corrective action ...

Страница 78: ...et Service Provider ISP which supplies the connection between your computer and the internet You should research the ISPs available in your region not forgetting to talk to friends and family about their experiences or to check reviews and consumer reports The ISP you select will provide instructions on how to connect to the internet you may need additional software or a special box that connects ...

Страница 79: ...es fast and always on internet service via a cable television line This service is generally available in large cities You can use your telephone and watch cable TV at the same time you are connected to the internet Cellular A cellular connection allows you to use cellular networks such as those used by a mobile phone to connect to the internet while away from home The socket for a SIM card may be...

Страница 80: ...low you and other users of your home network to share access to files and devices connected to the network for example a printer or scanner Also you can share an internet connection with other computers in your home Installation speed and simplicity Installing a wireless LAN system can be fast and easy and eliminates the need to pull cables through walls and ceilings Components of a wireless LAN T...

Страница 81: ...y and secure web browsing experience As soon as you have your internet access installed and you are connected from the Start Menu click the Microsoft Edge tile or the icon located in the taskbar and take your internet experience to a new level Acer website To get you started why not visit our website www acer com Acer is dedicated to provide you with on going personalized support Check out our Sup...

Страница 82: ...sometimes with little action on the user s part Immediately after a software manufacturer announces an update hackers are ready with malware that can breach holes in the software that would have been patched if the update was installed How to stay safe Perform any and all software updates as soon as they are available Keep a lookout for fake or phishing emails Beware of emails that appear to be fr...

Страница 83: ...they ve got into a device and what to do if you re ever infected Ransomware A form of malware that will encrypt personal data files on your computer and attached devices Encryption converts files into another format that can only be opened with a specific decryption key Once the ransomware installs itself it will display a warning message that the computer is now locked The user is given a specifi...

Страница 84: ... a virus is just one type of malicious threat A virus is classified as a self replicating piece of malicious code that travels by inserting itself into files or programs What to do if you re infected Take steps to avoid infection by staying protected with internet security software like Norton Security If you subscribed to Norton Security and think you may have a virus contact Norton s on call tec...

Страница 85: ...0 uppercase and lowercase letters symbols and numbers Don t click on random links or open unsolicited messages and attachments particularly from people you don t know Don t access any personal information or social media accounts over unprotected Wi Fi networks Use security software on your devices to help protect yourself from the latest threats Protect your computer with Windows security tools W...

Страница 86: ...ine security However do not blame every computer problem on a virus If you suspect your computer is infected the first thing to do is update if you have not already done so and run your antivirus and anti spyware software ...

Отзывы: