

Quick Start Guide
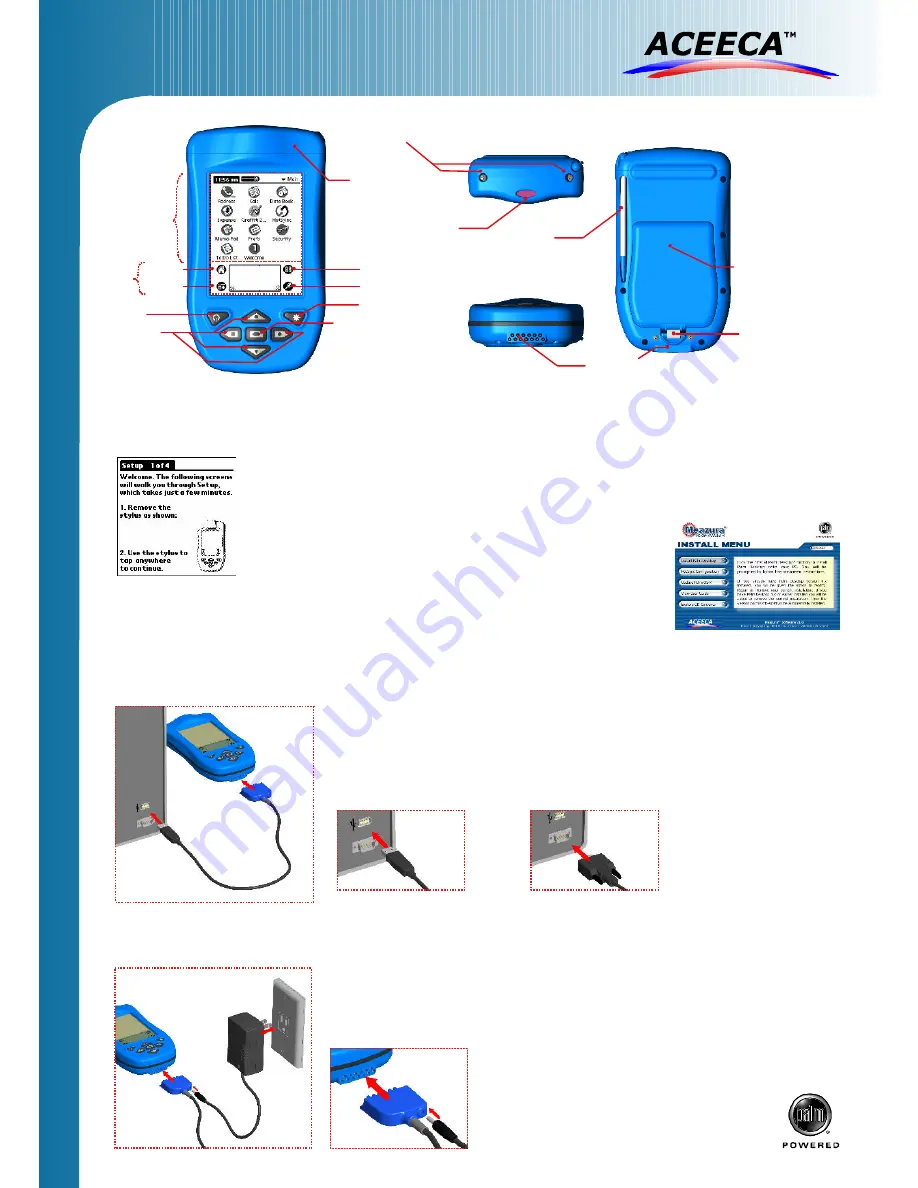
1. Setup
3. Charging
Front View
Rear View
Top View
Bottom View
Power
Directional
Arrows
Backlight
Center
Menu
Home
Calculator
Find
MZIO™ Module
Infrared Port
Battery Pack
Battery Clip
Stylus
Communications and
Charging Connector
Module Fasteners
Meazura™ Setup
When powering up your Meazura™ for the first time, press the Power button and follow the on-screen
instructions to setup the device. This includes calibration of the touch sensitive screen and setting your
location, date and time. During this procedure, you can at your option take a Graffiti writing tutorial
for entering text and special characters on your Meazura™.
Touch
sensitive
screen
Graffiti
Pad
• Plug the Communications cable into a USB or Serial port on your computer (as pictured
in figure 2a/b below).
• Connect the communications cable to the communication connector located at the bottom
of the Meazura™ (as pictured in figure 1 left).
• Ensure the Meazura™ Desktop Software CD-ROM is inserted into your computers CD-
ROM drive.
• Press the power button to turn on your Meazura™ and perform a HotSync operation
following the instructions in step 4 to commence the driver install for your Meazura™.
• Follow all instructions on your PC and your Meazura™.
2. Connect
Figure 1
Figure 2a
Figure 2b
Figure 3
Figure 4
PC Setup
To communicate between the Meazura™ and your PC, you must install
‘Palm Desktop’ located on your CD-ROM included with your kit.
1. Exit all programs, including those that may be running in the taskbar.
2. Insert the Meazura™ Software CD into your CD-ROM drive.
3. The install menu should appear automatically. If it doesn’t then
navigate to
‘install_menu.exe’
located on your CD-ROM using
Windows Explorer.
4. Follow the on-screen instruction for installing ‘Palm Desktop’.
USB Connection
Serial Connection
• Connect your AC adaptor to the bottom of your communications cable (as pictured below
in figure 4).
• Connect the communications cable to the comms connector located at the bottom of your
Meazura™ (as pictured below in figure 4).
• Ensure your connection setup is the same as pictured in figure 3 left to commence charging.
WARNING: For safety reasons, ensure the Meazura™ is
completely dry before using the electrical charger.
(Charging time varies depending on battery level)