


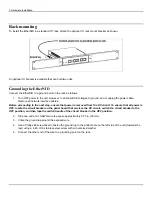


2: Hardware Installation
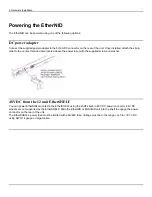
Powering the EtherNID
The EtherNID can be powered using one of the following options:
DC power adapter
Connect the supplied power adapter to the 5V/2A DC connector on the rear of the unit. Once installed, attach the strain
relief to the center, threaded hole located above the power input with the supplied screw and washer:
48V DC from the 12 unit EtherSHELF
You can power EtherNIDs mounted in the EtherSHELF using the shelf’s built-in 48 V DC power connector. 24V DC
models are not supported by the EtherSHELF. Slide the EtherNID or MetroNID unit into the shelf to engage the power
connector on the rear of the unit.
The EtherSHELF’s power feed must be limited with a 5A/48V fuse. Voltage must be in the range +/-40 to +/-57 V DC
using AWG 14 gauge or larger cable.
Содержание EtherNID EE
Страница 8: ...8 Alarms 199 1 APPENDIX B MIB SUPPORT 203 Public MIBs 203 Private MIBs 205...
Страница 71: ...4 Port configuration...
Страница 121: ...6 Alarms Alarm configuration The Alarm Configuration page lists all defined alarms...
Страница 164: ...9 Performance Assurance Agent 3 Configure parameters and click Apply...
Страница 191: ...11 CFM 10 Open the CFM DMM Configuration and select add...
Страница 193: ...11 CFM 12 Open the CFM Packet loss Configuration and select add 13 Simply enable the Packet loss module and apply...


