background image

USER MANUAL

USER MANUAL

AUTO BOOSTER FAN

WITH PRESSURE SWITCH

Содержание AC-BFP4

Страница 1: ...USER MANUAL USER MANUAL AUTO BOOSTER FAN WITH PRESSURE SWITCH...

Страница 2: ......

Страница 3: ...oduct quality and friendly customer service If you have any questions or suggestions please don t hesitate to contact us Visit www acinfinity com and click contact for our contact information EMAIL su...

Страница 4: ...4 PRODUCT Automatic Duct Booster Fan 4 MODEL AC BFP4 UPC A 819137023789 MANUAL CODE BFP2211X1...

Страница 5: ...uct Contents Installation Mounting Installation Configuration Setup Powering and Setup Cleaning Programming Recalibration FAQ Other AC Infinity Products Warranty Page 5 Page 6 Page 8 Page 9 Page 11 Pa...

Страница 6: ...e chemical laden or wet atmospheres Ducted products must always be vented to outdoor areas Do not cover power cords with rugs or other fabric materials This product has rotating parts Safety precautio...

Страница 7: ...PRESSURE SWITCH The differential pressure switch has positive and negative outlets Do NOT block or insert the tube over the negative pressure outlet MOVEMENT AFTER INSTALLATION Do NOT move the fan af...

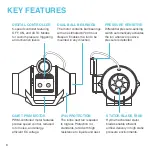
Страница 8: ...duct fan is sealed to Ingress Protection 44 standards rated with high resistance to liquids and dust STATOR BLADE FANS Hydro mechanical stator blades enable efficient airflow delivery in high static p...

Страница 9: ...9 PRODUCT CONTENTS WIRE MOUNT x6 PROBE MOUNT x1 WOOD SCREWS WALL HANG x4 DUCT FAN SYSTEM x1...

Страница 10: ...10 PRODUCT CONTENTS...

Страница 11: ...from the flange bracket Remove the wind circle between the motor box and the intake flange STEP 1 Remove the tube from the differential pressure switch Unscrew the bolts on both sides from the plastic...

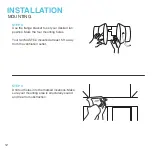
Страница 12: ...cations Make sure your mounting area is structurally sound and free from obstruction STEP 3 Use the flange bracket to set your desired fan position Mark the four mounting holes Your fan MUST be mounte...

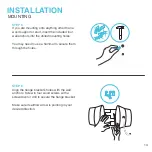
Страница 13: ...r or drill to secure the flange bracket Make sure its airflow arrow is pointing in your desired direction STEP 5 If you are mounting onto anything other than a wood support or stud insert the included...

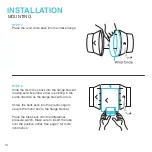
Страница 14: ...on as the flange bracket s arrow Screw the bolts back into the plastic rings to secure the motor box to the flange bracket Place the tube back onto the differential pressure switch Make sure to insert...

Страница 15: ...t fan making sure there is a tight seal Tighten the duct clamps using a flathead screwdriver MOUNTING Do NOT move the fan after it is fully installed Movement of the fan unit may result in false trigg...

Страница 16: ...o achieve optimal ventilation make sure your fan s mounting location is free of obstruction as specified on the product warning page Make sure your exhaust is flowing towards your ventilation source u...

Страница 17: ...17 POWERING AND SETUP STEP 1 Plug your fan s power cord into an AC power outlet to power your fan...

Страница 18: ...an blades of any dust and debris Remove the wind circle in between the motor box and input flange STEP 1 Unplug your fan to completely unpower it Then remove the motor box from the mounting flange Ref...

Страница 19: ...otor box onto the mounting flanges Refer to steps 7 9 on page 14 15 to learn how to secure the motor box STEP 3 Clear the stator blades of any dust and debris on the opposite end Clean the area inside...

Страница 20: ...N Cycles through the controller s modes OFF ON and AUTO 2 SPEED BUTTON Cycles through the levels to select a fan speed from 0 5 Pressing the speed button increases the fan speed in one unit increments...

Страница 21: ...21 PROGRAMMING OFF MODE Your fan will not run while in this mode ON MODE Your fan will actively run at the level set here The ON Mode setting also serves as the maximum level the AUTO Mode will run at...

Страница 22: ...fan will run for 5 minutes then pause for 5 seconds to test the atmospheric pressure It will remain off if no difference is detected Otherwise the fan will repeat the cycle as needed The fan speed mu...

Страница 23: ...wer it If you need to relocate your fan continue to step 2 Otherwise skip to step 6 STEP 2 Remove the tube from the differential pressure switch Remove the motor box and wind circle from the mounting...

Страница 24: ...NINSTALLATION STEP 4 Unscrew the wood screws with a screwdriver or drill to release the flange bracket from the wall STEP 3 Loosen the duct clamps using a flathead screwdriver and remove the duct tube...

Страница 25: ...your fan to a stable location free of obstruction Refer to steps 3 9 on pages 12 15 to learn how to mount your fan STEP 6 Plug your fan s power cord into an AC power outlet to power your fan The base...

Страница 26: ...f I m outside the US A This product s voltage range is 100 240V AC You may need a simple travel adapter to plug it into a foreign socket or a power converter if your country uses a different voltage Q...

Страница 27: ...ion Clamp A rubber coupler designed to connect ductwork components together while dampening sound and vibrations Built with matte black rubber and steel clamps with worm drive locks for a secure hold...

Страница 28: ...uring that period AC Infinity will replace your product with a new one or issue you a full refund The warranty program does not cover abuse or misuse This includes physical damage submersion of the pr...

Страница 29: ...part of the materials including graphics or logos available in this booklet may be copied photocopied reproduced translated or reduced to any electronic medium or machine readable form in whole or in...

Страница 30: ......

Страница 31: ......

Страница 32: ...www acinfinity com...

Отзывы: