background image

Installation

BusinessPhone – Dialog 4425 IP Vision

136

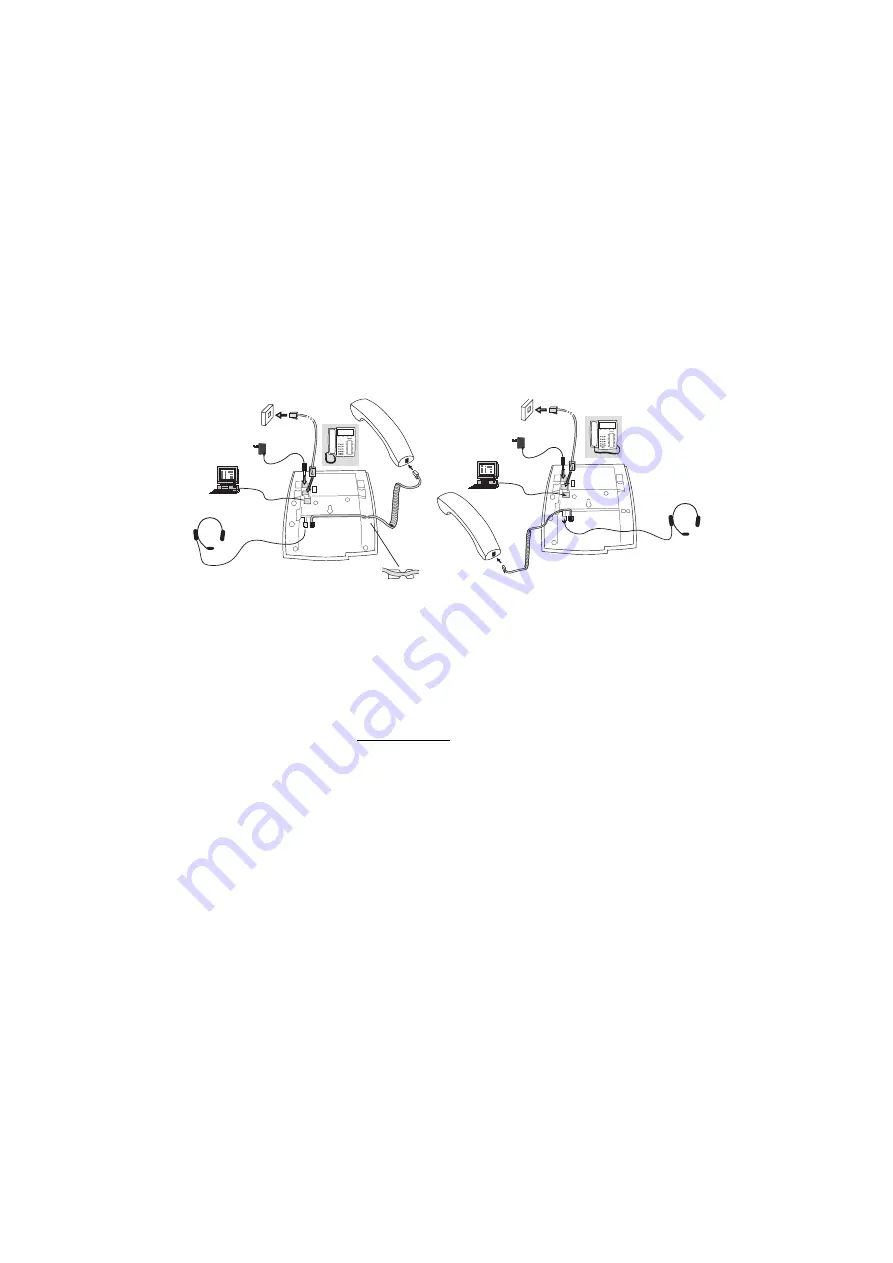
Install cables

You can put the cable to the handset in the notch underneath the 

telephone. The cable to the exchange has to be plugged in LINE 

and the handset cable has to be plugged in HANDSET.

Note:

The installation of the 24 V power adapter is optional. 

If no external power supply has been installed, the 

telephone will rely on the LAN power supply.

Change cables

To remove a cable, use a screwdriver to unlock the stop.

Handset cable to the left

Handset cable to the right

Содержание Dialog 4425

Страница 1: ...ng it in the text flow Select Graphics Properties and make the following settings Width 15 4 cm Important Height 11 2 cm May be smaller Top 5 3 cm Important Left 0 3 cm Important This text should then...

Страница 2: ...BusinessPhone Dialog 4425 IP Vision 2 EN LZTBS 180 345 R3A Aastra Telecom Sweden AB 2008 All rights reserved...

Страница 3: ...uring Calls 42 Call Forwarding 48 Absence Information 55 Mailbox System 59 Contacts Phone Book 69 System Phonebook 76 Group Features 78 Other Useful Features 83 Write Text 90 Settings 92 Accessories 1...

Страница 4: ...a Dialog 4425 IP Vision with a default programming There may be some differences in the way your phone is programmed Please consult your system administrator if you need further information Note The A...

Страница 5: ...altered publication Microsoft and Microsoft Outlook are either registered trademarks or trademarks of Microsoft Corporation in the United States and or other countries regions Aastra is a registered t...

Страница 6: ...ssure as this may damage the cable If the power supply cord or plug is damaged disconnect the product and contact qualified service personnel Headsets used with this equipment must comply with EN IEC...

Страница 7: ...d below or an adapter approved by your local reseller Disposal of the product Your product should not be placed in municipal waste Please check local regulations for disposal of electronic products Aa...

Страница 8: ...Description BusinessPhone Dialog 4425 IP Vision 8 Description A B C D E F G H I J K L M N O P Q 7 7 13 18 14 6 7 1 2 3 4 5 8 9 11 12 19 10 16 20 7 17 15...

Страница 9: ...is pressed you always go to the home position independent of which menu you are in b On WAP pages if you press this key for a short while you will return to the WAP home page See section Corporate Di...

Страница 10: ...sage indication key Press the key to retrieve the message See section Access the Mailbox on page 61 17 Pull out leaf for quick access optional See section Pull out Leaf optional on page 109 18 Designa...

Страница 11: ...traffic state of the ongoing call or function Extinguished lamp The function is not active Steady light The function is active supervised extension or trunk is busy heard message Rapidly flashing lam...

Страница 12: ...diversion state etc can be shown If the SOS call function is enabled the text For SOS calls dial xxx is shown The lower line presents lead texts for the menu keys When an information ends with three...

Страница 13: ...black frame below The appearance of the top menu depends on which telephone version you are using Dialog 4425 v 1 phone or Dialog 4425 v 2 phone see examples below Dialog 4425 v 1 phone Dialog 4425 v...

Страница 14: ...Incoming call Indicates an answered incoming call in the call list o Outgoing call Indicates an outgoing call in the call list e Scroll bar If a list for example your telephone directory or a list wit...

Страница 15: ...that can be selected from the Home menu Dialog 4425 v 1 phone Use the navigation keys to go to the Settings Call List PhoneBook or WAP Services menu Dialog 4425 v 2 phone Use the navigation keys to go...

Страница 16: ...ned WAP portal is available 5 Only available to your system administrator Home Return to home position idle mode Log off Absence n Missed 1 Dial Name Edit Delete Add Central Directory Other WAP addres...

Страница 17: ...defined WAP portal is available 5 Only available to your system administrator Home Return to home position idle mode Log off Absence n Missed 1 Dial Name Edit Delete Add Other WAP address Home 4 Top...

Страница 18: ...ept digits active diversion on telephone Ringing tone Ringing signal to called party repeated after 4 s Busy tone Called party is busy Number unobtainable tone Called number not accessible or vacant C...

Страница 19: ...r to continue with the start up procedure When this is done and the phone is connected to the local network LAN your phone starts the start up procedure automatically when connected to the mains Notes...

Страница 20: ...displays shows The x indicates a timer counting down seconds If no key is pressed during this time no change is selected automatically Notes The administrator mode is used to change the IP settings o...

Страница 21: ...d from and can only be changed by the system administrator z Enter your user identity The display menu key Erase is used to remove a wrong entry Log on Press see display z Enter your password The disp...

Страница 22: ...by pressing No change The administrator mode is used to change the IP settings in your phone This mode is reserved for your system administrator The display now indicates that the phone is connecting...

Страница 23: ...update the software Yes The software download takes about 30 seconds then the startup procedure continues automatically Note It is important that you do not disconnect the power from the phone while...

Страница 24: ...the telephone is powered by the LAN no additional power adapter is needed The LAN or the external power adapter must be connected to the telephone before use If the power connection fails your IP phon...

Страница 25: ...on screen is displayed contact your system administrator Telephone version note For Dialog 4425 v 2 phone the password can be entered with letters or numbers see section Write Text on page 90 When lo...

Страница 26: ...displayed number z Log on Enter your extension number and press see display z Log on Enter your Password and press see display To correct a wrong entry Erase Press see display Option 2 The following...

Страница 27: ...sted z Enter your password Telephone version note For Dialog 4425 v 2 phone the password can be entered with letters or numbers see section Write Text on page 90 Log on Press to log on see display The...

Страница 28: ...u Lift the handset to accept the call Or Reject Press to dismiss the call see display Note The rejected call is added to the Call List see section Call List on page 37 Handsfree Line Press without lif...

Страница 29: ...untry see table Alternative programming for Automatic Callback Camp on Intrusion on page 105 Deflect the call If you do not want to take the call when the phone rings Reject Press see display to defle...

Страница 30: ...e Which digit to press for external call access depends on the configuration of the system The display shows the entered number for example After entering the number the number is dialled immediately...

Страница 31: ...blished you will be connected to the other party via the loudspeaker and microphone Press to terminate a handsfree call Note To learn more about other ways to make a call see sections Abbreviated Numb...

Страница 32: ...xtension finishes the ongoing call or the next time the extension finishes a new call You have to answer within eight seconds otherwise the Callback service is cancelled u Lift the handset when you ar...

Страница 33: ...is allowed 8 Press to intrude Intrusion tone is heard and a three party call is established When the called extension replaces the handset and you keep off hook the called extension will be recalled...

Страница 34: ...nal numbers are stored centrally in your BusinessPhone Communication Platform Common Abbreviated Numbers can be dialled from every extension that has the authority to do so z Enter the Common Abbrevia...

Страница 35: ...ter the Abbreviated Number A number between 0 and 9 Program Individual Abbreviated Numbers To program external numbers on the digit keys 0to 9 u Lift the handset 51 Enter programming mode z Select an...

Страница 36: ...25 IP Vision 36 Cancel one specific Individual Abbreviated Number u Lift the handset 51 Press z Enter an Abbreviated Number between 0 and 9 and press Cancel all Individual Abbreviated Numbers u Lift t...

Страница 37: ...sorted by date and the call duration hours minutes seconds For example If the list is too long and cannot be displayed at a time a scroll bar appears on the right side of the display The call duration...

Страница 38: ...e call from the Call List see display Or AddContact Press to add the number to the Contacts see display Dialog 4425 v 2 only See section Add missed rejected answered or dialled calls to the Contacts P...

Страница 39: ...missed calls in this example one Now the Call List menu is displayed Note You can also enter the Call List by selecting the Call List menu with the navigation keys Call Press to call see display Or m...

Страница 40: ...Phone Book see display Dialog 4425 v 1 only OK Press to add the call to the Phone Book see display Or Edit Press to edit the number before you add it to Contacts Phone Book see display Via the displa...

Страница 41: ...ision Call List Delete an entry from the Call List CallList Select with the navigation keys see display Eor F Press to browse the CallList see display more Press see display Delete Press see display T...

Страница 42: ...ate a Conference or put the call on hold to perform other tasks From handset to handsfree You have an ongoing conversation via the handset Press to switch the loudspeaker on You are now in the handsfr...

Страница 43: ...ongoing conversation you would like to make an inquiry to an internal or external party Line Press The first call is put on hold Enter the number of the person you would like to ask z Enter the number...

Страница 44: ...d party Please read the notes and warnings in section Useful Hints on page 132 d Replace the handset The call is transferred Transfer to a busy extension You can even transfer calls to busy extensions...

Страница 45: ...er in handsfree mode Conference You have an ongoing conversation and you want to establish a telephone conference Line Press z Enter the number of the third party Line 3 Press to establish a three par...

Страница 46: ...ne minute or if not it will recall on your extension Line Press again to retake the call that has been put on hold Common Hold Line Press the Line key d Replace the handset The call can be picked up o...

Страница 47: ...essage to an extension when you receive busy tone or get no answer Callback message To send a Call Me message 9 Press to send Voice message To send a Voice message 99 Press and speak Press to play bac...

Страница 48: ...is also equipped with a bypass function Depending on the type of diversion you are also able to record your Personal Greeting for your mailbox see section Change your Personal Greeting on page 64 Not...

Страница 49: ...d answering position e g secretary Activate Fixed Diversion 21 Press activate diversion The displays shows Cancel diversion 21 Press to cancel diversion Individual Diversion This feature gives you the...

Страница 50: ...ress see display The displays shows Cancel Internal Diversion Absence Press see display Eor F Press see display Repeat until the Follow me menu is framed Select Press see display Deactivate Press to d...

Страница 51: ...F Press see display Repeat until the External Follow me menu is framed Select Press see display z OK Enter the digit or digits to get an external line and enter the external number and press see disp...

Страница 52: ...l the External Follow me menu is framed Select Press see display Deactivate Press to deactivate see display Re activate External Diversion Divert your calls to an external position 22 Press to activat...

Страница 53: ...ivate Follow me Note This procedure has to be executed from the telephone the calls are diverted to 21 Press z Enter your extension number and press z Enter the new diversion address and press Verific...

Страница 54: ...fic extension even if Call Forwarding is activated on this extension Note To use this function your extension has to be authorized by the system administrator 60 Press z Enter extension number Press Y...

Страница 55: ...ed to the operator who also has access to your absence info Note When you have activated a diversion with a Personal Greeting callers will receive this greeting even if you have activated the Absence...

Страница 56: ...return if required and press see display The display shows the reason and if entered time date of return Pre defined texts Settings CallList Contacts CorpDirectory Web Absence 12 46 12 Mar 2008 Follo...

Страница 57: ...listen to your recording 9 Press and speak to re record Press to activate Press to finish the procedure Internal callers will hear the information via the handset or the loudspeaker External callers w...

Страница 58: ...ure Use saved information When the information is switched off 23 Press to activate saved info Information is active Press to finish the procedure Erase information Absence Press see display Eor F Pre...

Страница 59: ...sible from own extension you might be requested to change your password if it is default 0000 See section Change Password on page 67 or follow the voice announcements Note To use the mailbox system yo...

Страница 60: ...em administrator can also define whether or not the mailbox should be activated if you do not answer your phone after a certain time or if your extension is busy Deactivate the Mailbox 21 Press Verifi...

Страница 61: ...on configuration dependent Change your password If there is a new message waiting the Message key lamp is flashing and you will hear a special dial tone after lifting the handset The displays shows Ac...

Страница 62: ...ed by a flashing message led and a special dial tone Heard messages indicated by a lighting message led and a special dial tone Stored messages not indicated Note Messages are deleted from the system...

Страница 63: ...age A copy of your received voice messages in the individual mailbox can be forwarded to other mailbox numbers individual or common When you forward a voice message heard or stored to an individual ma...

Страница 64: ...rsion for all your calls Access the mailbox See chapter Access the Mailbox on page 61 Listen and follow the voice announcements in the main menu 2 Select to change your Personal Greeting z Select the...

Страница 65: ...ated voice announcements Messages can be heard or re recorded before they are sent to a mailbox Note A message can also be sent during a call see Send Message on page 47 Outcall External Notification...

Страница 66: ...ation attempts Access the mailbox See chapter Access the Mailbox on page 61 Listen and follow the voice announcements in the main menu 4 Select to set up outcall notification Listen and follow the ded...

Страница 67: ...change the password Listen and follow the dedicated voice announcements Press to finish the procedure Note The password can also be changed without accessing the mailbox by using the procedure Change...

Страница 68: ...al message For information on how to retrieve Dictaphone messages see section Listen to your Messages on page 62 Record message To start the recording u Lift the handset 58 Press and record your messa...

Страница 69: ...e keypad in the same way as with a mobile phone 2 Add an incoming call from the Call List into Contacts PhoneBook 3 From a PC browse into the phone using a standard web browser and enter the name and...

Страница 70: ...e name and number Option 1 2 9 Press and hold for 1 second Up to five Phone Book entries starting with the same letter as the letter above the key are displayed Call Press to make the call see display...

Страница 71: ...scroll the list see display Call Press to make the call see display Add a name and number to Contacts Phone Book There are several ways to add number and names to the Phone Book Using the keypad 0 9 s...

Страница 72: ...name and press see display z Save Enter the number and press see display OK Press to save see display The name and number are stored in the Phone Book Or Edit Press to edit the name and number again s...

Страница 73: ...s marked To correct a typing error just press Erase For E Press to scroll the list see display When the entry is found and marked with a frame Select Press to select the marked name see display The Ed...

Страница 74: ...ursor moves to the end of the number Erase Press multiple times to erase the number see display Each time you press the Erase menu key one digit is deleted z Save Change the number and press see displ...

Страница 75: ...press see display A list with up to five entries appears The first name beginning with the selected characters is marked For E Press to scroll the list see display When the entry is found and marked...

Страница 76: ...s internal directory numbers as well as external common abbreviated numbers As the System Phonebook is available for several telephone types the access as well as the navigation within the Phonebook i...

Страница 77: ...the whole System Phonebook you can start the search function immediately without entering the first letter s of the name Press to activate the search function Search routine was successful The first...

Страница 78: ...establish an external call by pressing the External Line key Answer an external call To answer an external call just press the flashing key Depending on the programming of the system an incoming exter...

Страница 79: ...the activity of other extensions free busy called Traffic situation Michael Ongoing conversation lamp is on Michael Free extension lamp is off Michael The extension is called flashing lamp Pick up ca...

Страница 80: ...imultaneously attempt to answer a call from the Common Bell extension only the first extension will pick it up The other extensions will receive the number unobtainable tone This will also happen if y...

Страница 81: ...ded to the programmed answering position e g operator Note If all members in a hunt group are busy the Callback or Intrusion function is not available Log in Before you can answer group hunting calls...

Страница 82: ...28 Press z Enter the hunt group code Please ask your system administrator for the configured number Press The display shows To log out from all hunt groups 28 Press Settings CallList Contacts CorpDir...

Страница 83: ...f the telephones is defined as the primary and the other one as the secondary This function enhances the communication for users that for example have a wired phone on their desk the primary telephone...

Страница 84: ...o deactivate the Tandem configuration 28 Press to log off the secondary telephone For incoming calls The secondary telephone cannot be called and the primary telephone works as a normal stand alone te...

Страница 85: ...Enter Reminder time and press 00 23 hour 00 59 minute When the time is reached your phone rings with recall signal Note If you receive busy tone your extension does not have the authority to set a Re...

Страница 86: ...andset You will be in speech connection with the calling party Opening of the doorlock After you have answered the Doorphone you can open the door making an inquiry to the door opener s directory numb...

Страница 87: ...ge it see section Change Password on page 67 You can also divert calls from your office extension to your external position see section Call Forwarding on page 48 During the procedure you will be prom...

Страница 88: ...external call Verified Account Numbers contain up to 10 digits Own Account Numbers contain up to 15 digits The Account Numbers can also be used via the DISA function see section Direct Inward System A...

Страница 89: ...number The usual way of making an outgoing external call Note Which digit to press for external line access depends on the configuration of the system Calling Least Cost Routing If LCR has been instal...

Страница 90: ...ntains a digit the digit can be created by pressing the digit key for more than 1 second Example 5 Press a digit Note Key 1is reserved for special characters Press to toggle between upper and lower ca...

Страница 91: ...ion Write Text Example 444 Enter the first character code followed by the Volume Up key 66 This sequence numbers always followed by the Volume Up key gives the word IN_ Note You can also write the fol...

Страница 92: ...ve logged on to your IP telephone Programmable Keys Ring Character Time Date Language Display Contrast Display Contrast Dialog 4425 v 2 only Log Off Restriction Option Unit can be selected only if an...

Страница 93: ...ns Exit To return to the previous menu For E Press to browse through the menus see display Select Press to select the menu option marked on the left side of the display see display Save Press to save...

Страница 94: ...ogrammable keys format menu is displayed Press the desired programmable key Note The Message and Line key are pre defined and cannot be used as programmable keys If a Supervision function has been pro...

Страница 95: ...s on your telephone each corresponding to a digit between 0 and 9 Settings Select with the navigation keys see display E Press to display the Ring Character menu see display Select Press to select rin...

Страница 96: ...nistrator To set the time format Settings Select with the navigation keys see display E Press to mark the Time Date menu see display Select Press to open the menu see display The Time Format menu is d...

Страница 97: ...to mark the Time Date menu see display Select Press to open the menu see display E Press to mark the Date Format option see display For E Press to browse through the different formats see display Sele...

Страница 98: ...ay Select Press to select the Display Menus option see display The language format menu is displayed showing the available languages for example For E Press to browse through the different language se...

Страница 99: ...the Display Contrast menu is framed Select Press see display The displays shows or Press to decrease or increase the contrast see display Note The menu key Cancel can be used to leave the menu without...

Страница 100: ...display Repeat until the Display Backlight menu is framed Select Press see display The displays shows or Press to decrease or increase the contrast see display Note The menu key Cancel can be used to...

Страница 101: ...ot activate the extra bell function Busy Signal The busy signal is activated when your phone is busy i e during calls The function can be used to control e g a Do not disturb lamp at the door Combined...

Страница 102: ...o get 6 dB increased hearing level in the handset and the headset Select Settings in the top menu see display Eor F Press see display Repeat until the Hearing Level menu is framed Select Press see dis...

Страница 103: ...or the current call and your phone is automatically set to silent ringing see below Silent ringing If you do not want to be disturbed by the ring signal but still want to be able to answer an incoming...

Страница 104: ...ect Press see display The following network options are available for viewing only DHCP IP Address Subnet Mask Default Gateway SW server from DHCP SW server Proxy Server Gatekeeper Discovery Gatekeepe...

Страница 105: ...If you cannot use a code of a function maybe your exchange system has been programmed with a different associated number Because this User Guide describes only the default programming the following ta...

Страница 106: ...l offers 17 additional keys Each key can be programmed as dial by name keys function keys etc See section Programmable Keys on page 94 For installation see section Install key panels on page 138 Use t...

Страница 107: ...t lifting the handset Activate headset preset mode When the headset preset mode is turned off Press and hold the Headset key for 4 seconds Now the Headset preset mode is activated headset symbol is sh...

Страница 108: ...activated Line Press the flashing Line key to answer Press to terminate a Headset call Make calls Press the Headset key Note You do not need to press the Headset key in headset preset mode z Enter th...

Страница 109: ...is used for a personal phone number list and is installed under the phone See also section Install pullout leaf optional on page 140 Use the Designation Card Manager to make and print your own card f...

Страница 110: ...utlook with area and country code including the international sign Install My Dialog 4000 Contacts The PC application must be installed on your PC network access required your system administrator sho...

Страница 111: ...7 Click Available Microsoft Outlook contacts are listed on the left side and all contacts already in Contacts in your phone are listed on the right side Mark the required contacts on the left hand sid...

Страница 112: ...ts PhoneBook Dialog 4425 v 1 phone only Add change or delete entries in PhoneBook Call List View the list make a call to a number in the list and delete items It is also possible to add numbers to Con...

Страница 113: ...ress to mark the Network menu see display Select Press see display The second option shows the IP address assigned to the telephone Write down the IP address Exit Press to return to idle mode Settings...

Страница 114: ...one has been unplugged from the network for some days the address might have been changed Enter the web server password Default password Welcome Case sensitive Note If you had to enter a password when...

Страница 115: ...ssPhone Dialog 4425 IP Vision Web Server Log on Click On the left hand side a menu is displayed with the following options Contacts Dialog 4425 v 2 only PhoneBook Dialog 4425 v 1 only Call List Settin...

Страница 116: ...ntacts they will be listed in a table Each entry can be modified by clicking on the respective link in the first column Name Click Select one of the options below Save Click to save the name and numbe...

Страница 117: ...ook they will be listed in a table Each entry can be modified by clicking on the respective link in the first column Name Click Select one of the options below Save Click to save the name and number i...

Страница 118: ...re entries in the Call List they will be listed in a table Each entry can be modified by clicking on the respective link in the first column Name Click Select one of the options below Delete Click to...

Страница 119: ...pter Access the Web Server on page 114 Click on the Settings folder in the menu on the left hand side The Settings sub menu will be displayed Change password Click Enter the new password The password...

Страница 120: ...of the telephone will be displayed in a table The Line 1 key and the Message waiting key are fixed supervision MNS keys can be programmed by the system administrator all others can be programmed with...

Страница 121: ...back to the key selection Settings Hearing level Access the web server See chapter Access the Web Server on page 114 Click on the Settings folder in the menu on the left hand side The Settings sub men...

Страница 122: ...arked see display Options Menu for return options see display Home Logon menu and Exit Return to top menu WAP Services E Move marker one step down see display F Move marker one step up see display Ret...

Страница 123: ...t name Select Press see display z Enter the first letters of the last name Eor F Press to reach the link Search see display Select Press see display The display shows a list of names that begin with t...

Страница 124: ...arked Select Press see display The display shows the directory data for the selected person Eor F Press see display Repeat until the phone number Phone is marked Select Press to make the call see disp...

Страница 125: ...dress Select Web in the top menu see display Eor F Press see display Repeat until the Other WAP Address menu is framed Select Press see display The Enter address page is shown z Enter the WAP address...

Страница 126: ...r case OK Press see display The top page for the entered address is shown Use the display menu keys for further steps on that page To leave the WAP page Options Press see display Eor F Press see displ...

Страница 127: ...o that person When you are logged on to the central directory you have the following available options Underlined Clickable link when marked see display Options Menu for return options see display Hom...

Страница 128: ...ys shows Eor F Press see display Repeat until requested search criteria is marked e g Last name Select Press see display z Enter the first letters of the last name Eor F Press to reach the link Search...

Страница 129: ...w search Eor F Press see display Repeat until requested person is marked Select Press see display The display shows the directory data for the selected person Eor F Press see display Repeat until the...

Страница 130: ...ess excluding http See example below Notes If a keypad key 0 9 is pressed for more than one second the corresponding digit is entered instead of the letter Press to switch between upper and lower case...

Страница 131: ...the WAP page Options Press see display Eor F Press see display Repeat until the Exit menu is framed Select Press see display You return to WAP Services in the top menu Note You can always press and k...

Страница 132: ...re like to draw your attention to the following Please do not transfer external calls to an external mailbox to information systems or to external parties before they have answered Try to avoid divert...

Страница 133: ...tomatically Note If you press a key accidentally please contact your system administrator Now the display shows The IP telephone is connecting to the DHCP server and gets its IP address from the netwo...

Страница 134: ...telephone is ready to use and you have to log on to the network See section Log On on page 24 Software updates If a new software for your IP telephone is available the following display will appear af...

Страница 135: ...play changes to It is important that you do not disconnect the telephone s power supply while this text is displayed The saving of the new application takes about 30 seconds If a power failure occurs...

Страница 136: ...xchange has to be plugged in LINE and the handset cable has to be plugged in HANDSET Note The installation of the 24 V power adapter is optional If no external power supply has been installed the tele...

Страница 137: ...137 BusinessPhone Dialog 4425 IP Vision Installation Install stand and adjust telephone Position high Position low Tiltable display Adjustable angle Press to fasten stand Release to remove stand...

Страница 138: ...n cards The Designation Card Manager is included on the Enterprise Telephone Toolbox CD or it can be downloaded from http www aastra com For questions regarding the product please contact your Aastra...

Страница 139: ...positioning 1 4 key panels Install card Use the Designation Card Manager to make and print your own key panel designation cards The Designation Card Manager is included on the Enterprise Telephone To...

Страница 140: ...sinessPhone Dialog 4425 IP Vision 140 Install pullout leaf optional 1 Remove the protective film from the guiding rails 2 Attach the guiding rails to the bottom of the phone observing the direction of...

Страница 141: ...Insert the pullout leaf Wall mounting handset hook The phone can be wall mounted without using a special console Useful for instance in conference rooms or public areas 1 Use a screwdriver to remove t...

Страница 142: ...42 3 Use a screwdriver to remove the two plastic covers 4 Drill wall holes according to measure 81 mm 180 mm 90 mm max 15 mm min 30 mm min 10 mm max 60 mm min 30 mm max 80 mm A A B B A A max 15 mm Spa...

Страница 143: ...nstallation 5 Mount screws according to measures and attach the phone max 5 5 mm 3 mm 9 10 mm min 22 mm A max 5 5 mm 6 mm 9 10 mm min 22 mm B Two upper wall distance screws and spacer s measures Lower...

Страница 144: ...ear sources of extreme heat e g near the radiator Make sure that the line cable isn t creased Cleaning the telephone Use a slightly moistened not wet soft cloth or an anti static cloth and wipe off th...

Страница 145: ...you have done everything correctly and that everything is properly connected 2 Disconnect all extra equipment If your telephone is working properly when done the problem lies in the extra equipment 3...

Страница 146: ...numbers or Common Abbreviated Numbers can be stored on each extension See section Abbreviated Numbers on page 34 Direct Inward System Access DISA If you are working externally the DISA function enable...

Страница 147: ...Call Me message 2 Voice message See section Send Message on page 47 Mute To switch the microphone temporarily off See section During Calls on page 42 Password System A four digit code needed to e g b...

Страница 148: ...2 Change information 58 Change Password via the telephone 67 via your mailbox 67 Change your Personal Greeting 64 Cleaning the telephone 144 Common Abbreviated Numbers 34 Common Hold 46 Conference 45...

Страница 149: ...tion Dialog 4223 Key panels 138 Intrusion 33 K Key panel 106 Key system 78 L Lamp indications 11 LAN access control network authentication 21 Language 98 Last External Number Redial 31 LCR 89 Least Co...

Страница 150: ...5 Settings 92 Backlight 100 Display contrast 99 Handset and loudspeaker volume 102 Language 98 Mute ring signal 103 Network Settings 104 Option unit 101 Ring signal volume 103 Ringing signal character...

Страница 151: ...151 BusinessPhone Dialog 4425 IP Vision...

Страница 152: ...BusinessPhone Dialog 4425 IP Vision 152...

Страница 153: ...ation without prior notice For questions regarding the product please contact your Aastra Certified Sales Partner Also visit us on www aastra com Aastra Telecom Sweden AB 2008 All rights reserved EN L...

Отзывы: