background image

48

WLAN: Registering a handset

Manual configuration

E

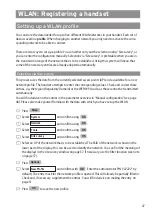
Press  

F

Select 

and confirm using  

.

F

Select 

and confirm using  

F

Select 

and confirm using  

If there is still no profile saved:

Press   

.

If profiles are already saved:

Press 

, select  

and confirm with  

. Enter the administrator

PIN (“22222” by default).

The empty entry masks for a network profile will be opened.

Parameter overview

Information regarding the menu control

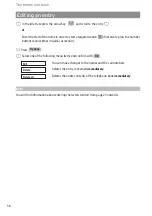
In the setting windows of the profiles and access data, you can, by 

shortly

pressing the arrow keys,

move the cursor in the entry line by one position. By 

keeping

the arrow keys 

pressed

, you can go to

the next entry line.

You can make the following entries in the profile. Please also familiarize yourself with the data with
which you have set up the WLAN. When making entries always switch between the entry/selection
lines using the arrow keys and finish the profile definition with  

Profile name

: Enter a name (any name) for this new profile (for advice on entering names see page

23, you can make corrections using the C button).

Region

: Choose the appropriate region from those offered in the list using the left softkey 

.

Press the arrow key in order to access other entries.

SSID (Network name)

: Enter the SSID.

Security

: Choose the desired encryption from the list of possibilities (WEP, WPA1-PSK, WPA2-PSK or

No security) using the left softkey 

. Press the arrow key in order to access other entries.

WEP key

or 

WPA key

: If you have selected WEP, WPA1-PSK or WPA2-PSK, you must enter the corre-

sponding rubric in the key. When the entry is made, the key is shown in plain text. After you have
quit the entry mask and called it up again only “*****” will be displayed. In order to correct a key,

OK

OK

New 

Options 

New

OK

Profiles

OK

Network

OK

System

Menu 

Содержание 312w

Страница 1: ...Aastra 312w User Guide ...

Страница 2: ...nd in doing so will answer all of your important questions If you should require any additional technical support or if you would like information about other Aastra products please contact the person responsible for your system or your retailer first You can also use our website www aastra com to find any further information We hope that you will enjoy using your Aastra 312w Welcome to Aastra ...

Страница 3: ...he charging point into operation 8 Putting handset into operation 9 Precautions when handling the battery 9 Precautions during use 10 Initial operation 10 Charging and use times 11 Inserting the battery 11 Inserting the MEM card 12 Removing the MEM card 12 Battery Battery status 13 Battery warning 13 Logging on the handset 14 Attaching removing the belt clip 14 Display screen softkeys and buttons ...

Страница 4: ...g the ringer off 27 Setting the ringer during a call 27 Handset not attainable 27 Illumination 27 Change the display contrast 28 Handset secrecy button 28 Calling 29 Dialing the call number 29 Dialing call number with predial 29 Dialing call number with direct dialing 29 Calling from the redialing list 30 Calling from the telephone book 31 Calling from the caller list 32 Accepting calls 33 Putting...

Страница 5: ... Info on the network connection 58 Info on the SIP server 59 Syslog 60 Software update licenses PIN 61 Version 61 Update 61 Licenses 62 Changing the administrator PIN 62 Reset 63 Deleting the MEM card 63 Deleting the local telephone book 63 Appendix 64 Free software 64 Warranty 64 Supported DHCP options 65 DHCP options supported by the Aastra 312w 65 Used producer dependent options vendor specific...

Страница 6: ...nance 68 Environmental characteristics and disposal 68 Advice for disposal 68 Declaration of conformity 69 Technical data 70 Menu tree 71 FCC Notices U S Only 72 Health and Safety Information 72 Industry Canada Canada only 73 Index 74 ...

Страница 7: ...pply for the use of the charging point The electricity can only be dis connected from the charging point when the mains adapter is taken out of the socket If there is a power failure all saved information program and user data is retained without changes Important advice on the battery can be found in the section Precautions when handling the bat tery Safety The charging point can only be installe...

Страница 8: ...ones within medical facilities comply with the regulations of the institution concerned Never open the charging point or the handset except for the battery cover yourself touch the plug contacts with sharp or metallic objects carry the charging point by the connecting cable Only clean your telephone with a slightly damp cloth Do not use your phone in areas where there is the danger of explosion In...

Страница 9: ...nergy consumption strongly depends on the characteristic of the access points APs used Please make sure that the AP supports the WMM Wi Fi multimedia feature also known as WME or 802 11e as well as ADSD Asynchronous Power Save Delivery Moreover you should be able to set the Delivery Traffic Indicator MAP DTIM The talk time of the handset is optimised by WMM and the standby time by DTIM A DTIM sett...

Страница 10: ...e delivery state the PIN is set to 22222 Change the PIN if necessary MEM card The Aastra 312w is equipped with a memory card MEM card The local settings of the device among others a local telephone book with 100 entries and the device identification MAC address are saved on the MEM card It is therefore possible to have this data available on another device when devices are exchanged by putting the...

Страница 11: ... Loudspeaker Softkey Softkey Info button Signal button R button Handset button Speakerphone hands free Number pad Delete key ON OFF button Microphone Arrow keys Connection for headset USB Schnittstelle für Service und spätere A Diagram ...

Страница 12: ...ing the button quickly when in the idle state opens the caller list The button flashes if new calls have been received in your absence The C button is used to correct entries Pressing and holding the button in the idle state turns the handset on off Handset button Equivalent to answer and or hang up on a standard phone Number buttons are used for direct entry of call numbers and names The pound bu...

Страница 13: ...d out that some of these products will contain components which corrode and soften the plastic feet of the charging point Device feet which have been altered in this way by foreign products could leave unpleasant marks on the surface of the furniture For obvious reasons the manufacturer cannot be held responsible for this type of damage There fore please use a non slip mat for your charging point ...

Страница 14: ...gnation ID no Europe 23 001066 00 U S Canada 4516883 for the charging point Plug the mains cable plug into the socket on the charging sta tion and then plug the mains adapter plug into a mains socket Note Ifthemainsadapterplushasnotbeenpluggedin oriftherehasbeenapowerfailure yourcharging pointwillnotwork Ahandset whichisinthechargingpointwithoutanyelectricitysupply remainsswitchedonandthebat teryw...

Страница 15: ...rticles necklaces leads etc Never try to dismantle the battery or modify it in any way and never subject it to strong blows Never submerge the battery in fresh or salt water Never use or store the battery in direct sunlight in a vehicle parked in the blazing sun or in any other location where there are high temperatures If you ever notice discharge of liquid an unusual smell heat development color...

Страница 16: ...hat the operational life of the battery has expired Replace the battery complete with the battery compartment cover with a new one Never wipe the battery with thinners petroleum ether alcohol or other liquid products or with chemically treated wipes This can lead to deformation of the battery and to operational fail ure Initial operation Charge the battery for approx 4 to 6 hours before using your...

Страница 17: ...n the following sketch Inserting the battery After inserting the MEM card see next page if not already inserted Set the cover at a slight angle 1 and click it down 2 until it is firmly locked into place Removing the battery To release the battery cover take a suitable pointed object e g biro and press it into the hole at the base of the handset 1 At the same time lift the cover upwards as shown in...

Страница 18: ... surfaces on the bottom and the slanted edge to the back Ensure that the MEM card is inserted far enough If in the correct position it will lie flat in the cavity and will be secured against slipping by the two raised sections in the casing Never touch the shiny gold contact Static discharge can lead to device defects Removing the MEM card You must only remove the MEM card if you want to give the ...

Страница 19: ...switched on If the handset is placed in the charging point with a fully discharged battery no display will be shown until a specific battery status has been reached This process can take a few minutes and is not a fault Even if the handset is switched off the battery will slowly run down Battery warning When the battery capacity has almost been used up the battery symbol in the display will flash ...

Страница 20: ...less network WLAN and to register it on an access point AP You will find a detailed description of the corresponding steps in the chapter WLAN Registering a handset starting on page 47 You can save five so called profiles on your handset These profiles contain the accounts of five dif ferent WLAN configurations When changing from one WLAN to another you are therefore able to make calls within a ve...

Страница 21: ...sion activated The ring tone is switched off The PIN protection for administrator entries is deactivated There is no connection from the handset to an access point AP New entry in the call list Symbols in the lower display row related to the buttons Softkey for redialing Softkey for the telephone book Menu Softkey for the main menu Softkey to cancel the keypad lock Softkey control buttons to scrol...

Страница 22: ...features can be scrolled up or down using the arrow keys An entry that can be selected is shown in bold Softkey row The texts and symbols in this row are related to the buttons below them The content of the row changes depending on the operating status Illumination The display automatically illuminates when you receive calls or when you press a button and turns the illumination off again automatic...

Страница 23: ...to move until the key is released When a selection list is displayed e g telephone book or menu move the cursor bar to the desired entry with the arrow keys Handset loudspeaker headset Adjust the volume to the desired level with the arrow keys The settings will be shown numerically and graphically Softkey OK You can confirm the selected function with If there is a possibility to switch a function ...

Страница 24: ...peaker button Activates speakerphone hands free function When the speakerphone hands free function is switched on this button is illuminated Info button i This button can be used to access the caller list If there are new entries in the caller list the info button flashes C button The C button has a number of functions The function is dependent on the current status of the phone e g in idle state ...

Страница 25: ...nd the button within five sec onds button Pressing and holding the button in idle state Switches the buzzer ringer on or off Pressing the button quickly whilst entering text e g names for telephone book entries Switches from upper to lower case letters or vice versa Number buttons The number buttons can be used for the direct entry of call numbers and names and alpha numer ics vanity numbers When ...

Страница 26: ...the idle or connection state When the device returns to the idle state the menu window which faded out will be shown again so that you can continue with any entries that were interrupted If you carry out entries in the connection state which require a new connection dependent menu to be called up e g the signal button ris pressed to make queries see Calling When using a softkey which calls up menu...

Страница 27: ... for selecting a submenu item Audio Display etc see also Overall menu on page 71 Please note Menu items that cannot be selected are shown in grey Then confirm your selection using From the submenu items contrast illumination background image language and font select e g font with the arrow keys and then press OK OK OK Menu OK Back Menu Audio Display Phone options Call diversion Alarm System OK Bac...

Страница 28: ...rry out the switching process to set this function using the softkey Setting possibilities using the number buttons or the arrow keys For example in the menu Audio Ringer settings Ringer volume you can set the desired vol ume e g level 4 using either the number keypad or the arrow keys After pressing your new setting will be adopted OK OK Do not disturb Do not disturb OK OK Back Menü Audio Anzeige...

Страница 29: ...d of time or if you enter a different character You can correct entries by moving the cursor to behind a character using the arrow keys The character to the left of the cur sor can be deleted using the C button At this point you can now insert new characters The asterisk button can be used to switch between different styles of writing lower case words starting in upper case upper case or numbers T...

Страница 30: ...ames The following example shows the character set of the buttons when the display language is set to German When the display language is set to a different language different more sets of charac ters will be offered Button Upper case Lower case 1 1 _ 1 2 A B C 2 Ä À a b c 2 ä à 3 D E F 3 É d e f 3 é 4 G H I 4 g h i 4 5 J K L 5 j k l 5 6 M N O 6 Ö m n o 6 ö 7 P Q R S 7 ß p q r s 7 ß 8 T U V 8 Ü t ...

Страница 31: ...will not be entered into the call list Switching on the handset C Press the C button After a few seconds the display will look like this e g The name of the SIP server will be shown as the network name You can change the name of the handset in the menu Phone options User name As a rule the current date and time settings will be supplied from the server on registering If necessary you will have to ...

Страница 32: ...he call using the handset button Turning the key lock on Press and hold the pound button in the idle state The symbol will appear over the left softkey Turning the key lock off DPress the softkey Press the pound key within five seconds to deactivate the lock Switching the hands free function on off Pressing the loudspeaker button Hin the idle state the handset is then ready to dial or during a con...

Страница 33: ...e back on press and hold the button again Alternatively you can also use the menu Audio Ringer settings Ringer device to deactivate the entry Buzzer then the symbol will also appear in the display Setting the ringer during a call If you are called you can use the arrow keys to temporarily change the ringer volume for this call If the temporary setting is confirmed using it is valid as the new basi...

Страница 34: ...u are on the phone with to hear what you are saying e g to another person in the room you can momentarily activate the secrecy button You are in the middle of a conversation D Press The symbol appears in the display The person you are talking to on the phone cannot hear what you are saying anymore When you want to talk to the person again press the left softkey once more The person you are on the ...

Страница 35: ...eys cursor and the C button to delete and replace with new entries if necessary A Press the handset button to dial Dialing call number with direct dialing A Press the handset button t Enter the call number and end it with the number will be dialed immediately Note Please enter the call number quickly because four seconds after the last number is entered dialing will be started even if has not been...

Страница 36: ...ial immediately or EPress F Select E Press to dial the call number In the option menu the following commands still have the following functions view details regarding the call transfer the telephone number into the telephone book delete the entry delete the complete list Note You can also call up the redialing list when you have already pressed the handset button and can hear the dialing tone If t...

Страница 37: ...tart the name in order to start a targeted search if necessary press the number buttons several times in quick succession A Press the handset button to dial immediately or EPress F Select E Press to dial the call number Note You can also call up the telephone book when you have already pressed the handset button and can hear the dialing tone If this is the case the selected entry will be transferr...

Страница 38: ... F Select E Press to dial the call number In the option menu the following commands still have the following functions view details regarding the call transfer the telephone number into the telephone book delete the entry delete the complete list Note You can also call up the caller list when you have already pressed the handset button and can hear the dialing tone If this is the case the selected...

Страница 39: ...splay The call number or the caller s name will be shown If the call number is saved in the telephone book the caller s name will be displayed as entered in the telephone book During the call you can D Reject the call using the softkey if so caller hears busy tone A Press the handset button to accept the call Reject Reject Call number ...

Страница 40: ... on the other end of the phone or EPress EPress You will be reconnected with the person on the other end of the phone Accept call waiting If you receive another call during a connection you will hear a call waiting signal You accept the call as follows r Press the signal button The active call is put on hold or E Press E Press The active call is put on hold or A Press the handset button twice The ...

Страница 41: ...starting on page 30 To end the query and to return to the held connection EPress F Select EPress You will be reconnected with the person you were originally speaking to Note When entering the call number if you do not press any buttons for 4 seconds the number you have entered up until that point will be dialed Subsequent dialing is not possible If you disconnect the query conversation with the ha...

Страница 42: ... will be transferred Blind transfer You are in an active call and want to transfer the call without query r Press the signal button the call is put on hold t Dial the call number manually or select a call number from the caller list redialing list or tele phone book as described starting on page 30 E Press the number is dialed A Once the phone is being called press the handset button The call is t...

Страница 43: ...e arrow key EPress F Select and confirm with t Enter the name and use the arrow key to proceed to enter the call number possibility for correction see page 23 t Enter the call number and press The entry will be saved Note Always enter the call number with the location network prefix as otherwise no name can be dis played when calls are received OK OK New Options ...

Страница 44: ... the number buttons several times in quick succession EPress F Select one of the following menu items and confirm with You can make changes to the names and the call numbers Deletes the entry concerned immediately Deletes the entire contents of the telephone book immediately Note You will find information about entering characters editor from page 23 onwards Delete all Delete Edit OK Options ...

Страница 45: ...sing Ringer via the loudspeaker Call with vibration alert Call signal in the headset Leave the menu using Select the appropriate entry with the arrow keys and switch on or off using Acoustic acknowledgement of pressing a key Acoustic acknowledgement of successful programming Warning signal for low battery capacity Warning signal for fluctuation radio signal at the range limit Leave the menu using ...

Страница 46: ...ired volume with the arrow keys and confirm with Select the desired volume with the arrow keys and confirm with Note If the handset is in energy saving mode the display is off the first time a button is pressed it will not be acknowledged by a key click OK Loudspeaker OK Earpiece OK Volume ...

Страница 47: ...ing point using the setting Charging light Settings range 10 sec to 240 sec in set steps Settings range Off to 240 sec in set steps Settings range 1 sec to 240 sec in set steps On and Off Using the arrow keys you can choose one of six motifs as a background image that will be shown as a screen saver Select the desired background image or No image and confirm with You can choose between two text si...

Страница 48: ... function on or off using If it is switched on the key lock is automatically switched on 60 sec after the last button is pressed You can switch this function on or off using If it is switched on no calls are signaled when the handset is in the charging point During this time Silent charging appears in the display The caller hears the busy tone The calls are listed in the caller list Press and ente...

Страница 49: ...r the preset Germany will be used This menu item allows the correct time zone to be set the NTP server always transmits GMT 0 London Press Firstly select a conti nent using In the following list the time difference in hours as well as a city or a region is specified In the list the time difference is given in hours as well as a town or region as an example The selection of the correct time zone al...

Страница 50: ...ect the date and time format used in your country using the key The following settings are possible day month year dd mm yy month day year mm dd yy year month day yy mm dd 24 hour time format 12 hour time format am pm OK Time format ...

Страница 51: ...firm using Using the respective property can be switched on or off Using the respective property can be switched on or off Press and set the time using the arrow keys Specify the telephone number of the rerouting destination Note The rerouting types Busy and By time can be activated simultaneously An active call diversion is shown in the display by means of the symbol This feature is not available...

Страница 52: ...menu items and confirm with Switch the alarm function on or off using Use to transfer the settings Enter an alarm time with the number buttons and confirm with Hinweis Note If the handset is switched off at the programmed alarm time the wake up call will be given as soon as possible once it is switched on again The wake up call will only be made once in order to have another wake up call the funct...

Страница 53: ...s e g the region Regulatory Domain or the WEP WPA code as these cannot be transmitted automatically You will find advice on the entries in the parameter overview in Manual configuration see page 48 Please also make yourself familiar with the data with which you have set up the WLAN E Press F Select and confirm using F Select and confirm using F Select and confirm using F Select and confirm using F...

Страница 54: ...aking entries always switch between the entry selection lines using the arrow keys and finish the profile definition with Profile name Enter a name any name for this new profile for advice on entering names see page 23 you can make corrections using the C button Region Choose the appropriate region from those offered in the list using the left softkey Press the arrow key in order to access other e...

Страница 55: ...order to request voice packages from the AP In contrast to the standard the PS Poll packages are not only used after the Beacons but asynchronously to them In this way one almost reaches the bat tery life span of U APSD with identical sound quality Not all APs support this mode If seri ous interruptions in the voice connection occur quite frequently you should use another power saving mode or no s...

Страница 56: ...omatically be selected as the active profile If the network is in reception range the field strength bars will be shown after a few seconds If per DHCP is selected for the address allocation in the menu System Network Profiles the field strength bars DHCP will flash alternately If the binocular symbol can still be seen the settings must be checked Is the SSID right Does the regulatory domain match...

Страница 57: ...d confirm using Enter the administrator PIN 22222 by default The profile will be deleted immediately Advice on the DHCP server It is possible to configure the handset so that in addition to the IP configuration the telephony accounts see chapter Setting up a SIP server page 52 are also transmitted per DHCP If a DHCP server only transfers an IP configuration without accounts the handset will ignore...

Страница 58: ... please see System Accounts Info see page 59 Info will not be able to be called up if absolutely no access has been set up and nothing has been received via DHCP Parameter overview Information regarding the menu control In the setting windows of the profiles and access data you can by shortly pressing the arrow keys move the cursor in the entry line by one position By keeping the arrow keys presse...

Страница 59: ...the system does not require an authentication or if the authentication name is the same as the user ID SIP password This is used for authentications Can be left empty if the system does not require any authentication This password is used independently of the inquired realm as it is not necessary to enter a realm Pref codec The voice codec which should preferably be used It influences the sound qu...

Страница 60: ...g accounts E Press F Select and confirm using F Select one of the following menu items and confirm with Select one of the following menu items and confirm with Select one of the displayed profiles and press The accounts of the selected entry are used You can change the accounts of the selected entry The selected entry will be deleted immediately or Select one of the menu items and confirm with If ...

Страница 61: ...mote processor If the device is in the idle state external ICMP echo requests will first be answered after several 100 ms E Press F Select and confirm using F Select and confirm using F Select and confirm using F Select and confirm using Enter the IP address and confirm with Press or to end the process Back OK OK OK Ping OK Tools OK Network OK System Menu Example display Above 16 ttl 64 t 14 ms xx...

Страница 62: ...onse at each of these routers is also measured Three requests are sent to each node hop in the network E Press F Select and confirm using F Select and confirm using F Select and confirm using F Select and confirm using Enter the IP address and confirm with Press or to leave the display Back OK OK OK Traceroute OK Tools OK Network OK System Menu Example display traceroute to 172 17 1 1 Destination ...

Страница 63: ...ation is shown about the selected AP E Press F Select and confirm using F Select and confirm using F Select and confirm using F Select and confirm using Note If you press you can switch a filter on using If the filter is active only the APs that have SSIDs matching the active profile are displayed in the list Using the submenu New profile you can transfer data from the site survey to produce a new...

Страница 64: ...and no address has yet been assigned Gateway IP address of the default gateway if none has been configured and or has not been assigned by DHCP MAC Own MAC address SSID If there is a connection to the WLAN the corresponding SSID is displayed here BSSID MAC address of the AP that the device is currently associated with if there is no associa tion i e no connection to the WLAN RSSI history In the di...

Страница 65: ... recent SIP error code will be displayed The following codes are used for frequently occurring errors Status No answer There is no SIP signalization error rather it is highly likely that there is a problem with the network This can be the case when e g the SIP server was not attainable or has not responded Status code 404 Not Found The user ID is unfamiliar to the registrar Status code 401 Unautho...

Страница 66: ...es and error entries of the system These can also help service technicians when trying to locate errors E Press F Select and confirm using F Select and confirm using F Select and confirm using Move the window with the right softkey to display the complete text OK Syslog OK Network OK System Menu ...

Страница 67: ...ware update the handset will be restarted in order to activate the new software You can continue making calls during the update process E Press F Select and confirm using F Select and confirm using F Select and confirm using F Select one of the following menu items and confirm it using Press It is checked whether another device software is available on the server If available this software is imme...

Страница 68: ...see also page 64 E Press F Select and confirm using F Select and confirm using F Select and confirm using Changing the administrator PIN Different system settings as well as the user name are protected by means of a PIN The PIN is set to 22222 by default Change the PIN 4 to 8 digits in order to prevent that unauthorised changes can be made to your settings E Press F Select and confirm using F Sele...

Страница 69: ...handset keep the C key pressed Simultaneously press the C key and number 5 and keep them pressed Only release the keys if you see a confirmation in the display Note After the deletion English is switched on as display language Deleting the local telephone book Switch off the handset keep the C key pressed Simultaneously press the C key and number 8 and keep them pressed Only release the keys if yo...

Страница 70: ...can be found on the separate data media e g CD Rom if any or at the following internet site ftp ftp aastra detewe de WLAN Warranty Aastra DeTeWe provides no warranty for the Open Source Software contained in the product if such software is used in any manner other than the software execution intended by Aastra DeTeWe The licenses listed below define the warranty if any from the authors or licensor...

Страница 71: ...ry used 43 Vendor specific N Vendor specific information RFC2132 Necessary if accounts are configured per DHCP otherwise optional Used producer dependent options vendor specific information Desig nation Name Length Type Meaning Comment 17 Country 2 u16 Country see table below Optional 20 System name N text Name of account Optional 21 SIP proxy N text SIP proxy address name port Necessary if accoun...

Страница 72: ...mment 26 SIP Auth Name N text SIP Authentication Name Necessary if the access data has been configured using DHCP and this value does not corres pond to the user ID Supported country codes Value Country 1 GERMANY 3 SWITZERLAND 5 FRANCE 100 USA 102 CANADA ...

Страница 73: ...ompany networks Currently no mecha nisms for bypassing NAT routers and firewalls are installed e g STUN The functionality behind such devices can thus not be guaranteed What is the difference between user name user ID and authentication name The user name in the telephone options is used as display name for SIP This is the one that is shown as name at the party receiving the call if applicable The...

Страница 74: ...energy consumption long life utility and ease of use fewer materials and com ponents were developed and those that were developed are environmentally sound You can contribute to ensuring your device has a long operational life but observing the safety instructions the information on the operational life of the battery and the service and maintenance instructions Advice for disposal To avoid any ne...

Страница 75: ...ices Old devices can be brought to these public return points free of charge Please find out the location of the return points from the information provided by the authorities responsible from waste disposal in the towns and municipalities Warning Old electrical devices do not belong in household waste Please hand them in to the recognized return points free of charge Declaration of conformity CE ...

Страница 76: ... on standby during conversations up to 50 hours approx 5 hours Battery Li Ion Polymer Pack NiMH 3 7 V 1000 mAh Empty battery charging time 4 to 6 hours Permitted surrounding temperatures for operation of the handset 5 C to 40 C Permitted surrounding conditions for operation of the charging point 5 C to 40 C 20 to 70 relative humidity Permitted storage temperature 10 C to 60 C Charging point measur...

Страница 77: ...ountry options Language English Deutsch Français Italiano Español Dansk Nederlands Svenska Suomi Norsk Polski Country per DHCP Germany Switzerland France USA Canada Time zone per DHCP Africa Asia Australia Europe North America South America Time format Date format Time format Call diversion Unconditional Busy By time Call number Alarm Active Set System Network Profiles Tools Ping Traceroute Site s...

Страница 78: ...ures Reorient or relocate the receiving antenna Increase the separation between the equipment and receiver Connect the equipment into an outlet on a circuit different from that to which the receiver is connected Consult the dealer or an experienced radio TV technician for help Health and Safety Information Exposure to Radio Frequency RF Signals The wireless phone is a radio transmitter and receive...

Страница 79: ...Canada Safety Code 6 These limits are part of comprehensive guidelines and established permit ted levels of RF energy for the general population These guidelines are based on the safety stan dards previously set by international standard bodies These standards include a substantial safety margin designed to assure the safety of all persons regardless of age and health This device and its antenna m...

Страница 80: ...Charging and use times 11 Charging light 41 Charging point 8 Codec 53 Contrast 41 Country 43 Country codes 66 Country options 42 D Declaration of conformity 1 69 Device hardware 61 DHCP options 65 DHCP server advice 51 Dialing the call number 29 Direct dialing 29 Disable call waiting 42 Display 15 41 Display contrast 28 Disposal 68 Do not disturb 42 DSCP ToS 50 DTMF method 53 During a call 33 Duri...

Страница 81: ...nu Display 41 Menu Phone options 42 Menü Wecker 46 N Navigating the menu 21 New Profile 47 NTP server 50 O Outbound Proxy 53 Overview 3 P Packaging content 7 Parameter overview profile 48 Parameter overview SIP server 52 Phone options 42 Phone settings 39 PIN 4 62 Ping 55 Power failure 1 Power save mode 49 Precautions 9 Predial 29 Preferred codec 53 Profile name 48 Putting a conversation on hold 3...

Страница 82: ...tons 17 Software update 61 SSID 48 58 Standby and talk times 3 Switching the handset on off 25 Switching the ringer off 27 Syslog 60 System name 52 T Technical data 70 Telephone book 31 37 Telephone book editor example 23 Time format 44 Time zone 43 Toggle 36 Tools 55 Traceroute 56 Transferring a call 36 Troubleshooting 55 U Update 61 User ID 53 User name 42 Using the phone 1 V Version 61 Vibrator...

Страница 83: ...77 ...

Страница 84: ...www aastra com As off 04 2008 Version 4 The right for technical modifications is reserved Aastra 312w ...

Отзывы: