EMB-Q87B
2-2
DC_PWR2
DISPLAYPORT3
DISPLAYPORT2
DISPLAYPORT1
USB3_12
USB3_56
LAN1
LAN2
AUDIO
ALC
887
Intel
I210AT
Intel PHY
I217LM
CLRTC
17.0cm(6.7in)
17.0cm(6.7in)
SATA6G_4
SATA6G_3 SATA6G_2 SATA6G_1
F_PANEL
DIS_ME
PCIE_SET
CHASSIS
USB1112 USB78
USB56
CPU_FAN
CHA_FAN
COM2
COM1
USB2
USB3
LGA1150
DDR3 DIMM_B1 (64bit, 204-pin module)
DDR3 DIMM_A1 (64bit, 204-pin module)
COM1
_VSET
DIO
BATTERY1
SB_PWR
VS_PWR
MINICARD1
MINICARD2
SATA_PWR
KBMS
SPI_1
Intel
®
Q87
Super
I/O
19
12
AAFP
17
6
5
1
3
2
4
13
14
7
8
9
10
11
15
7
16
1
18
15
20
21
2.2
Motherboard layout
Place this side
towards the rear
of the chassis
NOTE:
Place four screws into the holes indicated by circles to secure the
motherboard to the chassis.
CAUTION!
Do not overtighten the screws! Doing so can damage the
motherboard.
Содержание EMB-Q87B
Страница 1: ...Industrial Motherboard EMB Q87B ...
Страница 12: ...EMB Q87B 2 4 2 3 Screw size 2 3 1 Component side ...
Страница 13: ...2 5 Chapter 2 Motherboard information 2 3 2 Solder side ...
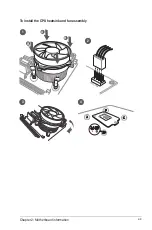
Страница 17: ...2 9 Chapter 2 Motherboard information To install the CPU heatsink and fan assembly B A A B 1 2 3 4 ...
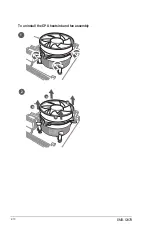
Страница 18: ...EMB Q87B 2 10 A B B A To uninstall the CPU heatsink and fan assembly 2 1 ...
Страница 30: ...EMB Q87B 2 22 ...
Страница 42: ...3 12 EMB Q87B ...


