background image

  CV-F01-TX  User Manual


1


Fiber Optic Extender User Manual 

Model: CV-F01-TX 

1.


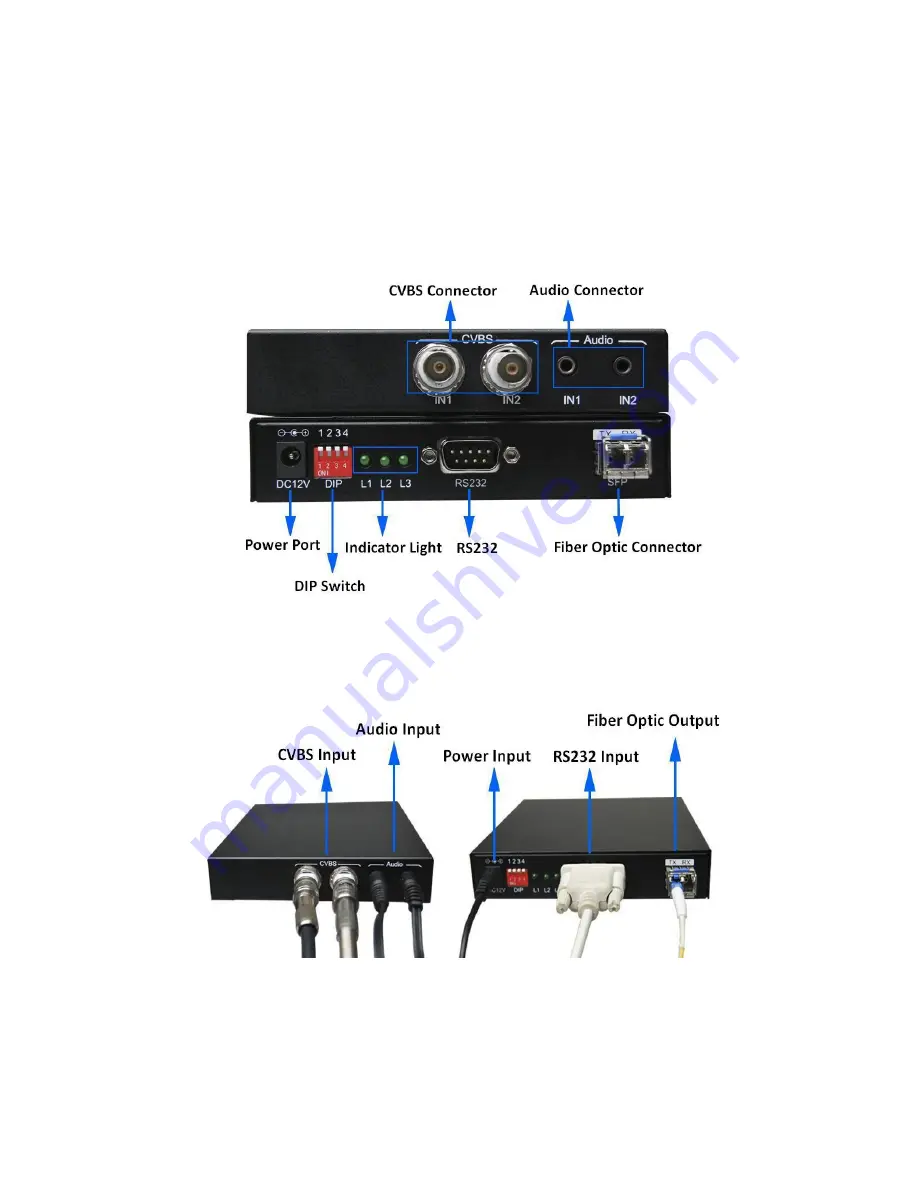
I/O Connectors 

Figure 1    CV-F01-TX Fiber Optic Transmitter I/O Connectors 


2.


Connection  introduction 

Figure 2    CV-F01-TX Fiber Optic Transmitter Connection 


Note: Please connect one single-mode  optical fiber to the 

TX

 port in the fiber optic connector. 

3.


DIP Switch   

Dial up is “OFF”, the corresponding number is “1”; dial  down is “ON”, the corresponding 
number is “0”.

 The 

DIP switch operating instructions  as shown in Table 1. And the DIP switch 

Содержание CV-F01-TX

Страница 1: ...Connection introduction Figure 2 CV F01 TX Fiber Optic Transmitter Connection Note Please connect one single mode optical fiber to the TX port in the fiber optic connector 3 DIP Switch Dial up is OFF the corresponding number is 1 dial down is ON the corresponding number is 0 The DIP switch operating instructions as shown in Table 1 And the DIP switch ...

Страница 2: ...Table 3 Indicator light and signal state Light State L1 flash L2 on off L3 on off Description The CV F01 TX works normally on Input 2 has signal off No signal in Input 2 on Input 1 has signal off No signal in Input 1 DIP Item Description Dial both switch 1 and switch 2 Function To set output mode and resolution Applying Condition Before applying power to the CV F01 TX or during the service of the ...

Страница 3: ...Third applying stable 12V 2A power to both the transmitter and the receiver 7 OSD Setting Step 1 Connect the CV F01 TX to the control computer Connect the CV F01 RXto the control computer by using the DB9 pin RS232 female cross serial line with the item Step 2 Put the CD into the control computer and decompress the configuration tool folder that burned in the CD and install the tool You can also a...

Страница 4: ...nd and foreground Details as shown in figure 4 Figure 4 OSD setting main interface Image mode setting steps are as follows Step 1 Select the input port Step 2 Click the checkbox which is in front of the Enable OSD Step 3 Select the background image according to your needs Please note that this step is optional Step 4 Set the color of image Step 5 Set the location and the size of image Step 6 Selec...

Страница 5: ... Step 2 Click the checkbox which is in front of the Enable OSD Step 3 Design the text content according to your needs Step 4 Set the color of text Step 5 Set the location and size Step 6 Select the magnification Step 7 Click the Download button and the setting will come into effect immediately The details as shown in figure 6 ...

Страница 6: ...e connector is needed 8 Parameter Setting The CV F01 TX is available in audio input selection image display setting and port parameter setting through the configuration tool Audio input is available in Input 1 or input 2 Image display mode can be controlled by the configuration tool or DIP switch Brightness chorma saturability contrast and mode setting are available The details as shown in figure ...

Страница 7: ...rent state of the item please click the Load button If the control mode is Dial Switch the resolution of the item can be configured by DIP switch directly The important and commonly used OSD information can be saved to the local computer software to facilitate later use through the configuration tool ...

Отзывы: